
前言
GraphQL 本质上是一种用于 API 的查询语言,以及一个在服务端执行这些查询的运行时环境
参考:
https://www.anquanke.com/post/id/147455
https://www.leavesongs.com/content/files/slides/%E6%94%BB%E5%87%BBGraphQL.pdf
https://half90.top/2022/07/13/graphql-gong-ji-mian-zong-jie/
https://graphql.nodejs.cn/learn/introspection/
核心概念
GraphQL 不是一种数据库,而是一种用于 API 的强类型查询语言
与 REST API 的区别
假设正在开发一个博客网站,首页需要展示用户的名字与最近 3 篇文章标题
在传统的 REST API 架构中,前端在这里需要访问获取用户信息的接口(假设是 /users/1)和获取用户文章信息的接口(假设是 /users/1/posts),这就导致两个问题:
- 获取过度:对于获取用户信息,我们只需要知道用户的名字,但是访问
/users/1会同时返回用户的其他信息,比如 email,phone 等内容 - 获取不足导致的多次请求:对于获取用户文章信息,访问
/users/1之后只返回用户信息而没有文章数据,于是还要发起第二个请求另一个接口/users/1/posts
二者明显会浪费网络带宽,增加页面加载时间
在 GraphQL 中,通常只有一个 api 端点,假设是 /graphql,前端想要什么数据就自行构造请求体发给服务端,对于上面的需求,前端会构造如下请求:
query {
  user(id: 1) {
    name           # 返回名字
    posts(last: 3) {
      title        # 返回最近3篇文章的标题
    }
  }
}
服务端在收到后,会严格按照要求的结构返回 json 数据
{
  "data": {
    "user": {
      "name": "Ema",
      "posts": [
        { "title": "hello world" },
        { "title": "React 性能优化" },
        { "title": "2026 前端展望" }
      ]
    }
  }
}
这就是 GraphQL 的核心概念:请求你所要的数据,不多不少;获取多个资源,只用一个请求
基础语法
可用于练习的 lab: https://graphql.org/swapi-graphql/
GraphQL SDL(Schema Definition Language,模式定义语言)
依旧以博客系统为例,首先服务端需要定义 Schema 与类型
# 1. 标量类型(基础类型):String, Int, Float, Boolean, ID

# 2. 对象类型:我们定义一个“用户”对象
type User {
  id: ID!          # 感叹号 ! 代表这个字段是必填的(绝对不会返回 null)
  name: String!
  age: Int
  posts: [Post!]!  # 中括号 [] 代表数组。这意味着它返回一个 Post 数组
}

# 3. 再定义一个“文章”对象
type Post {
  id: ID!
  title: String!
  content: String
  views: Int
}

# 4. 根查询类型(Query):暴露给客户端的“查询入口”
type Query {
  # 查询所有用户
  allUsers: [User!]!
  # 根据 id 查询单个用户,需要传入参数 id
  getUserById(id: ID!): User
}

type Mutation {
  # 创建一篇文章,需要标题和内容,返回创建好的文章对象
  createPost(title: String!, content: String): Post!
}
然后前端就可以进行 Query 了,这里的 Query 相当于 REST 中的 GET 请求
query {
  allUsers {
    name
    age
  }
}
然后后端返回
{
  "data": {
    "allUsers": [
      { "name": "Ema", "age": 16 },
      { "name": "Hiro", "age": 16 }
    ]
  }
}
带参数嵌套查询的例子:
query {
getUserById(id: "101") { # 括号里传递参数
name
posts { # 嵌套查询文章信息
title
views
}
}
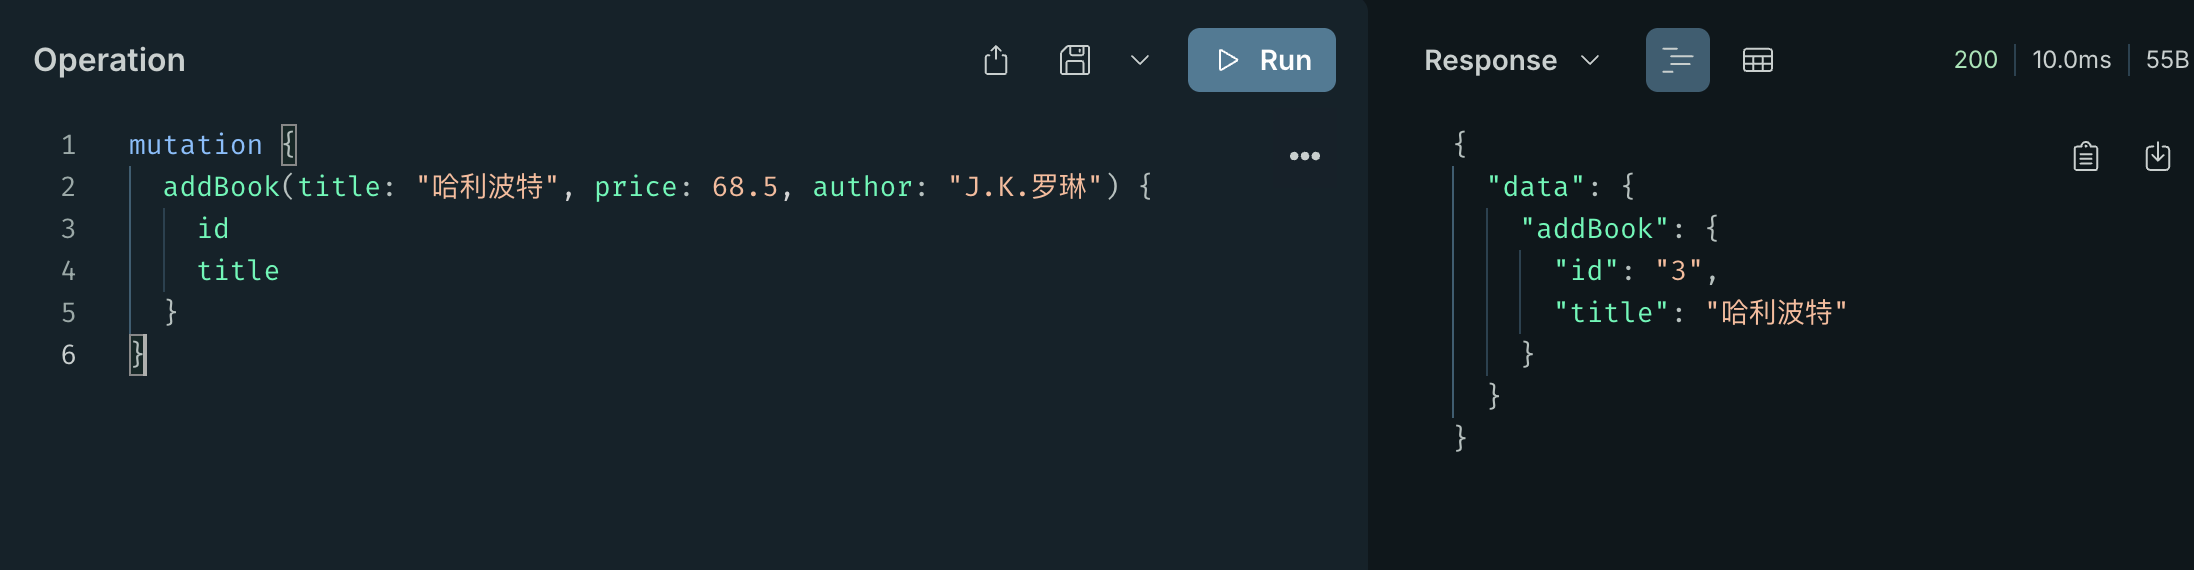
}修改数据使用 Mutation 类型(Mutation 执行后,可以立刻查询新生成的数据):
mutation {
  createPost(title: "GraphQL", content: "hello world") {
    id        # 创建成功后,后端立刻把新生成的 id 返回给我
    title     # 返回文章标题
  }
}
后端返回
{
  "data": {
    "createPost": {
      "id": "999",
      "title": "GraphQL"
    }
  }
}
服务端实现
服务端需要提供 Resolver,在解析 GraphQL 的 Schema 后进行下一步操作获取数据,如数据库查询、调用第三方 API
不同语言的 Resolver 框架实现:
- Nodejs:Apollo Server
- Java:Spring for GraphQL 或 graphql-java
- Python:Graphene 或 Strawberry
- Golang:gqlgen
这里使用 Apollo Server 实现
package.json
{
  "name": "graphql-lab",
  "version": "1.0.0",
  "type": "module",
  "scripts": {
    "start": "node index.js"
  },
  "dependencies": {
    "@apollo/server": "^4.10.0",
    "graphql": "^16.8.0"
  }
}
index.js
import { ApolloServer } from '@apollo/server';
import { startStandaloneServer } from '@apollo/server/standalone';

// 模拟数据库
let databaseBooks = [
  { id: '1', title: '三体', price: 99.0, author: '刘慈欣' },
  { id: '2', title: '百年孤独', price: 55.5, author: '马尔克斯' },
];

// 1. 定义 Schema
const typeDefs = `#graphql
  type Book {
    id: ID!
    title: String!
    price: Float!
    author: String!
  }

  type Query {
    getTopBooks(limit: Int!): [Book!]!
  }

  type Mutation {
    addBook(title: String!, price: Float!, author: String!): Book!
  }
`;

// 2. 编写 Resolvers
const resolvers = {
  Query: {
    getTopBooks: (_, args) => {
      return databaseBooks.slice(0, args.limit);
    },
  },
  Mutation: {
    addBook: (_, args) => {
      // 从 args 中拿出前端传来的数据,生成新书
      const newBook = {
        id: String(databaseBooks.length + 1), // 简单生成一个ID
        title: args.title,
        price: args.price,
        author: args.author,
      };
      // 存入数据库
      databaseBooks.push(newBook);
      // 必须返回这本新书,因为 Schema 规定了返回值是 Book
      return newBook;
    },
  },
};

// 3. 启动服务器
const server = new ApolloServer({
  typeDefs,
  resolvers,
});

// 在 Docker 中,推荐显式指定 host 为 0.0.0.0
const { url } = await startStandaloneServer(server, {
  listen: { port: 4000, host: '0.0.0.0' },
});

console.log(`🚀 GraphQL Server 准备就绪: ${url}`);
Dockerfile
FROM node:18-alpine

WORKDIR /app

COPY package*.json ./
RUN npm install

COPY . .

EXPOSE 4000

CMD ["npm", "start"]
docker-compose.yml
version: '3.8'

services:
  graphql-server:
    build: .
    container_name: graphql-lab
    ports:
      - "4000:4000"
    volumes:
      - .:/app
      - /app/node_modules
前端实现
原生的做法,直接 fetch 即可
// 1. 定义你的 GraphQL 查询字符串
const myQuery = `
  query GetBooks($limit: Int!) {
    getTopBooks(limit: $limit) {
      title
      price
    }
  }
`;

// 2. 使用原生 fetch 发送 POST 请求
fetch('http://localhost:4000/', {
  method: 'POST',
  headers: {
    'Content-Type': 'application/json',
  },
  // 核心:把 query 和 variables 塞进 body 里传给后端
  body: JSON.stringify({
    query: myQuery,
    variables: { limit: 2 }
  }),
})
  .then(res => res.json())
  .then(result => console.log('前端拿到的数据:', result.data));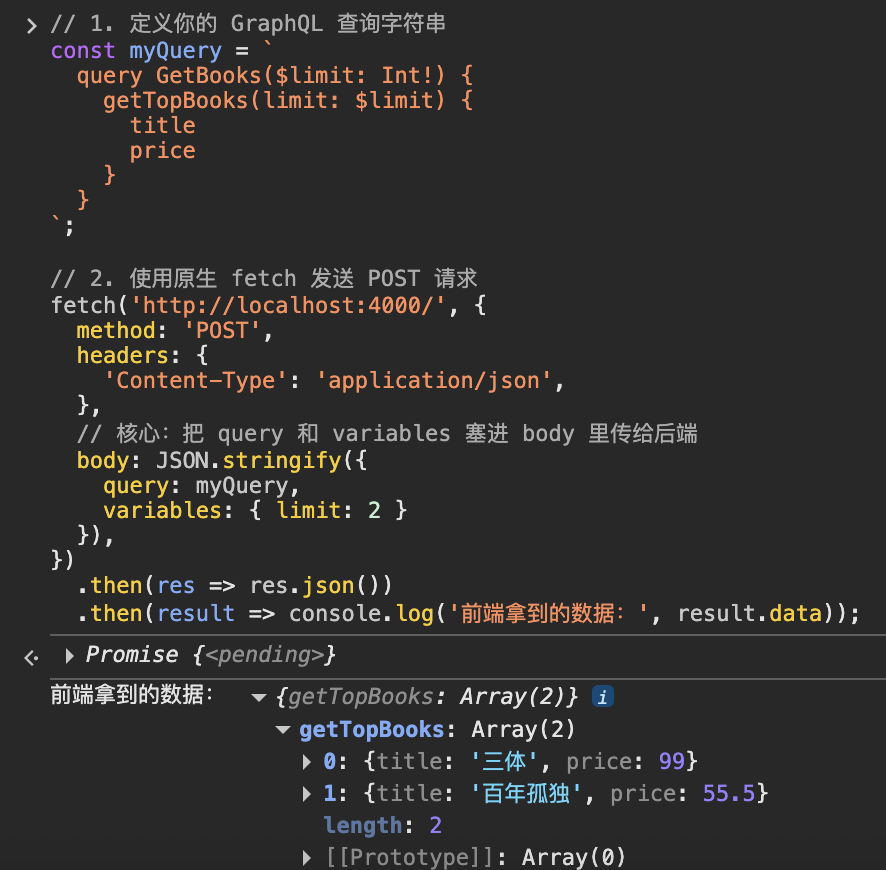
实现认证与授权
在 GraphQL 中,每次收到前端的请求,都会先生成一个 Context 对象。这个对象会被原封不动地传递给所有的 Resolver。
所以实现认证的最佳位置是在生成 Context 阶段
import { ApolloServer } from '@apollo/server';
import { startStandaloneServer } from '@apollo/server/standalone';
import { GraphQLError } from 'graphql';

// 模拟一个验证 Token 的函数 (实际开发中一般用 jsonwebtoken 库的 jwt.verify)
const getUserFromToken = (token) => {
  if (token === 'super-secret-token-admin') {
    return { id: '1', name: 'Admin', role: 'ADMIN' };
  }
  if (token === 'secret-token-user') {
    return { id: '2', name: 'John Doe', role: 'USER' };
  }
  return null;
};

const server = new ApolloServer({
  typeDefs,
  resolvers,
});

const { url } = await startStandaloneServer(server, {
  listen: { port: 4000 },
  // 核心:context 函数会在每一次前端发来请求时执行
  context: async ({ req }) => {
    // 1. 从 HTTP 请求头中拿到 token
    const authHeader = req.headers.authorization || '';
    const token = authHeader.replace('Bearer ', '');

    // 2. 解析 token 获取当前用户
    const user = getUserFromToken(token);

    // 3. 返回的对象就是 GraphQL 的 Context!所有 Resolver 都可以拿到它。
    return { user };
  },
});
然后是授权部分,拿到 user 之后,接下来就是在 Resolvers 中进行权限判断
如果要保护整个 Query 或 Mutation,那就直接在这个操作中添加一个 Context 校验:
const resolvers = {
  Mutation: {
    updateMyName: (parent, args, context) => {
      if (!context.user) {
        throw new GraphQLError('请先登录!', {
          extensions: { code: 'UNAUTHENTICATED' },
        });
      }

      console.log(`把用户 ${context.user.id} 的名字改成了 ${args.newName}`);
      return true;
    },
  },
};
设置只有 ADMIN 才能删除用户:
const resolvers = {
  Mutation: {
    deleteUser: (parent, args, context) => {
      if (!context.user) {
        throw new GraphQLError('未登录', { extensions: { code: 'UNAUTHENTICATED' } });
      }

      if (context.user.role !== 'ADMIN') {
        throw new GraphQLError('权限不足,只有管理员可操作', {
          extensions: { code: 'FORBIDDEN' }
        });
      }

      return "删除成功";
    },
  },
};
设置字段级的授权,仅用户自身或管理员可以看到邮箱信息:
# Schema 定义
type User {
  id: ID!
  name: String!
  email: String # 邮箱可能是空的(如果没权限看)
}
const resolvers = {
Query: {
getAllUsers: () => [
{ id: '1', name: 'Admin', email: 'admin@abc.com' },
{ id: '2', name: 'John Doe', email: 'john@abc.com' }
]
},
// 单独为 User 类型的 email 字段写一个 Resolver
User: {
email: (parent, args, context) => {
// parent 即当前正在解析的这个 User 对象
if (context.user && (context.user.role === 'ADMIN' || context.user.id === parent.id)) {
return parent.email;
}
return null;
}
}
};内省查询
GraphQL 允许我们使用 Introspection query 自省查询来了解 GraphQL API 的结构
结构自省
如果你为 GraphQL API 设计了 type,那么此时你应该已经知道可用的类型。但如果你没有设计它,可以通过查询 __schema 字段来询问 GraphQL,该字段在 query 根操作类型上始终可用。
query {
  __schema {
    types {
      name
    }
  }
}
查询结果如下:
{
  "data": {
    "__schema": {
      "types": [
        {
          "name": "Book"
        },
        {
          "name": "ID"
        },
        {
          "name": "String"
        },
        {
          "name": "Float"
        },
        {
          "name": "Query"
        },
        {
          "name": "Int"
        },
        {
          "name": "Mutation"
        },
        {
          "name": "Boolean"
        },
        {
          "name": "__Schema"
        },
        {
          "name": "__Type"
        },
        {
          "name": "__TypeKind"
        },
        {
          "name": "__Field"
        },
        {
          "name": "__InputValue"
        },
        {
          "name": "__EnumValue"
        },
        {
          "name": "__Directive"
        },
        {
          "name": "__DirectiveLocation"
        }
      ]
    }
  }
}- 上面自定义过的 type:
Book、Query、Mutation - 内置的 type:
ID、String、Float、Int、Boolean - 自省系统的 type:
__Schema、__Type、__TypeKind、__Field、__InputValue、__EnumValue、__Directive、__DirectiveLocation
接下来尝试查询所有查询的起始类型:
query {
  __schema {
    queryType {
      name
    }
  }
}
{
"data": {
"__schema": {
"queryType": {
"name": "Query"
}
}
}
}Query 类型是我们起始的地方。注意,这里的命名只是按照惯例;我们可以将 Query 类型命名为其他任何名称,如果我们指定它是查询的起始类型,它仍然会在这里返回。
接下来查询特定类型及其相关信息,这里选择 Book
query {
  __type(name: "Book") {
    name
    kind
  }
}
{
"data": {
"__type": {
"name": "Book",
"kind": "OBJECT"
}
}
}再查询其中的字段
query {
  __type(name: "Book") {
    name
    fields {
      name
      type {
        name
        kind
      }
    }
  }
}
{
"data": {
"__type": {
"name": "Book",
"fields": [
{
"name": "id",
"type": {
"name": null,
"kind": "NON_NULL"
}
},
{
"name": "title",
"type": {
"name": null,
"kind": "NON_NULL"
}
},
{
"name": "price",
"type": {
"name": null,
"kind": "NON_NULL"
}
},
{
"name": "author",
"type": {
"name": null,
"kind": "NON_NULL"
}
}
]
}
}
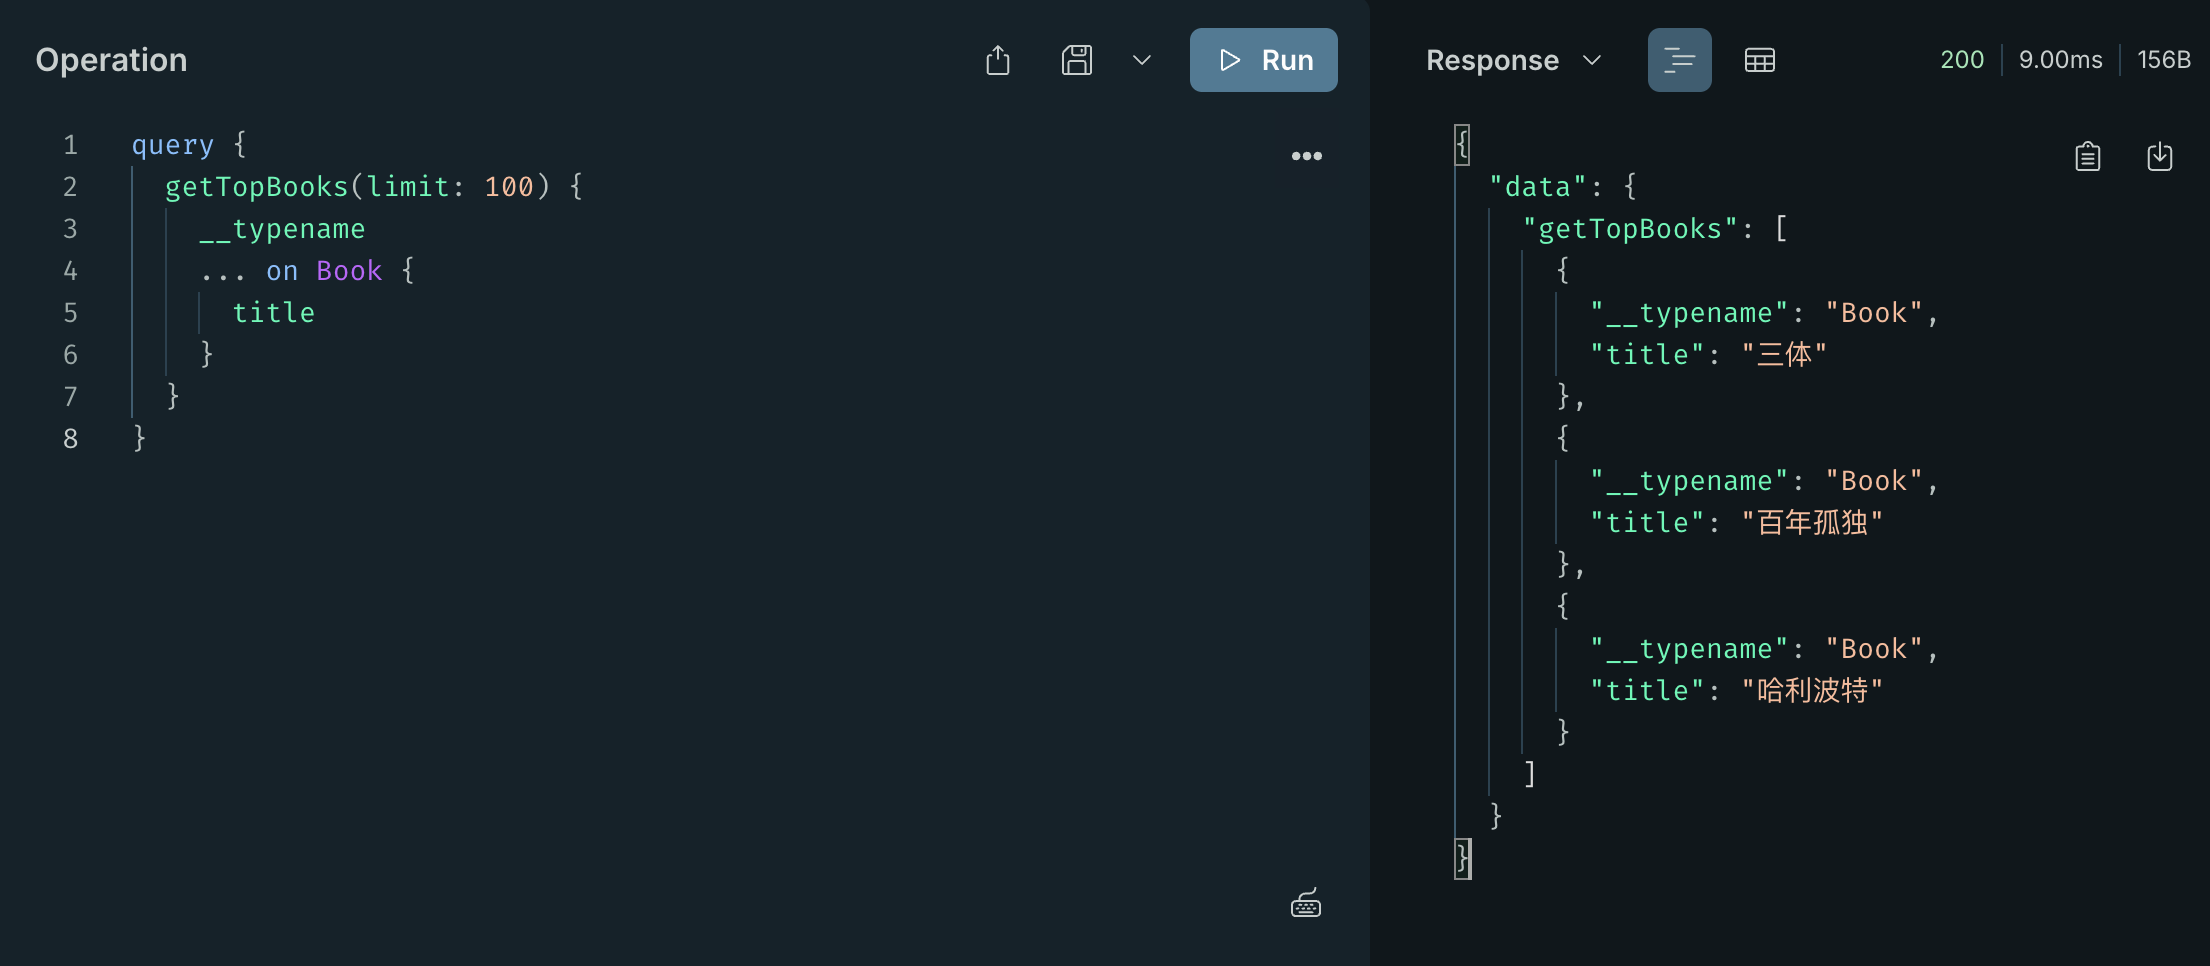
}类型名称自省
使用 __typename 元字段以查找任何具有对象、接口或联合类型作为基础输出类型的字段
query {
  getTopBooks(limit: 100) {
    __typename
    ... on Book {
      title
    }
  }
}
导入 voyager
使用下面这一串查询,可以将查询的结果导入到 https://apis.guru/graphql-voyager/ 来生成可视化 api 文档
query IntrospectionQuery {
  __schema {

    queryType { name kind }
    mutationType { name kind }
    subscriptionType { name kind }
    types {
      ...FullType
    }
    directives {
      name
      description

      locations
      args {
        ...InputValue
      }
    }
  }
}

fragment FullType on __Type {
  kind
  name
  description


  fields(includeDeprecated: true) {
    name
    description
    args {
      ...InputValue
    }
    type {
      ...TypeRef
    }
    isDeprecated
    deprecationReason
  }
  inputFields {
    ...InputValue
  }
  interfaces {
    ...TypeRef
  }
  enumValues(includeDeprecated: true) {
    name
    description
    isDeprecated
    deprecationReason
  }
  possibleTypes {
    ...TypeRef
  }
}

fragment InputValue on __InputValue {
  name
  description
  type { ...TypeRef }
  defaultValue


}

fragment TypeRef on __Type {
  kind
  name
  ofType {
    kind
    name
    ofType {
      kind
      name
      ofType {
        kind
        name
        ofType {
          kind
          name
          ofType {
            kind
            name
            ofType {
              kind
              name
              ofType {
                kind
                name
                ofType {
                  kind
                  name
                  ofType {
                    kind
                    name
                  }
                }
              }
            }
          }
        }
      }
    }
  }
}
攻击面
DVGA 靶场: https://github.com/dolevf/Damn-Vulnerable-GraphQL-Application
信息收集
使用 graphw00f 实现 GraphQL 的检测和指纹识别: https://github.com/dolevf/graphw00f
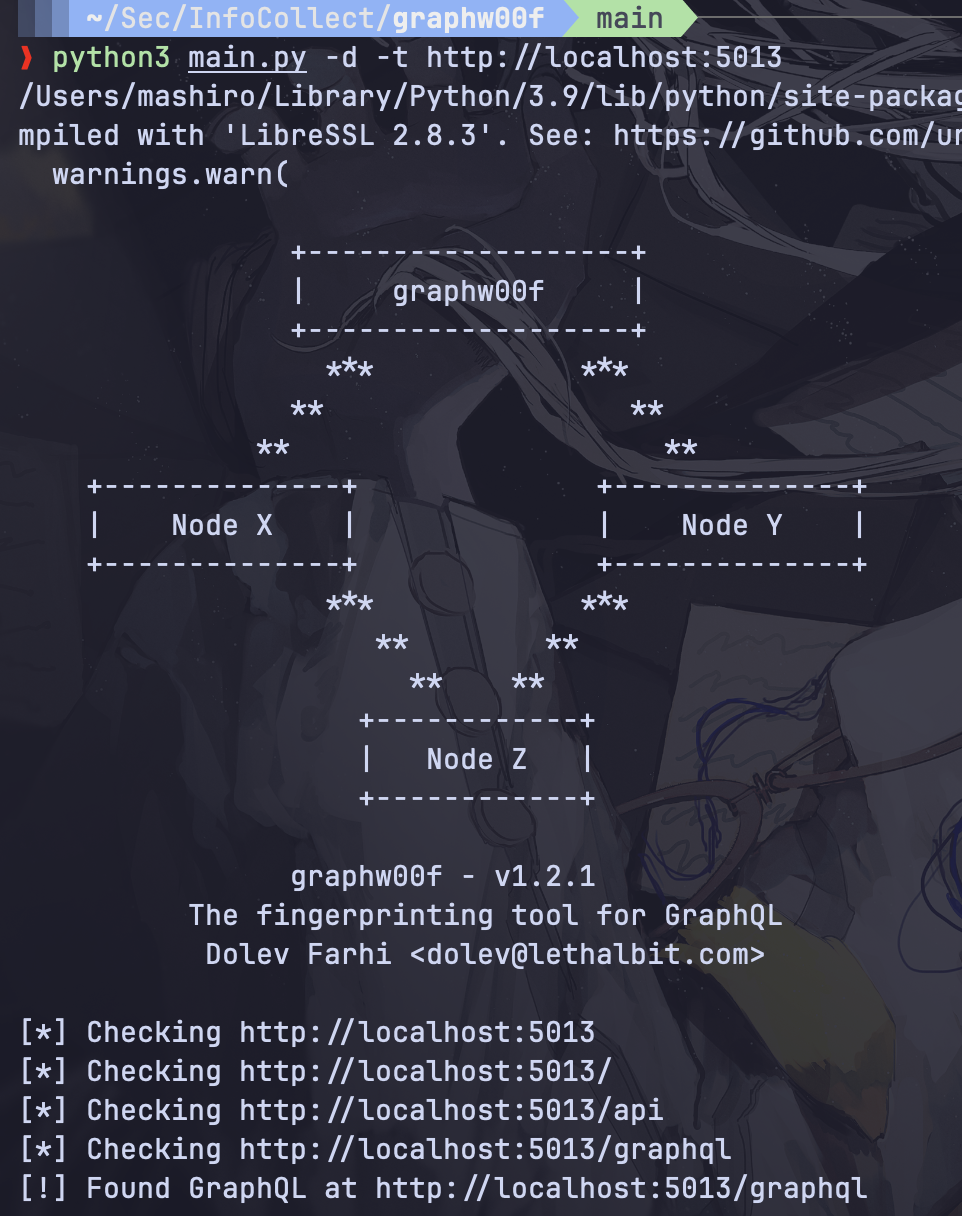
找到 GraphQL 后对其服务器进行指纹识别来确定底层实现
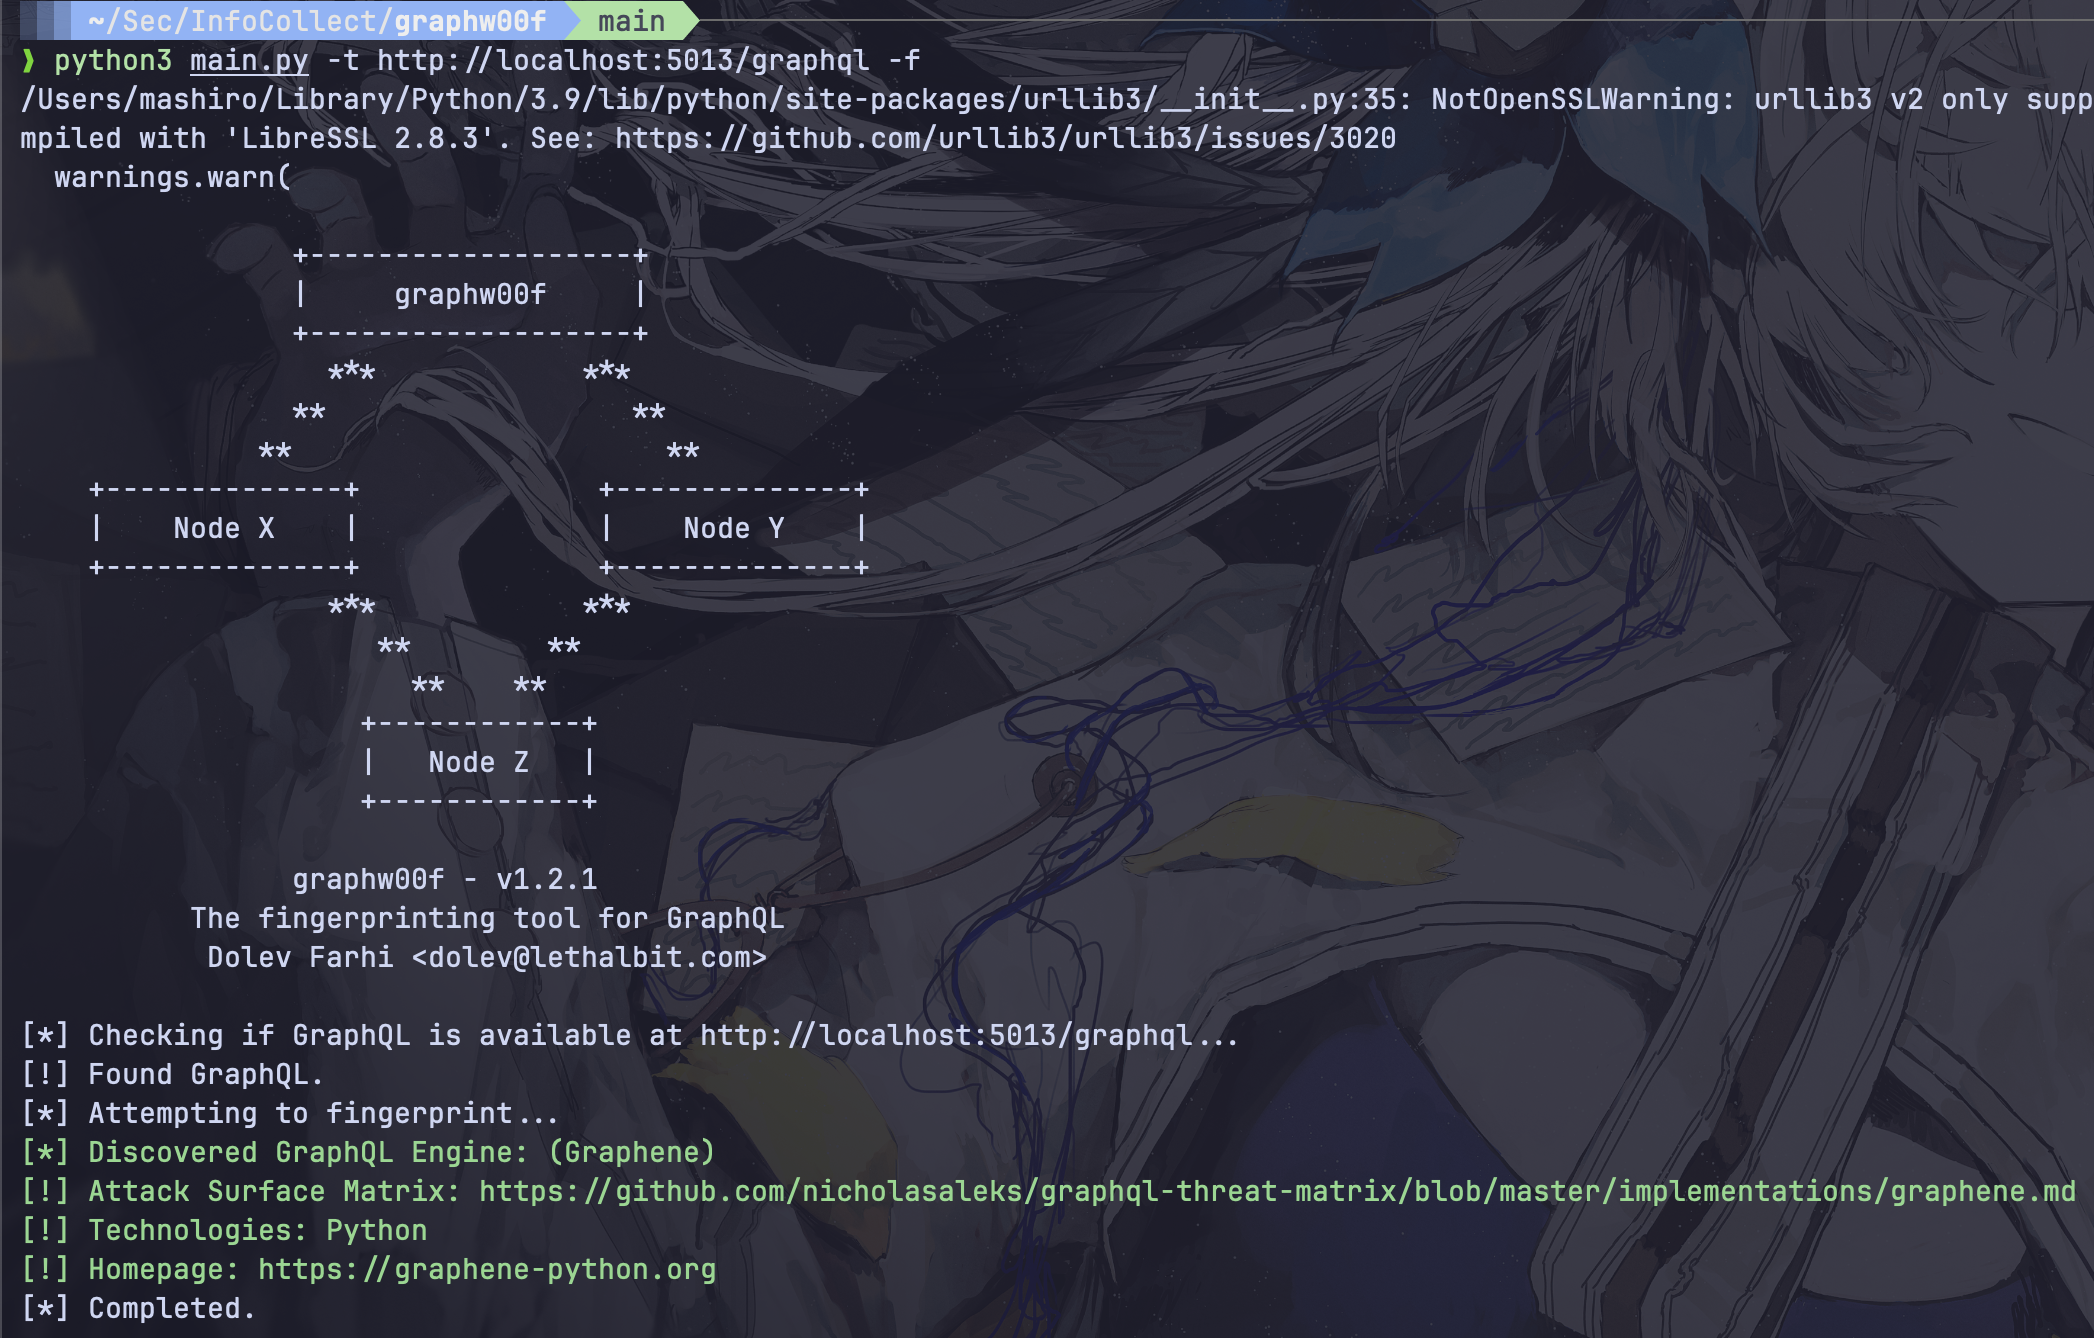
主要寻找 /graphql 的接口或者 /graphiql 的交互界面
敏感信息泄露与越权
__schema 自省机制列出 GraphQL 中的 Query、Mutation、ObjectType、Field、Argument
在 objects.types 中寻找敏感信息字段,如 email、password、token 等,以及一些废弃的字段
框架漏洞
Express-GraphQL
Graphene-Django
GraphQL 注入
本质是用户输入能够闭合某些东西来进入到代码中,实现 SQL、XSS、命令注入等