
前言
开发与安全缺一不可,虽然不知道自己到底少学了多少基础,但是现在就先跟着Drun1baby的学习路线吧
java第一步,先学 SpringBoot,同时我这里也会稍微学一下 Spring 和 SpringMVC
参考:
https://www.bilibili.com/video/BV1PE411i7CV
https://www.yuque.com/boogipop/ot88z5/bho0otrcaa8kl1xf
https://www.yuque.com/pmiaowu/gpy1q8
Spring
Spring是一个分层的 JavaSE/EE full-stack(一站式) 轻量级开源框架,可以说是给Java程序员带来了春天,因为它的优点是极大地简化了开发
Spring的理念:不去重新发明轮子。其核心是控制反转(IOC)和面向切面(AOP)。
IOC
AOP
Aspect Oriented Programming 面向切面编程,是通过预编译方式和运行期动态代理实现程序功能的统一维护的一种技术
利用 AOP 可以对业务逻辑的各个部分进行隔离, 从而使得业务逻辑各部分之间的耦合度降低, 提高程序的可重用性, 同时提高了开发的效率
Spring AOP 模块提供拦截器来拦截一个应用程序,通过这些拦截器,我们只需要对需要关注的部分进行代码编写, 并通过配置的方式完成指定目标的方法增强
一些术语:
| 项 | 描述 |
|---|---|
| Aspect | 一个模块具有一组提供横切需求的 APIs,例如: 一个日志模块为了记录日志,将被 AOP 方面调用 应用程序可以拥有任意数量的切面, 这取决于需求 |
| Join point | 在应用程序中它代表一个点,在实际的应用程序中,其中一个操作将使用 Spring AOP 框架 |
| Advice | 这是实际行动之前或之后执行的方法,在程序执行期间通过 Spring AOP 框架实际被调用的代码 |
| Pointcut | 使用表达式或模式指定切入点 |
| Introduction | 引用允许你添加新方法或属性到现有的类中 |
| Target object | 被一个或多个切面所通知的对象,该对象永远是一个被代理对象,也称为被通知对象 |
| Weaving | 把切面连接到其它的应用程序类型或者对象上, 并创建一个被通知的对象 这些可以在编译时, 类加载时和运行时完成 |
通知的类型:
Spring 切面可以使用下面提到的五种通知工作:
| 通知 | 描述 |
|---|---|
| 前置通知 | 在一个方法执行之前,执行通知 |
| 后置通知 | 在一个方法执行之后,不考虑其结果,执行通知 |
| 返回后通知 | 在一个方法执行之后,只有在方法成功完成时,才能执行通知 |
| 抛出异常后通知 | 在一个方法执行之后,只有在方法退出抛出异常时,才能执行通知 |
| 环绕通知 | 在建议方法调用之前和之后,执行通知 |
SpringMVC
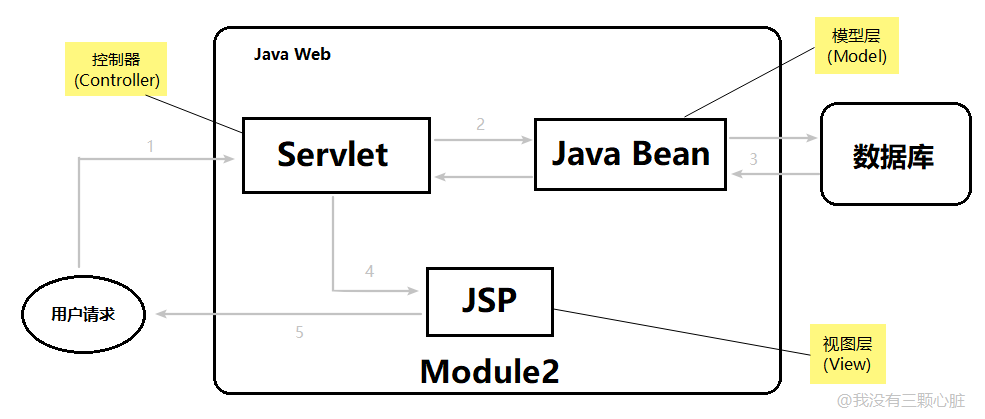
MVC架构
之前学习 ThinkPHP 的时候我们就接触到 MVC 架构了
MVC是Model、View、Controller的缩写,他们三者的意思分别为:
- Model(模型):程序员需要操纵的数据以及信息,也就是数据库
- View(视图):提供用户前端展示界面,是程序的外壳
- Controller(控制器):他负责根据用户从视图层输入的指令,选取数据层中的数据,然后进行对应的操作,最终产生结果
所以顺序分别是View->Controller->Model,由外到里
在 SpringMVC 中这三者分别就对应 Servlet,JSP,JavaBean
映射配置文件
web.xml
<servlet-mapping>
    <servlet-name>dispatcher</servlet-name>
    <url-pattern>/</url-pattern>
</servlet-mapping>
Spring MVC 的映射配置文件名为 xxx-servlet.xml(这里对应 web.xml 中的 dispatcher)
dispatcher-servlet.xml
<?xml version="1.0" encoding="UTF-8"?>
<beans xmlns="http://www.springframework.org/schema/beans"
       xmlns:xsi="http://www.w3.org/2001/XMLSchema-instance"
       xsi:schemaLocation="http://www.springframework.org/schema/beans http://www.springframework.org/schema/beans/spring-beans.xsd">

    <bean id="simpleUrlHandlerMapping"
          class="org.springframework.web.servlet.handler.SimpleUrlHandlerMapping">
        <property name="mappings">
            <props>
                <!-- /hello 路径的请求交给 id 为 helloController 的控制器处理-->
                <prop key="/hello">helloController</prop>
            </props>
        </property>
    </bean>
    <bean id="helloController" class="controller.HelloController"></bean>
</beans>
此处的 class 需要是完整包名
Controller配置
@RestController注解:放在类上就相当于给每个方法都加了Responsebody注解,加上了Responsebody注解后就是单纯返回一个字符串
@RequestMapping注解:可以用来设置路由,这个注解是放在方法上面的,但同时也可以放在一个类上,GetMapping即以get方式访问,PostMapping即以post方式访问
SpringBoot
核心思想:约定大于配置
默认帮我们进行了很多设置,多数 Spring Boot 应用只需要很少的 Spring 配置,同时继承了大量常用的第三方库配置(如 Redis),这些第三方库几乎可以零配置开箱即用
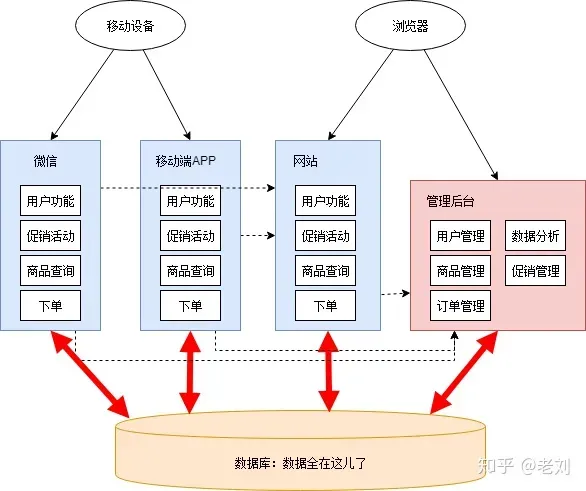
微服务架构
微服务是一种架构风格,它要求我们在开发一个应用的时候,这个应用必须构建成一系列小服务的组合,可以用http的方式进行互通
单体应用架构(all in one):一个应用中的所有应用服务都封装在一个应用中,无论是ERP、CRM等系统,都把数据库访问、web访问等功能都放到一个war包内
而微服务架构打破了 all in one 的架构方式,把每个功能元素独立出来,把独立出来的功能元素进行动态组合
最初的架构图:
随着需求变多,用户量变大,数据库公用可能出现冲突矛盾,因此微服务架构诞生,其架构图:
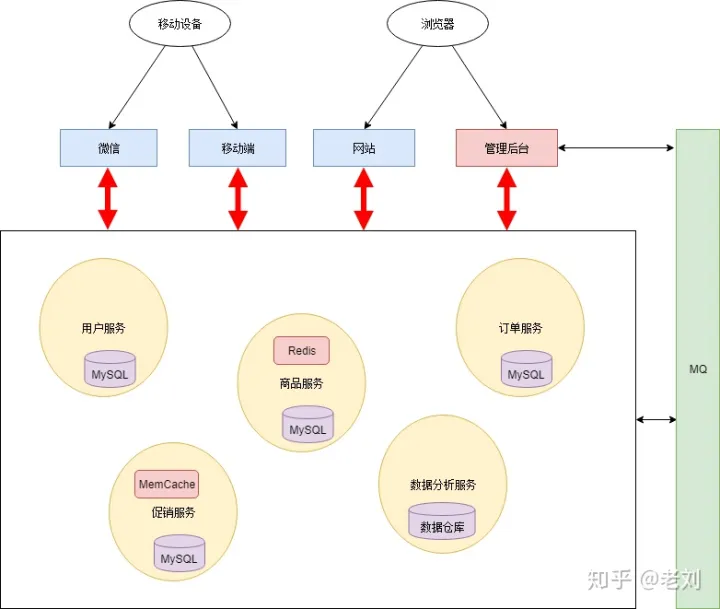
如果需要修改其中的一个功能,只需要更新升级其中一个功能服务单元即可
第一个SpringBoot程序
喜报:官方已经提供了一个快速生成SpringBoot的网站:https://start.spring.io/
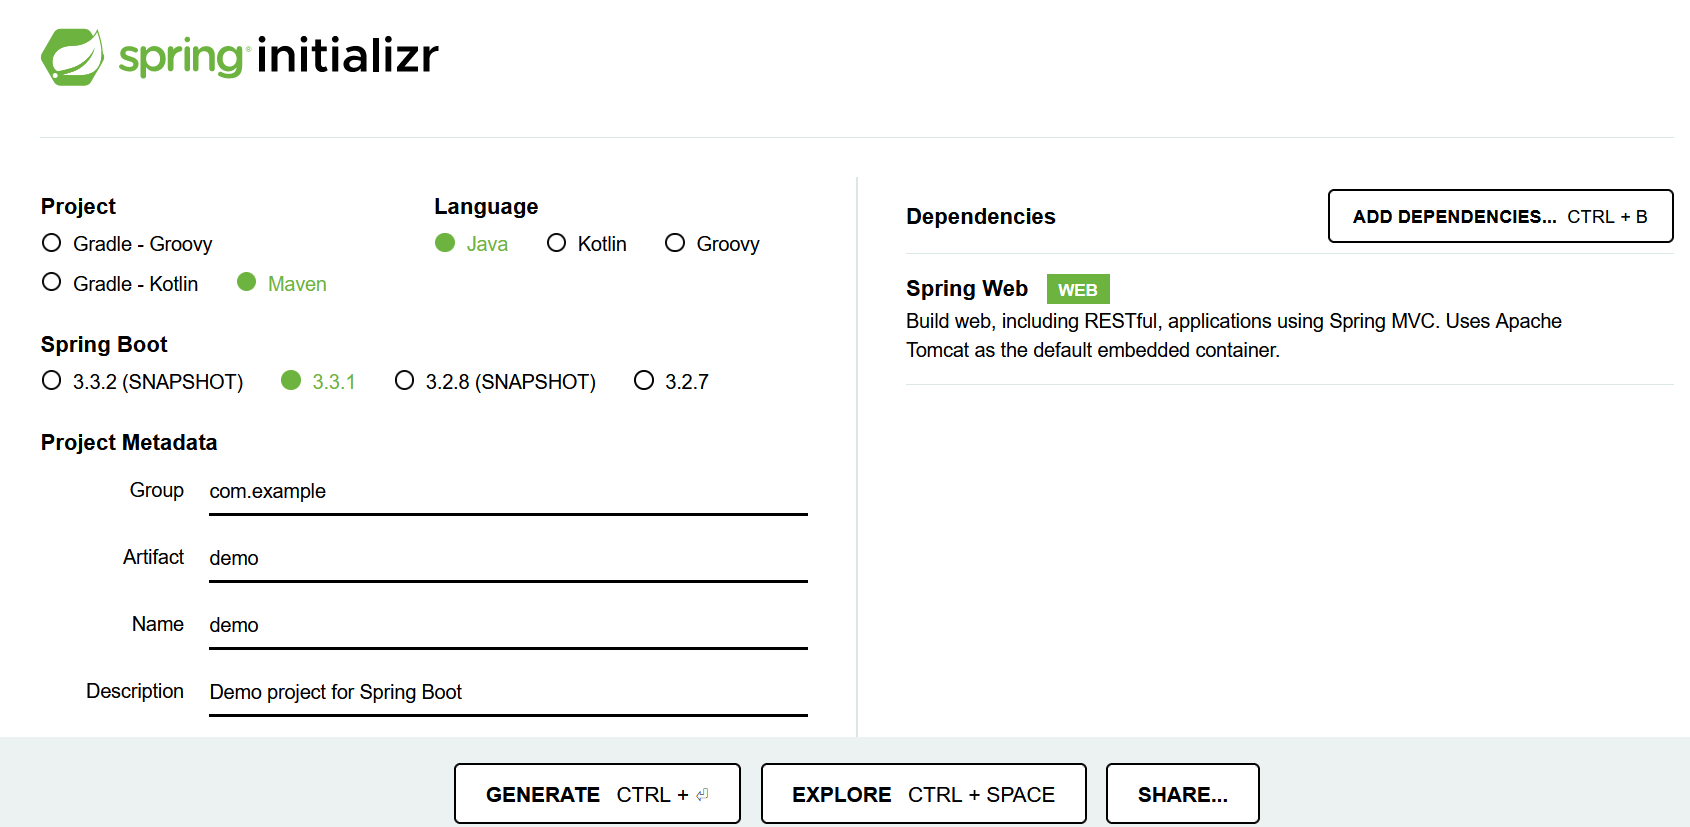
SNAPSHOT是快照版本,右上角可以添加依赖,这里是添加了个web依赖(包括web.xml,tomcat等),generate后会下载一个zip文件,然后导入到IDE即可
当然IDEA也集成了这个网站
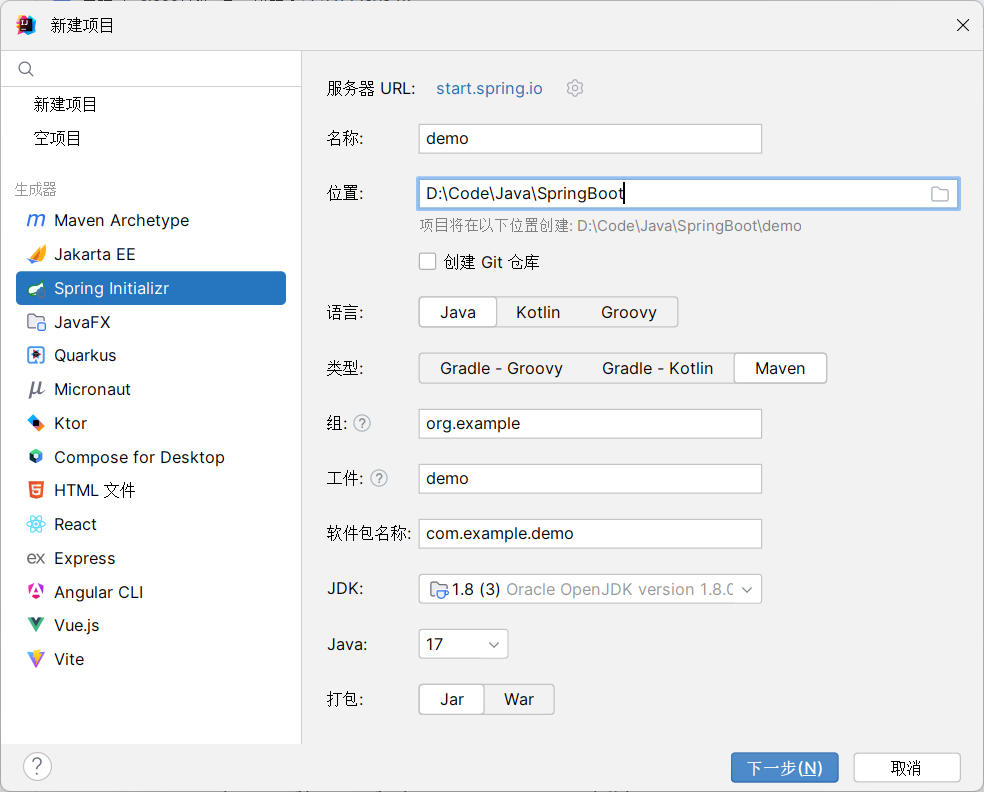
注意:Spring Boot 3.0.0后只使用Java 17以上的版本,而官方源不再支持3.0以下的版本,如果我们要使用jdk1.8来创建则需要换源为阿里云:https://start.aliyun.com/
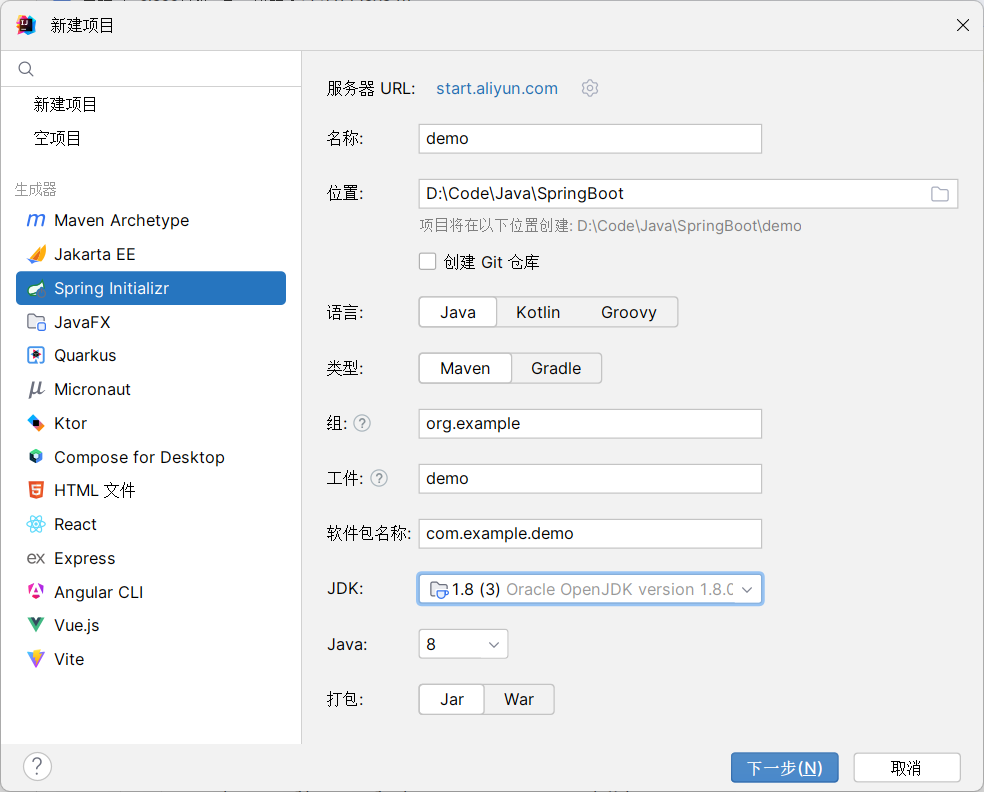
设置spring boot版本和依赖
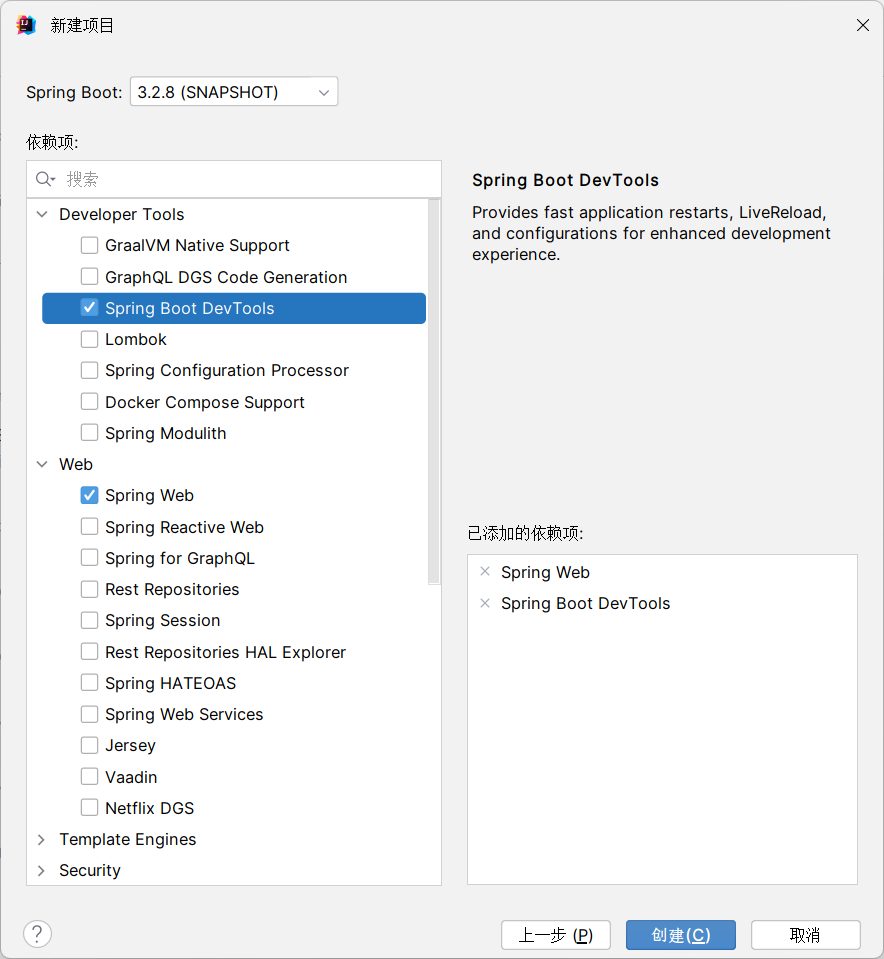
于是就直接创建了,然后依赖的jar包会自动进行下载
目录结构
├─.idea
│  └─libraries
├─.mvn
│  └─wrapper
├─src
│  ├─main
│  │  ├─java
│  │  │  └─com
│  │  │      └─example
│  │  │          └─demo
│  │  └─resources
│  │      ├─static
│  │      └─templates
│  └─test
│      └─java
│          └─com
│              └─example
│                  └─demo
└─target
    ├─classes
    │  └─com
    │      └─example
    │          └─demo
    └─generated-sources
        └─annotations
这里的 Application.java 文件就是我们 SpringBoot 的主程序,即程序的主入口,之后启动web服务器就是运行这个文件
SpringBoot 本质上还是一个Tomcat程序,它内置了tomcat服务器,并且经过了改动,因此启动比 Tomcat 迅速许多
pom.xml的依赖中,org.springframework.boot包括了tomcat,dispatcherServlet,xml
<dependency>
    <groupId>org.springframework.boot</groupId>
    <artifactId>spring-boot-starter-web</artifactId>
</dependency>
接下来尝试运行,访问本地的8080端口
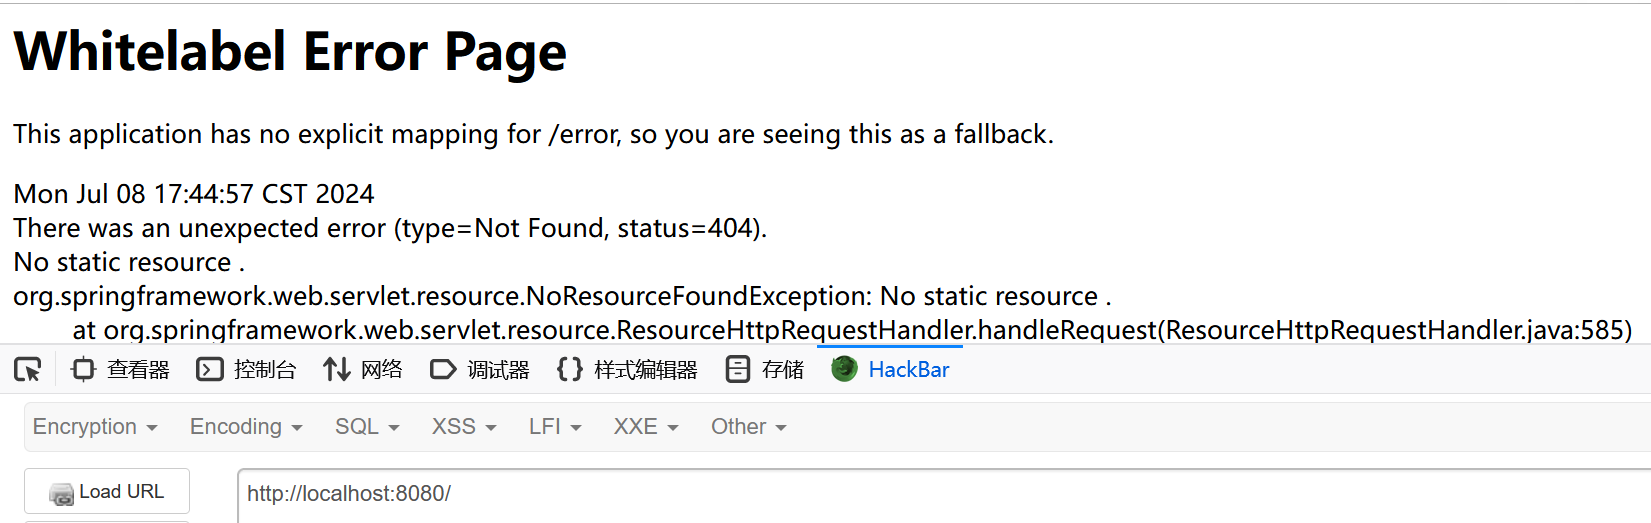
此时我们还没添加任何的静态资源和controller,所以返回404
创建一个简单的controller
在 Application.java 的同级目录下创建一个controller package,然后在里面写一个HelloController.java
package com.example.demo.controller;

import org.springframework.stereotype.Controller;
import org.springframework.web.bind.annotation.RequestMapping;
import org.springframework.web.bind.annotation.RestController;

@RestController
public class HelloController {
    @RequestMapping("/hello")
    public String hello(){
        // 调用业务,接收前端参数
        return "hello,world";
    }
}这样就创建了一个接口:http://localhost:8080/hello
成功访问
配置端口
在application.properties里添加server.port即可指定端口
SpringBoot自动装配原理
没怎么学Spring,一时半会还感受不到SpringBoot的核心魅力
先放个参考文章在这:https://www.cnblogs.com/javaguide/p/springboot-auto-config.html
Yaml语法
编Docker-compose,配置hexo博客时已经非常熟悉了,这边粗略写点基本的语法
语法特点
- 大小写敏感
- 和python类似,使用缩进表示层级关系
- 缩进不允许使用tab,只允许空格
- 缩进的空格数不重要,只要同级元素左对齐即可
#表示注释
数据类型
- 对象:键值对的集合,又称为映射,哈希,字典
- 数组:一组按次序排列的元素
- 纯量:实际上就是普通的单一变量
#对象的用法
Person:
  name: Azusa
  age: 16
  #子对象
  Dog:
      name: Gino
      age: 7

#数组用法,下面例子表示Human:["YourName","YourAge","Nothing"]
Human:
    - YourName
    - YourAge
    - Nothing
#或者
Human2: [a,b,c]
#字成员用法 A:[1,2,[1,2,3]]
A:
  - 1
  - 2
  -
    - 1
    - 2
    - 3
#还有复杂一点的用法,companies: [{id: 1,name: company1,price: 200W},{id: 2,name: company2,price: 500W}]
companies:
  -
    id: 1
    name: company1
    price: 200w
  -
    id: 2
    name: company2
    price: 300w
#复合结构
languages:
  - ruby
  - perl
  - python
websites:
  Yaml: yaml.org
  ruby: ruby.org
  python: python.org

#纯量包括:字符串,布尔值,整数,浮点数,Null,时间,日期
boolean:
  - TRUE #或者true,这里的true就是纯量
  - FALSE
float:
  - 3.14 #3.14也是纯量,纯量的意思就是一些常量
  - 1.1415
int:
  - 1
  - 2
null:
  nodename: 'node'
  parent: ~ #使用~表示null
string:
  - 哈哈
  - hello
  - "hello" #加不加引号都无所谓
data:
  - 2022-12-12 #日期必须以yyyy-MM-dd的格式
datatime:
  - 2022-12-12T15:02:31+08:00 #时间使用ISO 8601格式,时间和日期之间使用T连接,最后使用+代表时区
给属性赋值的几种方式
传统派:Value赋值
使用@Componet注解表明这个类是一个bean,不用像SpringMVC那样去xml写<bean id="" class="">
JavaBean是一种Java类,而且是一种特殊的、可重用的类:必须具有无参数的构造器,所有的属性都是private的,通过提供setter和getter方法来实现对成员属性的访问,需要被序列化并且实现了 Serializable 接口,bean的示例如下:
public class StudentsBean implements java.io.Serializable{
   private String firstName = null;
   private String lastName = null;
   private int age = 0;

   public StudentsBean() {
   }
   public String getFirstName(){
      return firstName;
   }
   public String getLastName(){
      return lastName;
   }
   public int getAge(){
      return age;
   }

   public void setFirstName(String firstName){
      this.firstName = firstName;
   }
   public void setLastName(String lastName){
      this.lastName = lastName;
   }
   public void setAge(int age) {
      this.age = age;
   }
}在SpringBoot中只需要用注解@Component,然后就能开始写bean类了
tips:IDEA中,alt+insert可以快速生成构造函数,getter,setter等方法
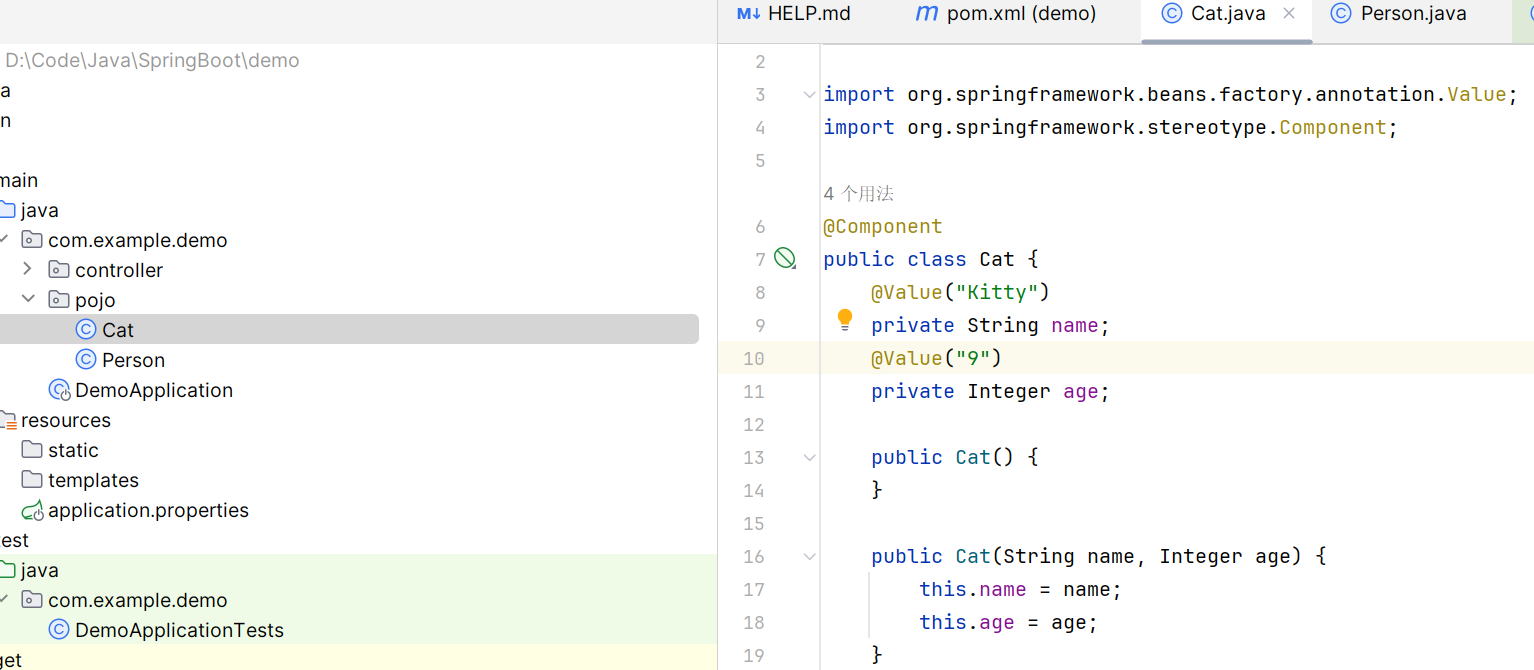
写一个Cat类:
package com.example.demo.pojo;

import org.springframework.beans.factory.annotation.Value;
import org.springframework.stereotype.Component;

@Component
public class Cat {
    private String name;
    private Integer age;

    public Cat() {
    }

    public Cat(String name, Integer age) {
        this.name = name;
        this.age = age;
    }

    public String getName() {
        return name;
    }

    public void setName(String name) {
        this.name = name;
    }

    public Integer getAge() {
        return age;
    }

    public void setAge(Integer age) {
        this.age = age;
    }

    @Override
    public String toString() {
        return "Cat{" +
                "name='" + name + '\'' +
                ", age=" + age +
                '}';
    }
}
再写一个Person类:
package com.example.demo.pojo;

import org.springframework.boot.context.properties.ConfigurationProperties;
import org.springframework.stereotype.Component;

import java.util.Date;
import java.util.List;
import java.util.Map;

@Component
@ConfigurationProperties(prefix = "person")
public class Person {
    private String name;
    private Integer age;
    private Boolean happy;
    private Date birth;
    private Map<String, Object> maps;
    private List<Object> lists;
    private Cat cat;

    public Person() {
    }

    public Person(String name, Integer age, Boolean happy, Date birth, Map<String, Object> maps, List<Object> lists, Cat cat) {
        this.name = name;
        this.age = age;
        this.happy = happy;
        this.birth = birth;
        this.maps = maps;
        this.lists = lists;
        this.cat = cat;
    }

    public String getName() {
        return name;
    }

    public void setName(String name) {
        this.name = name;
    }

    public Integer getAge() {
        return age;
    }

    public void setAge(Integer age) {
        this.age = age;
    }

    public Boolean getHappy() {
        return happy;
    }

    public void setHappy(Boolean happy) {
        this.happy = happy;
    }

    public Date getBirth() {
        return birth;
    }

    public void setBirth(Date birth) {
        this.birth = birth;
    }

    public Map<String, Object> getMaps() {
        return maps;
    }

    public void setMaps(Map<String, Object> maps) {
        this.maps = maps;
    }

    public List<Object> getLists() {
        return lists;
    }

    public void setLists(List<Object> lists) {
        this.lists = lists;
    }

    public Cat getCat() {
        return cat;
    }

    public void setCat(Cat cat) {
        this.cat = cat;
    }

    @Override
    public String toString() {
        return "Person{" +
                "name='" + name + '\'' +
                ", age=" + age +
                ", happy=" + happy +
                ", birth=" + birth +
                ", maps=" + maps +
                ", lists=" + lists +
                ", cat=" + cat +
                '}';
    }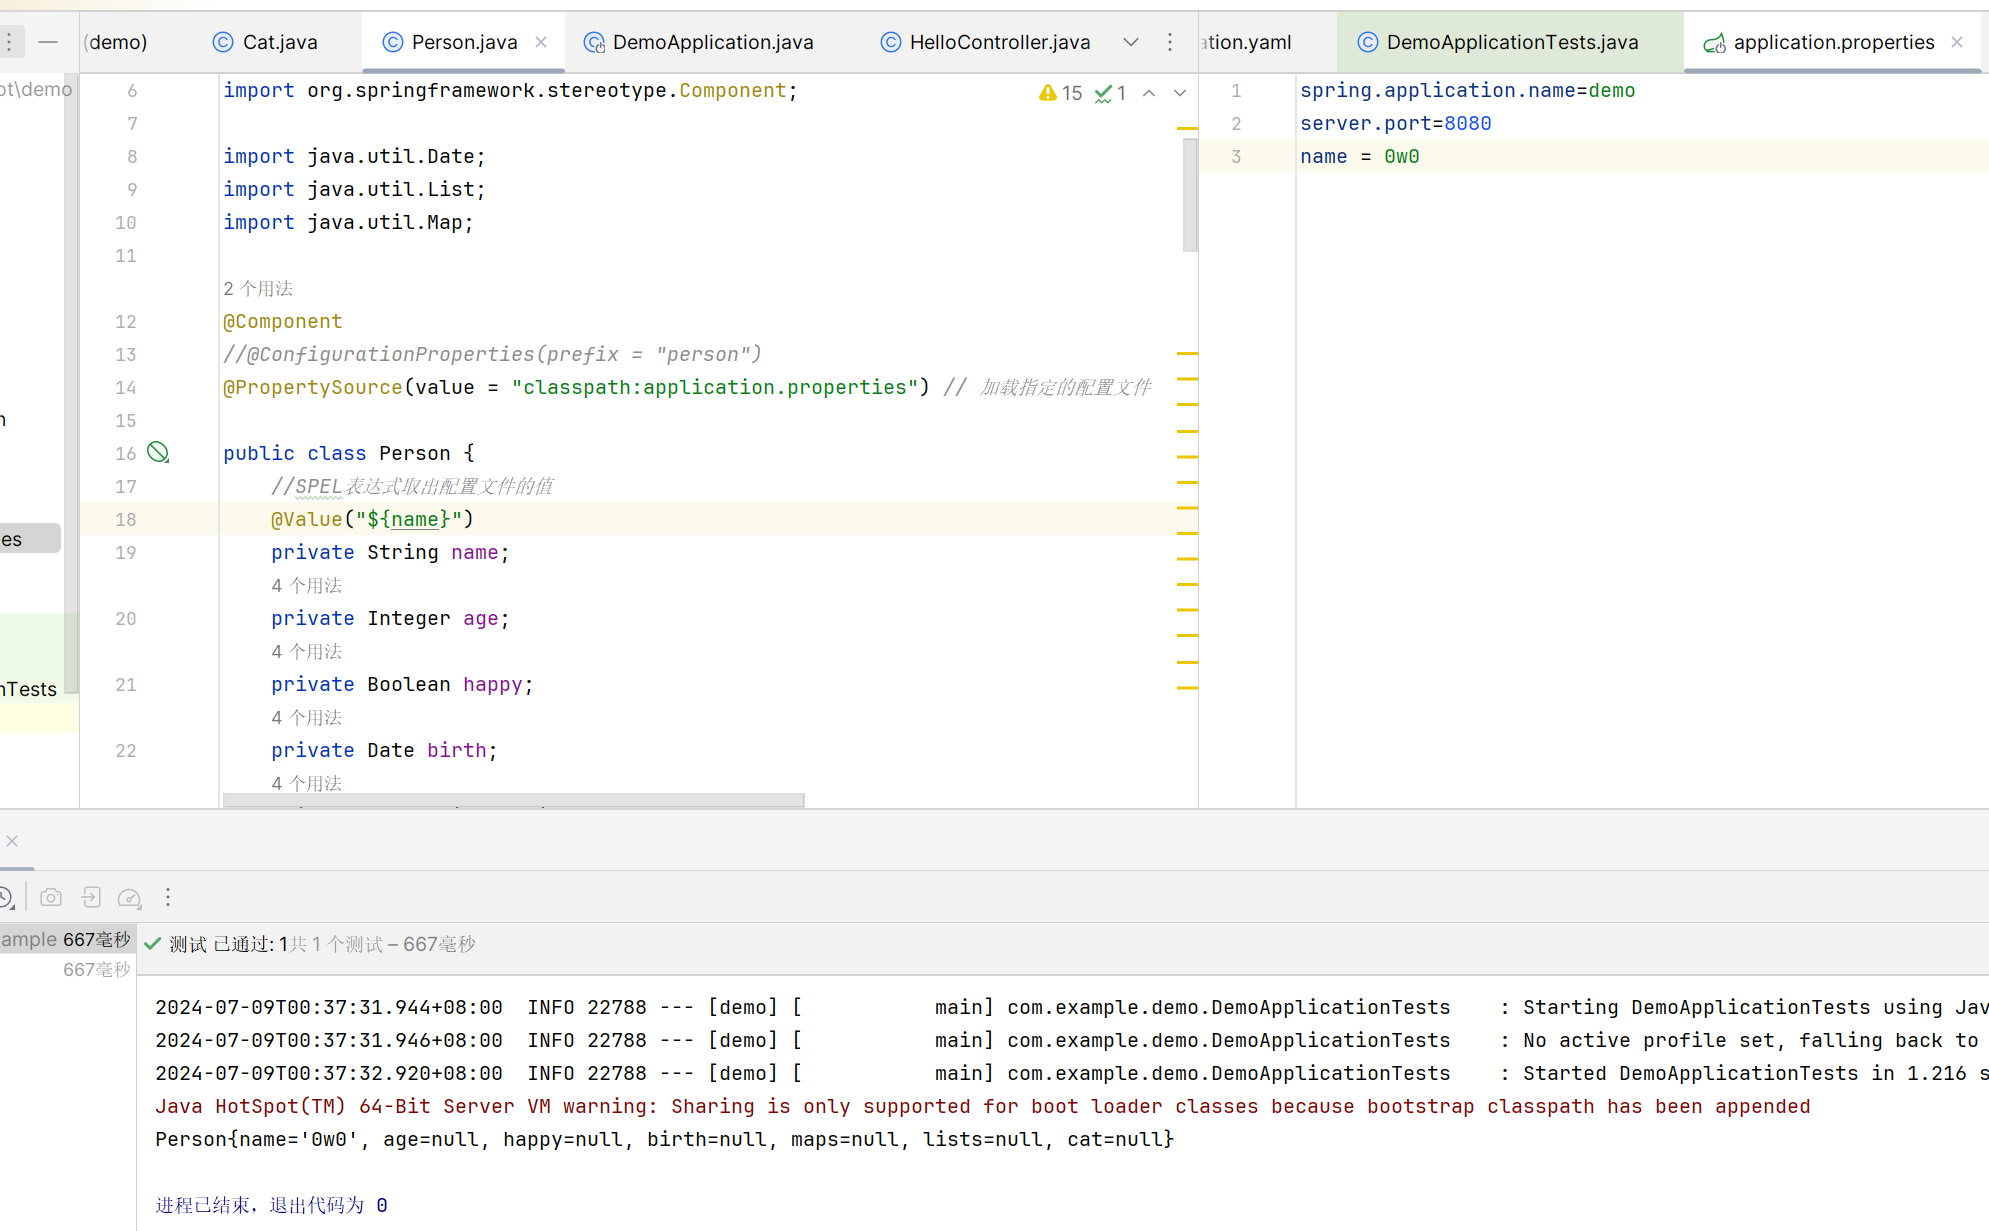
}然后可以在Cat类里面添加@Value注解来赋值,需要一个个属性指定来进行赋值
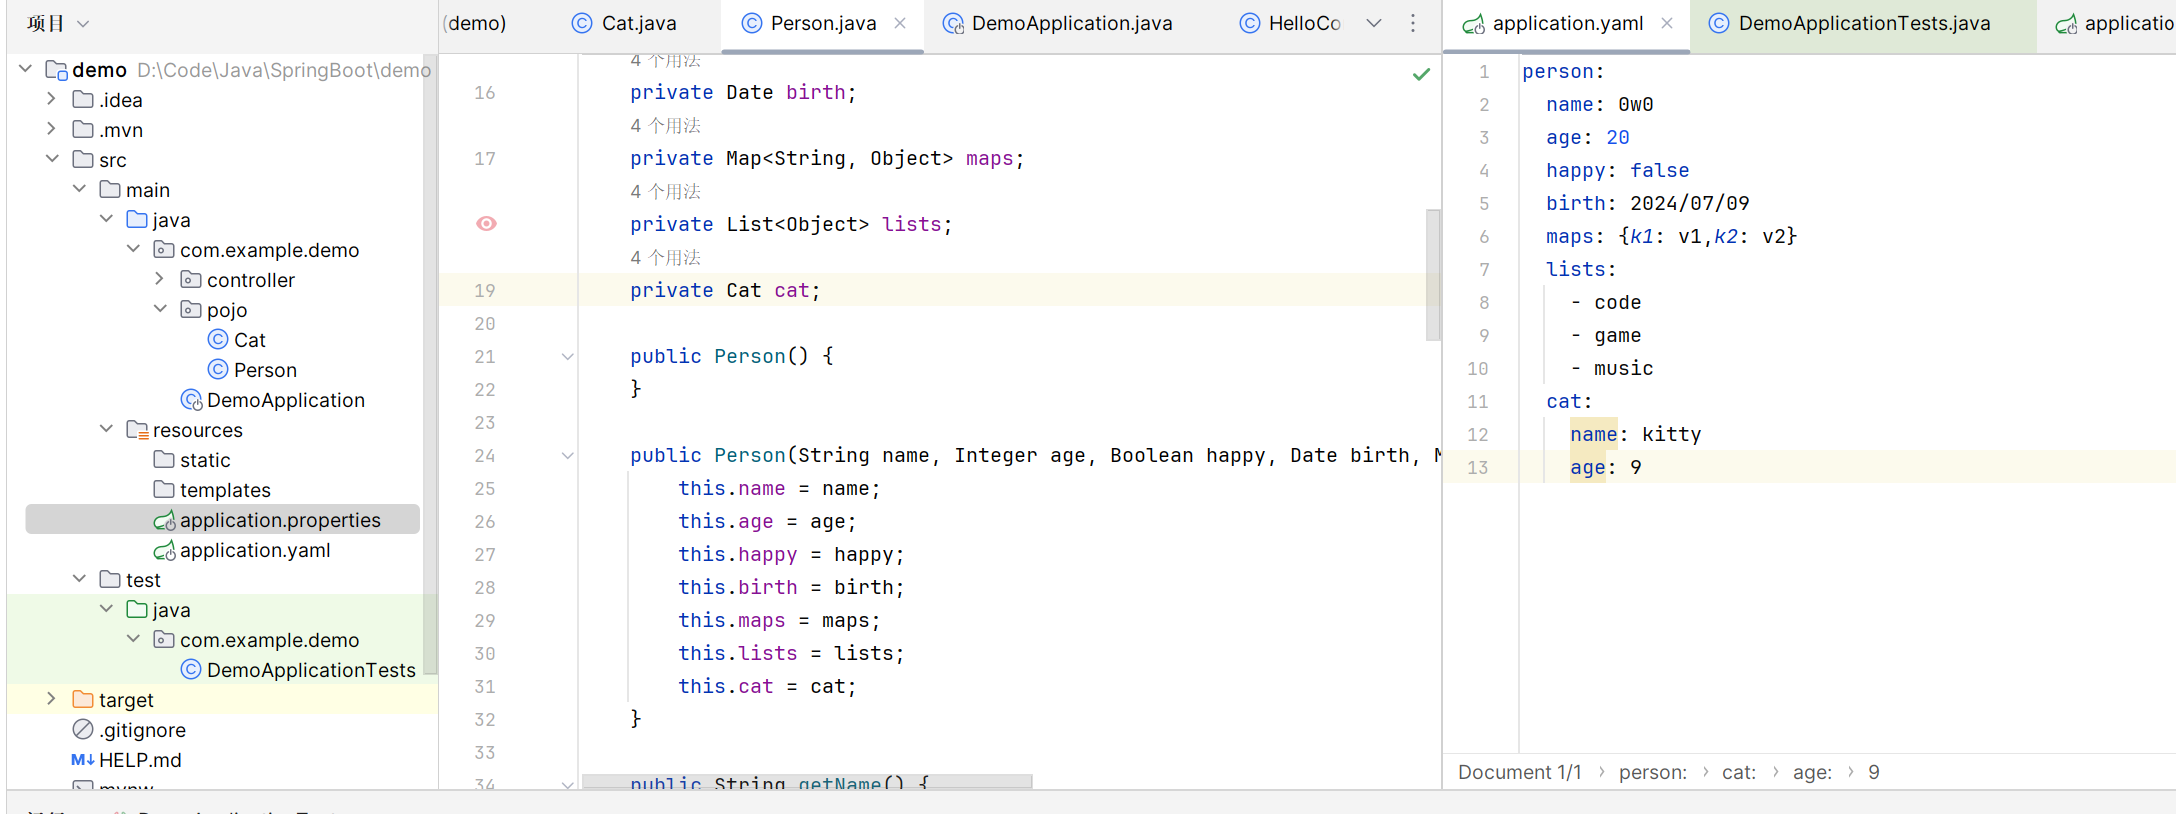
Yaml配置文件绑定
在resources文件夹下创建application.yaml:
person:
  name: 0w0
  age: 20
  happy: false
  birth: 2024/07/09
  maps: {k1: v1,k2: v2}
  lists:
    - code
    - game
    - music
  cat:
    name: kitty
age: 9然后在Person.java中添加@ConfigurationProperties(prefix = "person")注解把yaml配置文件绑定上去
@ConfigurationProperties:将配置文件中配置的每一个属性的值,映射到这个组件中;参数
prefix将配置文件中的所有属性进行一一对应
和@Value的区别:
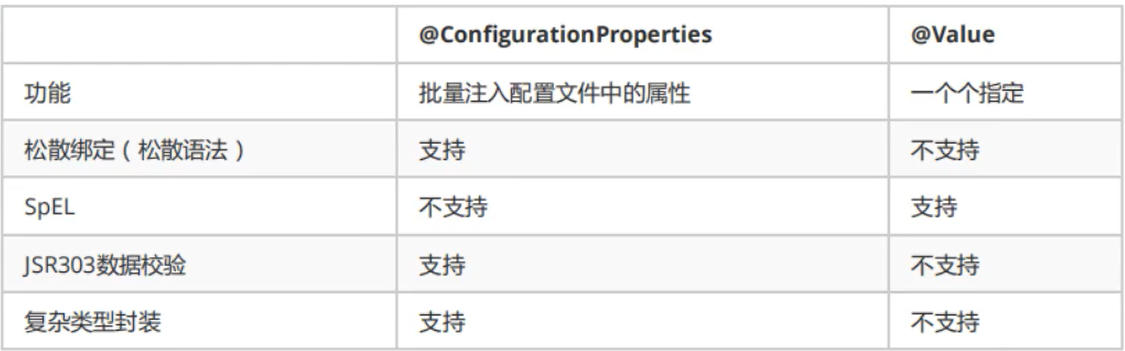
松散绑定:yaml中
last-name和lastName是一样的,-后跟着的字母默认是大写的
实例:
接下来用test文件夹下的DemoApplicationTests进行测试打印,使用@Autowired注解,即自动装配
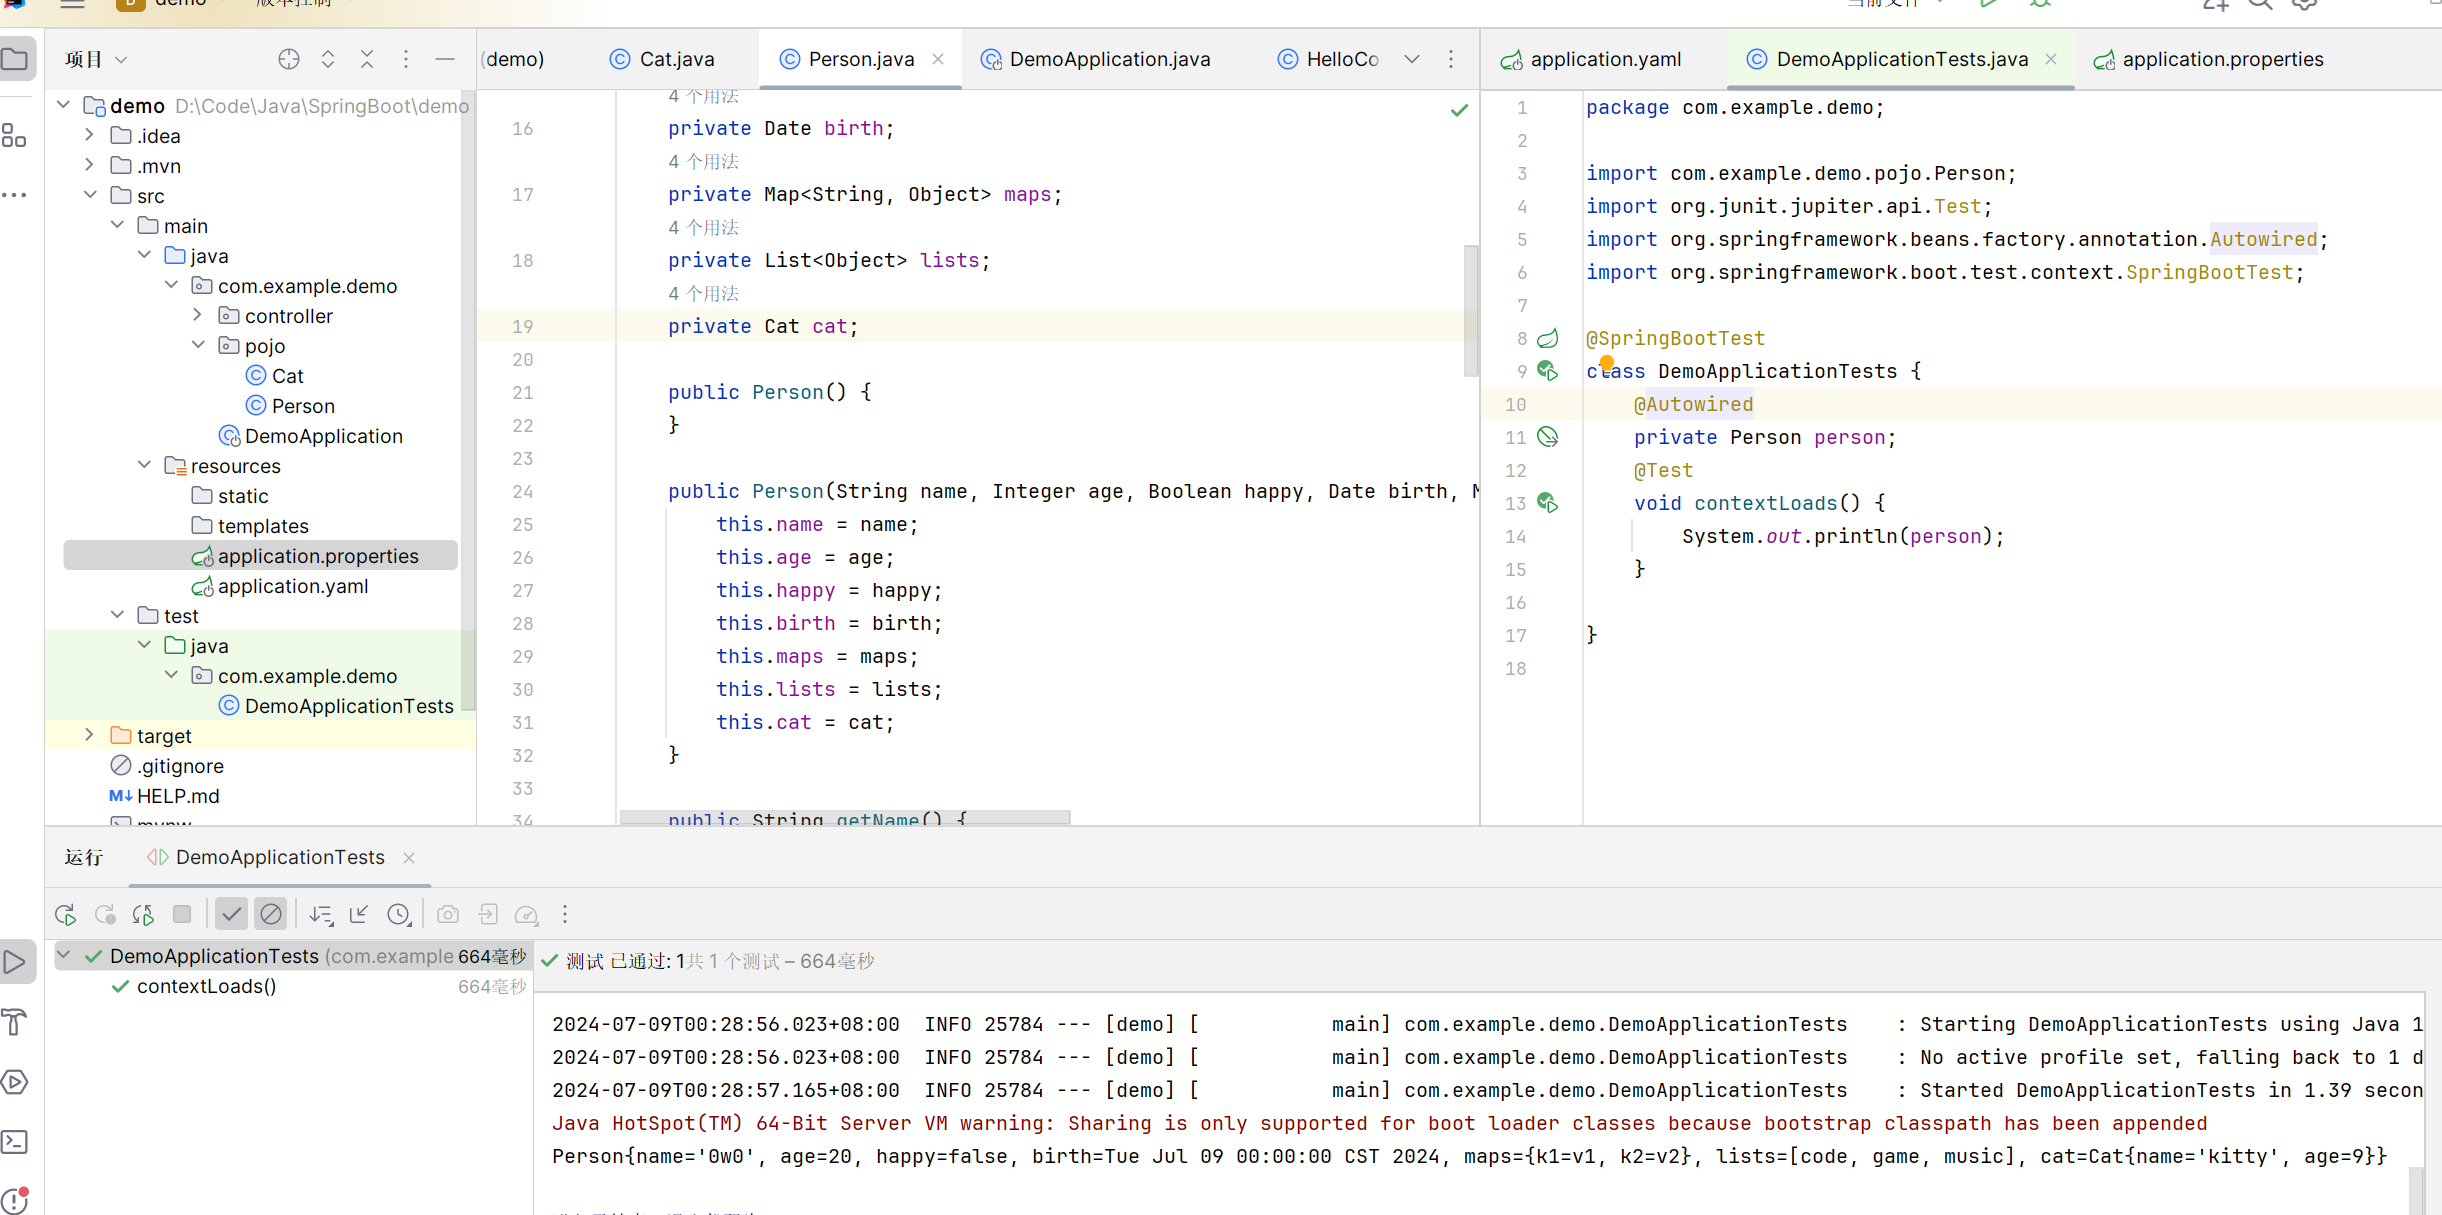
成功打印出来
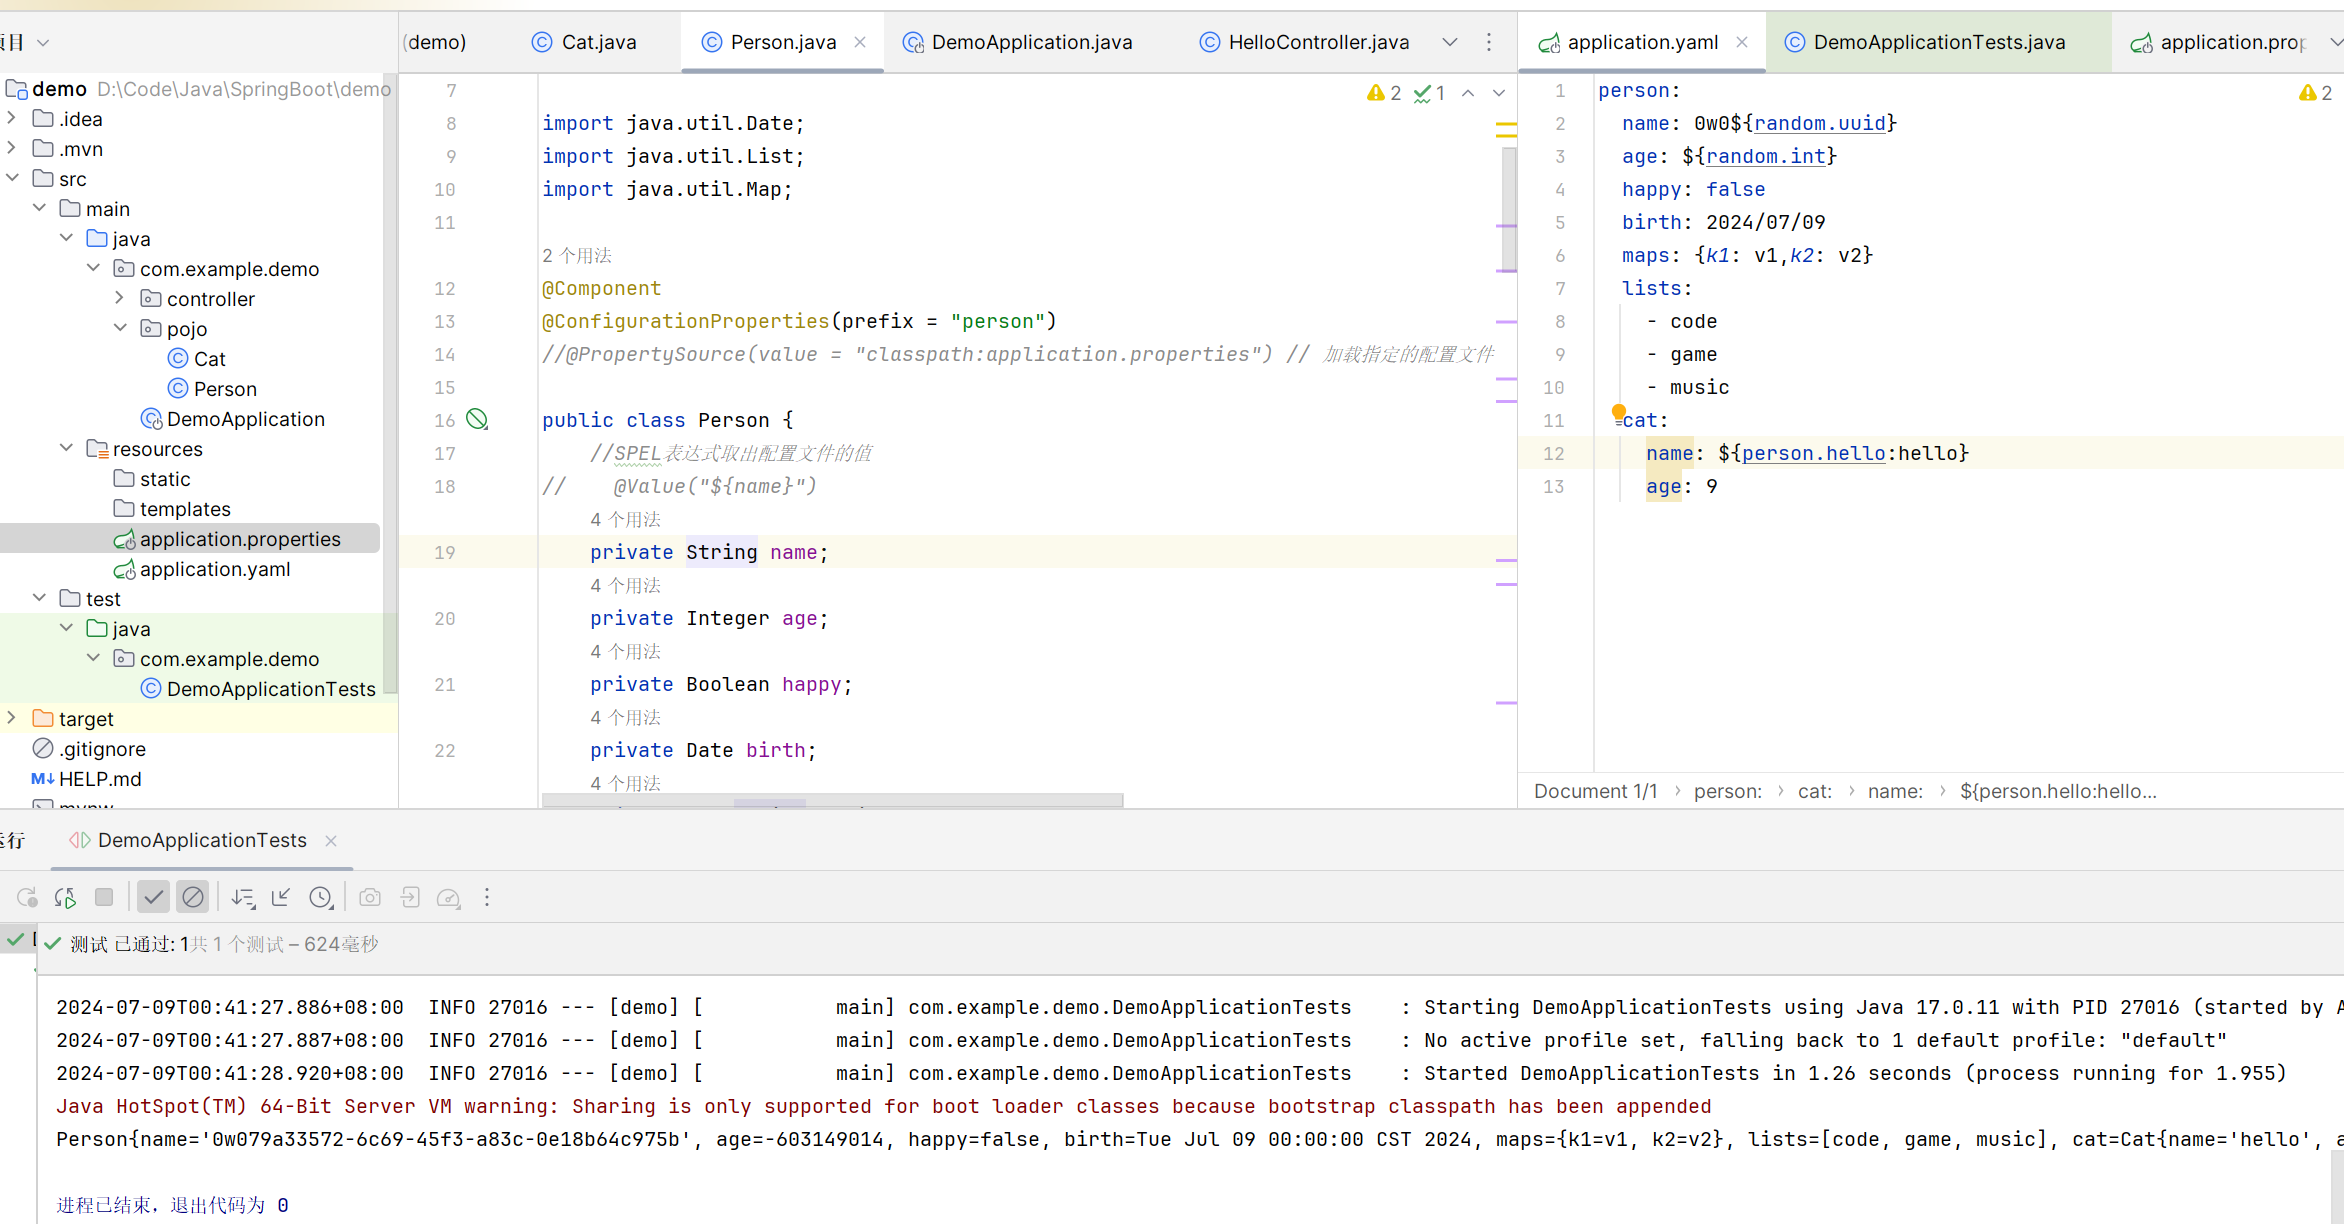
注意:yaml配置文件可以插入el表达式
Properties配置文件绑定
这种方式和yaml差不多,都是通过配置文件进行指定
name=0w0Person.java使用@PropertySource注解来加载指定的配置文件
然后用@Value("${name}")这个SPEL表达式来取出配置文件的值
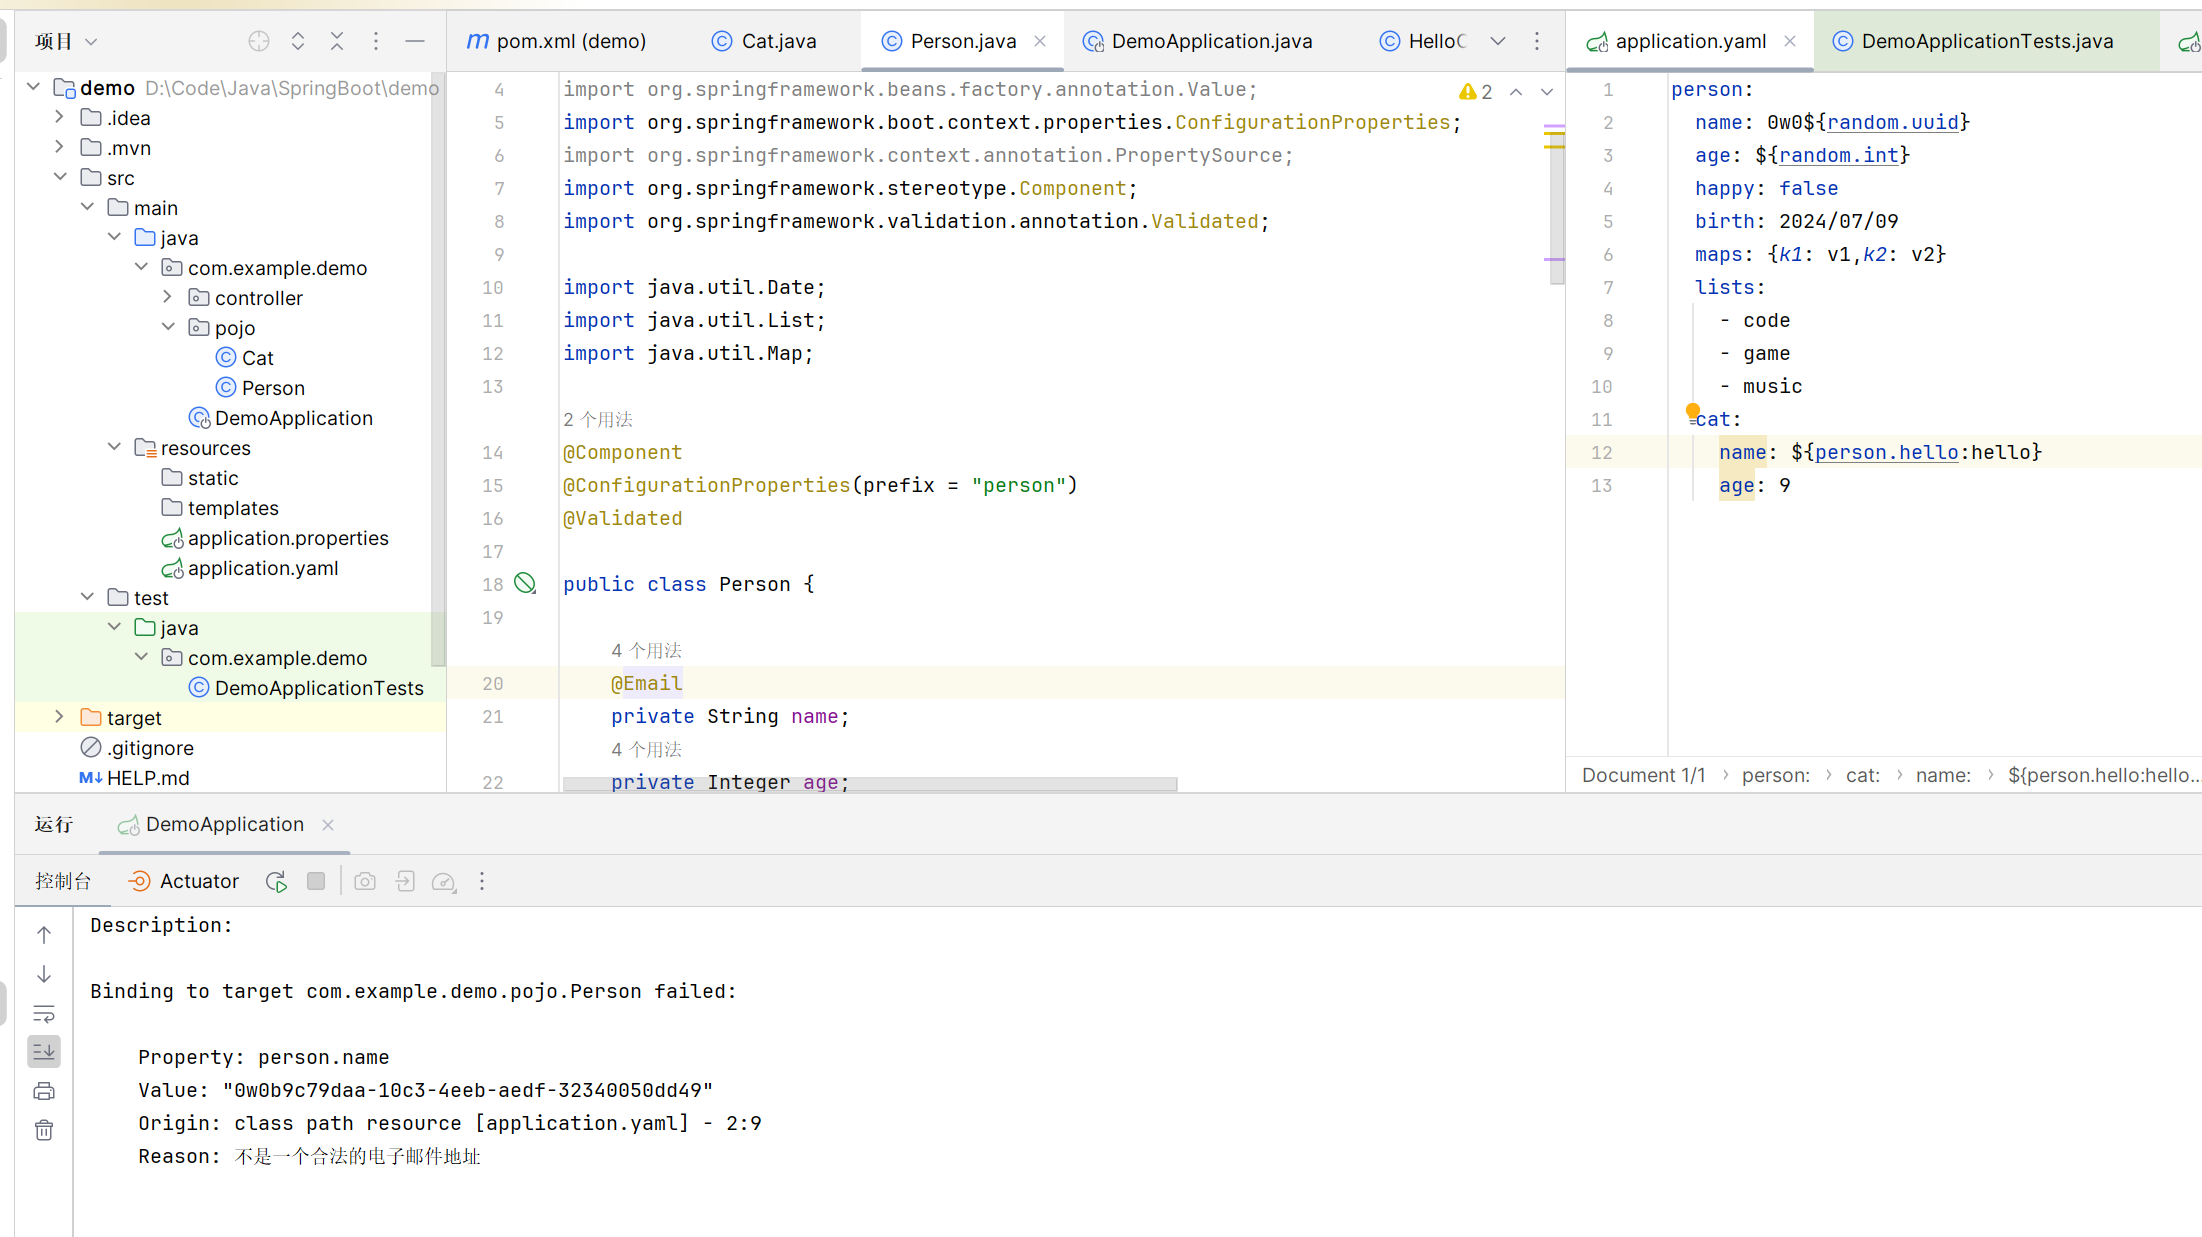
JSR303校验
在字段中增加一层过滤器验证,保证数据的合法性
SpringBoot中用@Validated来校验数据,如果数据异常则会统一抛出异常,方便异常中心统一处理
引入依赖:
<dependency>
    <groupId>jakarta.validation</groupId>
    <artifactId>jakarta.validation-api</artifactId>
    <version>3.0.2</version>
</dependency>
tips:如果安装依赖出现
connect timeout的建议直接在maven下的conf/setting.xml里添加代理,参考:https://www.feiyiblog.com/2021/07/09/maven%E8%AE%BE%E7%BD%AE%E4%BB%A3%E7%90%86/
这里写一个注解让name只能支持Email格式:
@Component
@ConfigurationProperties(prefix = "person")
@Validated

public class Person {
    @Email
    private String name;
当我们继续传入前面的name时就会报错
跟进一下@Email
package jakarta.validation.constraints;

import jakarta.validation.Constraint;
import jakarta.validation.Payload;
import java.lang.annotation.Documented;
import java.lang.annotation.ElementType;
import java.lang.annotation.Repeatable;
import java.lang.annotation.Retention;
import java.lang.annotation.RetentionPolicy;
import java.lang.annotation.Target;

@Documented
@Constraint(
    validatedBy = {}
)
@Target({ElementType.METHOD, ElementType.FIELD, ElementType.ANNOTATION_TYPE, ElementType.CONSTRUCTOR, ElementType.PARAMETER, ElementType.TYPE_USE})
@Retention(RetentionPolicy.RUNTIME)
@Repeatable(List.class)
public @interface Email {
    String message() default "{jakarta.validation.constraints.Email.message}";

    Class<?>[] groups() default {};

    Class<? extends Payload>[] payload() default {};

    String regexp() default ".*";

    Pattern.Flag[] flags() default {};

    @Target({ElementType.METHOD, ElementType.FIELD, ElementType.ANNOTATION_TYPE, ElementType.CONSTRUCTOR, ElementType.PARAMETER, ElementType.TYPE_USE})
    @Retention(RetentionPolicy.RUNTIME)
    @Documented
    public @interface List {
        Email[] value();
    }
}可以看到对应的处理逻辑,@Email(message="xxx")修改message的值可以改变报错返回的信息
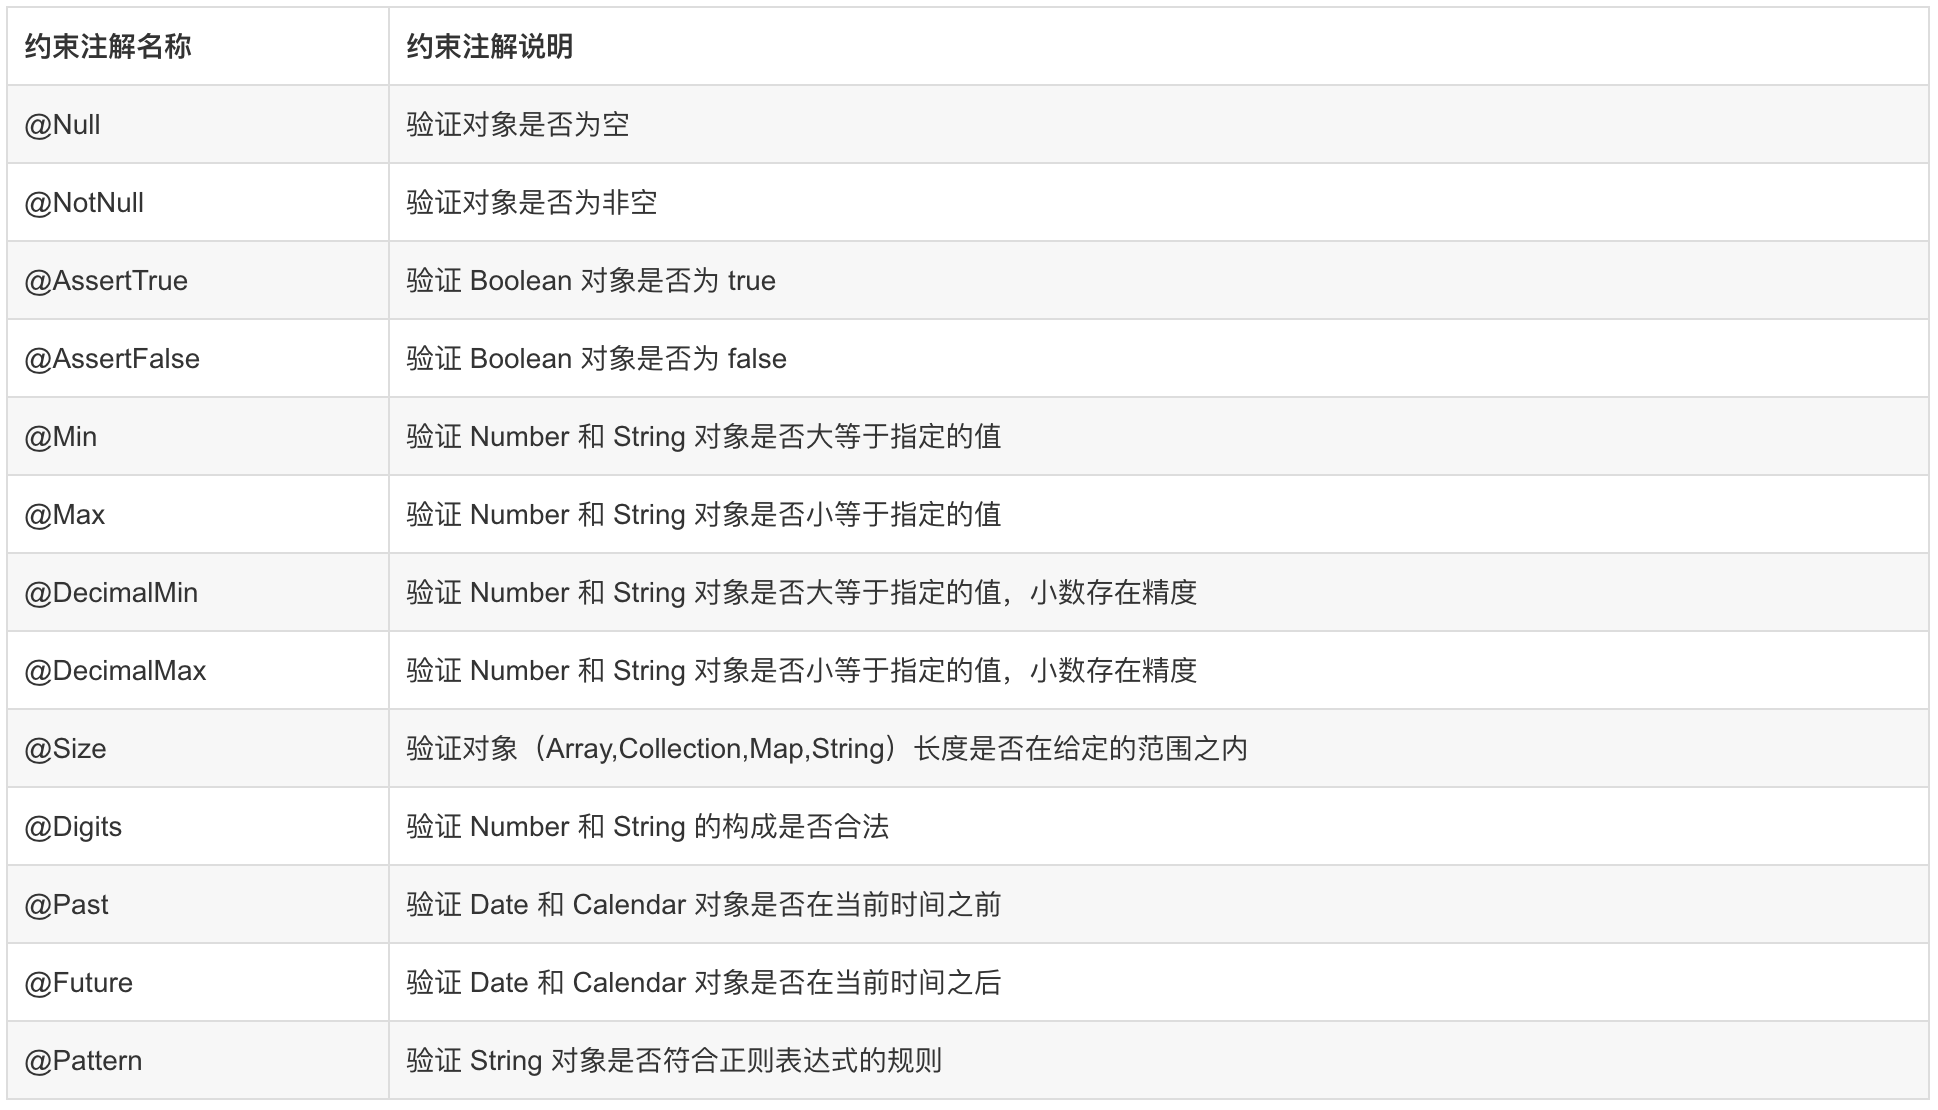
一些内嵌的约束注解:
多环境配置和配置文件位置
SpringBoot中有四个地方可以存放我们的application.yaml(或.properties)配置文件(最新版貌似有五个),优先级如下:
项目同级目录的config目录下:
file:./config/项目同级目录:
file:./resource的config目录下:
classpath:./config/resource目录下(默认):
classpath:./
可以通过指定spring.profiles.active来选择环境,配置文件名为application-xxx.yml(properties)(xxx表示不同环境,如test——测试环境,dev——开发环境),这样子我们只需要在application.yml(properties)中指定spring.profiles.active的值就可以应用对应的配置:
spring.profiles.active=testspring:
profiles:
active: testWeb开发
静态资源导入
- web项目中resource目录下
- 项目中的resource/resource目录下
- 项目中的resource/static目录下
- 项目中的resource/public目录下
优先级:resource>static(默认)>public
还有一个webjars的路径:webjars/jquery/3.5.1/jquery.js
tips:IDEA中ctrl+shift+a可以全局搜索
源码分析:参考https://blog.csdn.net/qq_43466788/article/details/108905644
WebMvcAutoConfiguration.class,在其中找到addResourceHandlers方法
public void addResourceHandlers(ResourceHandlerRegistry registry) {
    if (!this.resourceProperties.isAddMappings()) {
        logger.debug("Default resource handling disabled");
    } else {
        this.addResourceHandler(registry, this.mvcProperties.getWebjarsPathPattern(), "classpath:/META-INF/resources/webjars/");
        this.addResourceHandler(registry, this.mvcProperties.getStaticPathPattern(), (registration) -> {
            registration.addResourceLocations(this.resourceProperties.getStaticLocations());
            if (this.servletContext != null) {
                ServletContextResource resource = new ServletContextResource(this.servletContext, "/");
                registration.addResourceLocations(new Resource[]{resource});
            }

        });
    }
}
算是比较简单的一个审计代码,有时间了再审(
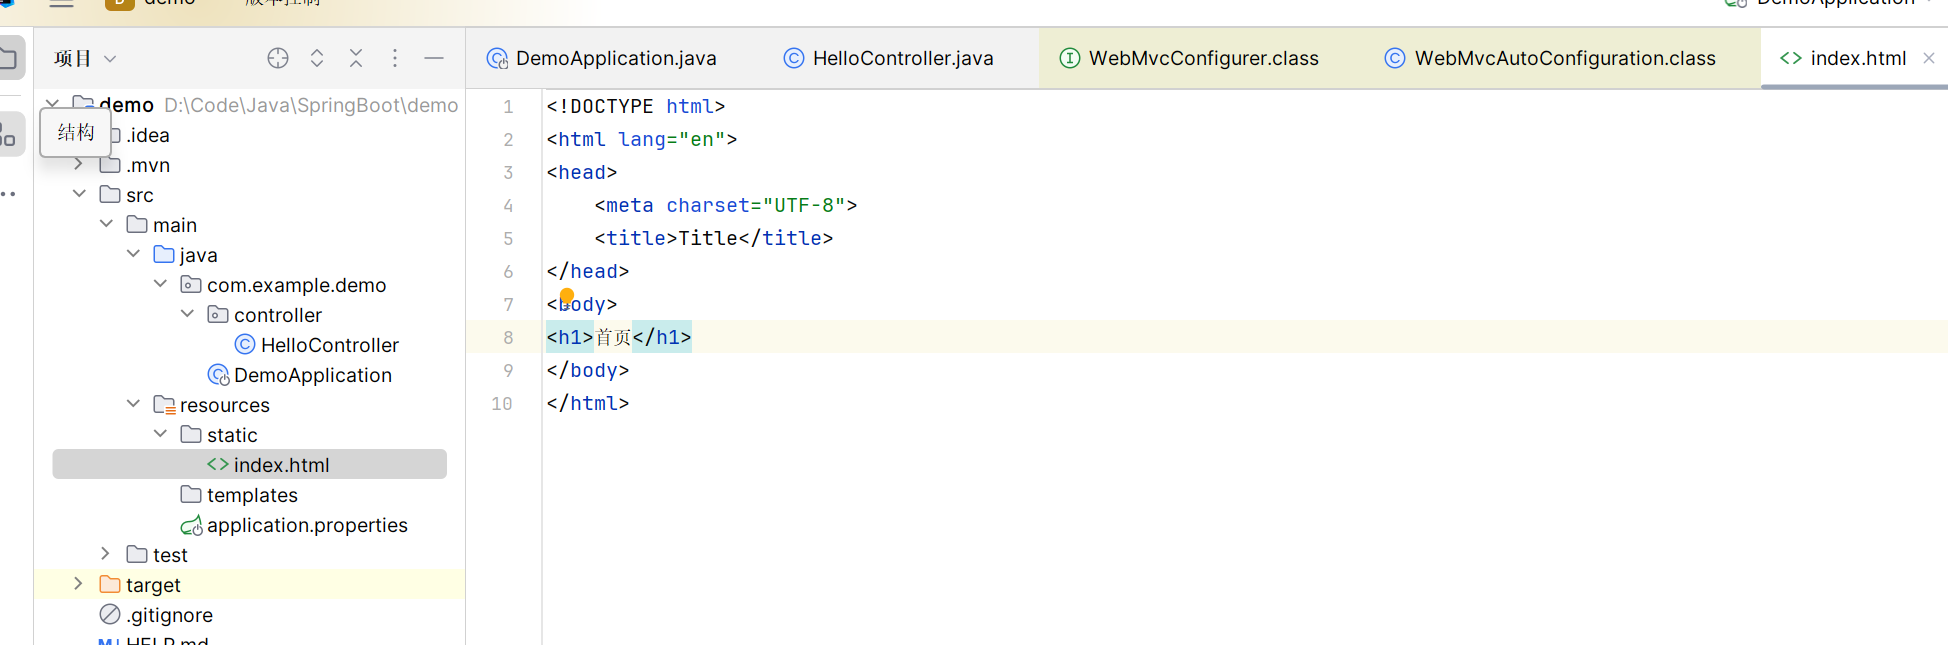
首页设置
把index.html放在templates目录或者static文件夹下,static没有就回去templates找
使用非index.html的文件作为首页,这里以login.html为例,有两种方法:
自定义一个Controller进行转发:
@Controller
public class HelloController {
    @RequestMapping("/")
    public String hello(){
        return "forward:login.html";
    }
}
自定义一个 MVC 配置,并重写
addViewControllers方法进行转发@Configuration public class WebMvcConfig implements WebMvcConfigurer { @Override public void addViewControllers(ViewControllerRegistry registry) { registry.addViewController("/").setViewName("forward:login.html"); } }
更多方法移步:https://www.hangge.com/blog/cache/detail_2528.html
Thymeleaf模板引擎
官方网站:https://www.thymeleaf.org/index.html
参考:https://blog.csdn.net/u010448530/article/details/113244611
导入依赖:
<dependency>
       <groupId>org.springframework.boot</groupId>
       <artifactId>spring-boot-starter-thymeleaf</artifactId>
   </dependency>
在application.properties中配置thymleaf:
spring.thymeleaf.mode = LEGACYHTML5(这个配置不是必须的,但是spring.thymeleaf.mode的默认值是HTML5,其实是一个很严格的检查,改为LEGACYHTML5可以得到一个可能更友好亲切的格式要求)
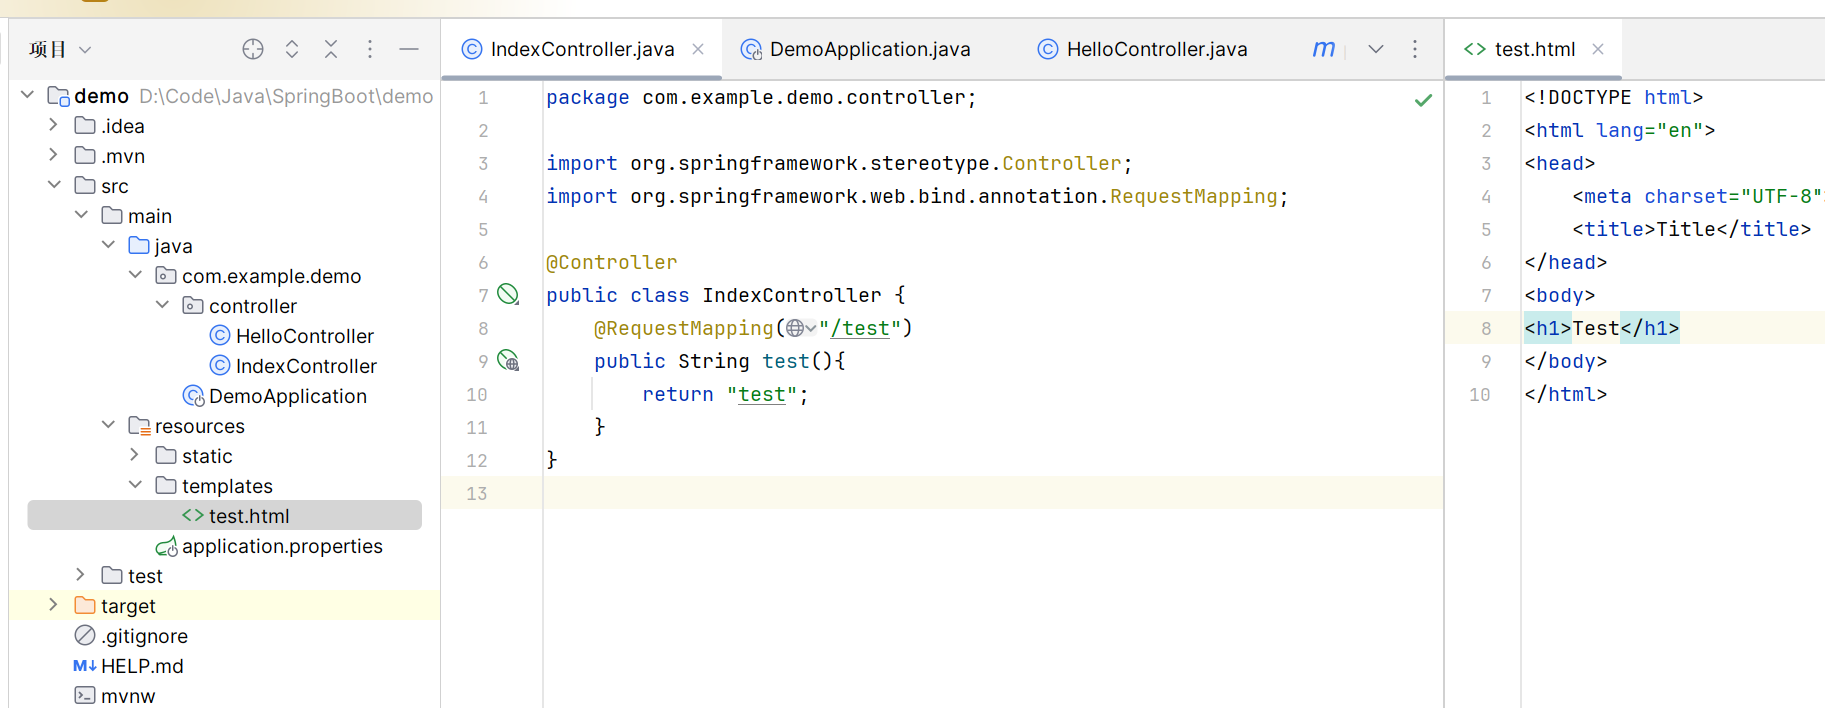
templates文件夹下创建test.html,然后创建一个IndexController控制器(在templates目录下的所有页面,只能通过controller来跳转,需要thymeleaf模板引擎的支持)
Thymeleaf语法
先看一下thymeleaf的源码,在 ThymeleafProperties.class
@ConfigurationProperties(
    prefix = "spring.thymeleaf"
)
public class ThymeleafProperties {
    private static final Charset DEFAULT_ENCODING;
    //规则前缀
    public static final String DEFAULT_PREFIX = "classpath:/templates/";
    //规则后缀
    public static final String DEFAULT_SUFFIX = ".html";
	...
}thymeleaf自动配置了规则前缀和后缀,所以只要我们把html页面放在classpath:/templates/下,thymeleaf就能自动渲染
依旧是可以在配置文件中来指定模板:
spring:
  thymeleaf:
    prefix: classpath:/templates/
    check-template-location: true
    cache: false
    suffix: .html
    encoding: UTF-8
    content-type: text/html
mode: HTML5- prefix:指定模板所在的目录
- check-tempate-location: 检查模板路径是否存在
- cache: 是否缓存,开发模式下设置为false,避免改了模板还要重启服务器,线上设置为true,可以提高性能
- encoding&content-type:与Servlet中设置输出对应属性效果一致
- mode:见官网说明
th属性
html有的属性,Thymeleaf基本都有,而常用的属性大概有七八个。其中th属性执行的优先级从1~8,数字越低优先级越高
th:insert:代码块引入,类似的还有th:replace,th:include,三者的区别较大,若使用不恰当会破坏html结构,常用于公共代码块提取的场景。优先级最高th:each:遍历循环元素,和th:text或th:value一起使用。注意该属性修饰的标签位置,详细往后看。th:if:条件判断,类似的还有th:unless,th:switch,th:case。th:object:声明变量,一般和*{}一起配合使用,达到偷懒的效果。th:attr:修改任意属性,实际开发中用的较少,因为有丰富的其他th属性帮忙,类似的还有th:attrappend,th:attrprepend。th:value:设置当前元素的value值,类似修改指定属性的还有th:src,th:href。th:text:设置当前元素的文本内容,相同功能的还有th:utext,两者的区别在于前者不会转义html标签,后者会。th:fragment:定义代码块,方便被th:insert引用。优先级最低
使用thymeleaf属性需要注意的点:
若要使用Thymeleaf语法,首先要声明名称空间:
xmlns:th="http://www.thymeleaf.org"设置文本内容
th:text,设置input的值th:value,循环输出th:each,条件判断th:if,插入代码块th:insert,定义代码块th:fragment,声明变量th:objectth:each的用法需要格外注意,打个比方:如果你要循环一个div中的p标签,则th:each属性必须放在p标签上。若你将th:each属性放在div上,则循环的是将整个div。变量表达式中提供了很多的内置方法,该内置方法是用
#开头,请不要与#{}消息表达式弄混。th:insert,th:replace,th:include三种插入代码块的效果相似,但区别很大。
例子:
先在controller中绑定数据
package com.example.demo.controller;

import com.example.demo.pojo.Person;
import org.springframework.stereotype.Controller;
import org.springframework.ui.Model;
import org.springframework.web.bind.annotation.RequestMapping;

import java.util.ArrayList;
import java.util.HashMap;
import java.util.List;
import java.util.Map;

@Controller
public class IndexController {
    @RequestMapping("/test")
    public String test(Model model){
        // 1.绑定一个字符串
        model.addAttribute("msg","this is a <b>String</b>");
        model.addAttribute("msgUtext","this is a <b>String</b>");

        // 2.绑定一个pojo对象
        Person per = new Person("0w0",20);
        model.addAttribute("per",per);

        // 3.绑定一个list
        List list=new ArrayList();
        list.add(per);
        list.add(new Person("Azusa",18));
        list.add(new Person("hina",18));
        model.addAttribute("pers",list);

        // 4.绑定一个map
        Map<String,Object> map=new HashMap<>();
        map.put("Boss",new Person("boss",999));
        model.addAttribute("map",map);

        return "test";
    }
}
在html中使用thymeleaf语法获取数据
声明命名空间
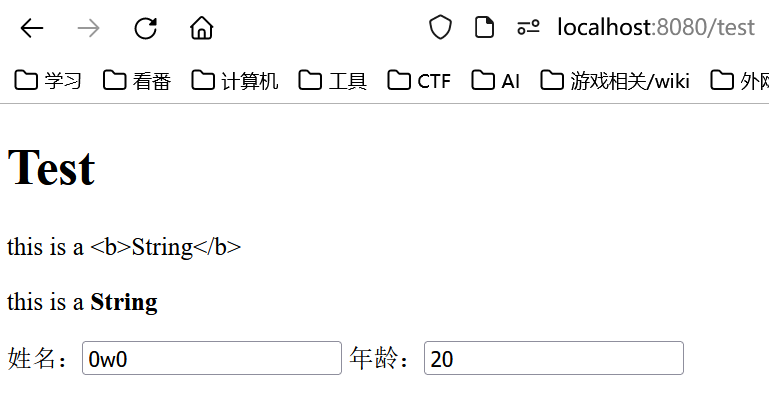
<!DOCTYPE html> <html lang="en" xmlns:th="http://www.thymeleaf.org"> <head> <meta charset="UTF-8"> <title>Title</title> </head>th:text和th:value<body> <h1>Test</h1> <p th:text="${msg}"></p> <!--不会转义html标签--> <p th:utext="${msgUtext}"></p> <!--th:value 设置当前元素的value值,常用,优先级仅比th:text高--> 姓名:<input type="text" th:value="${per.name}" /> 年龄:<input type="text" th:value="${per.age}" /> </body>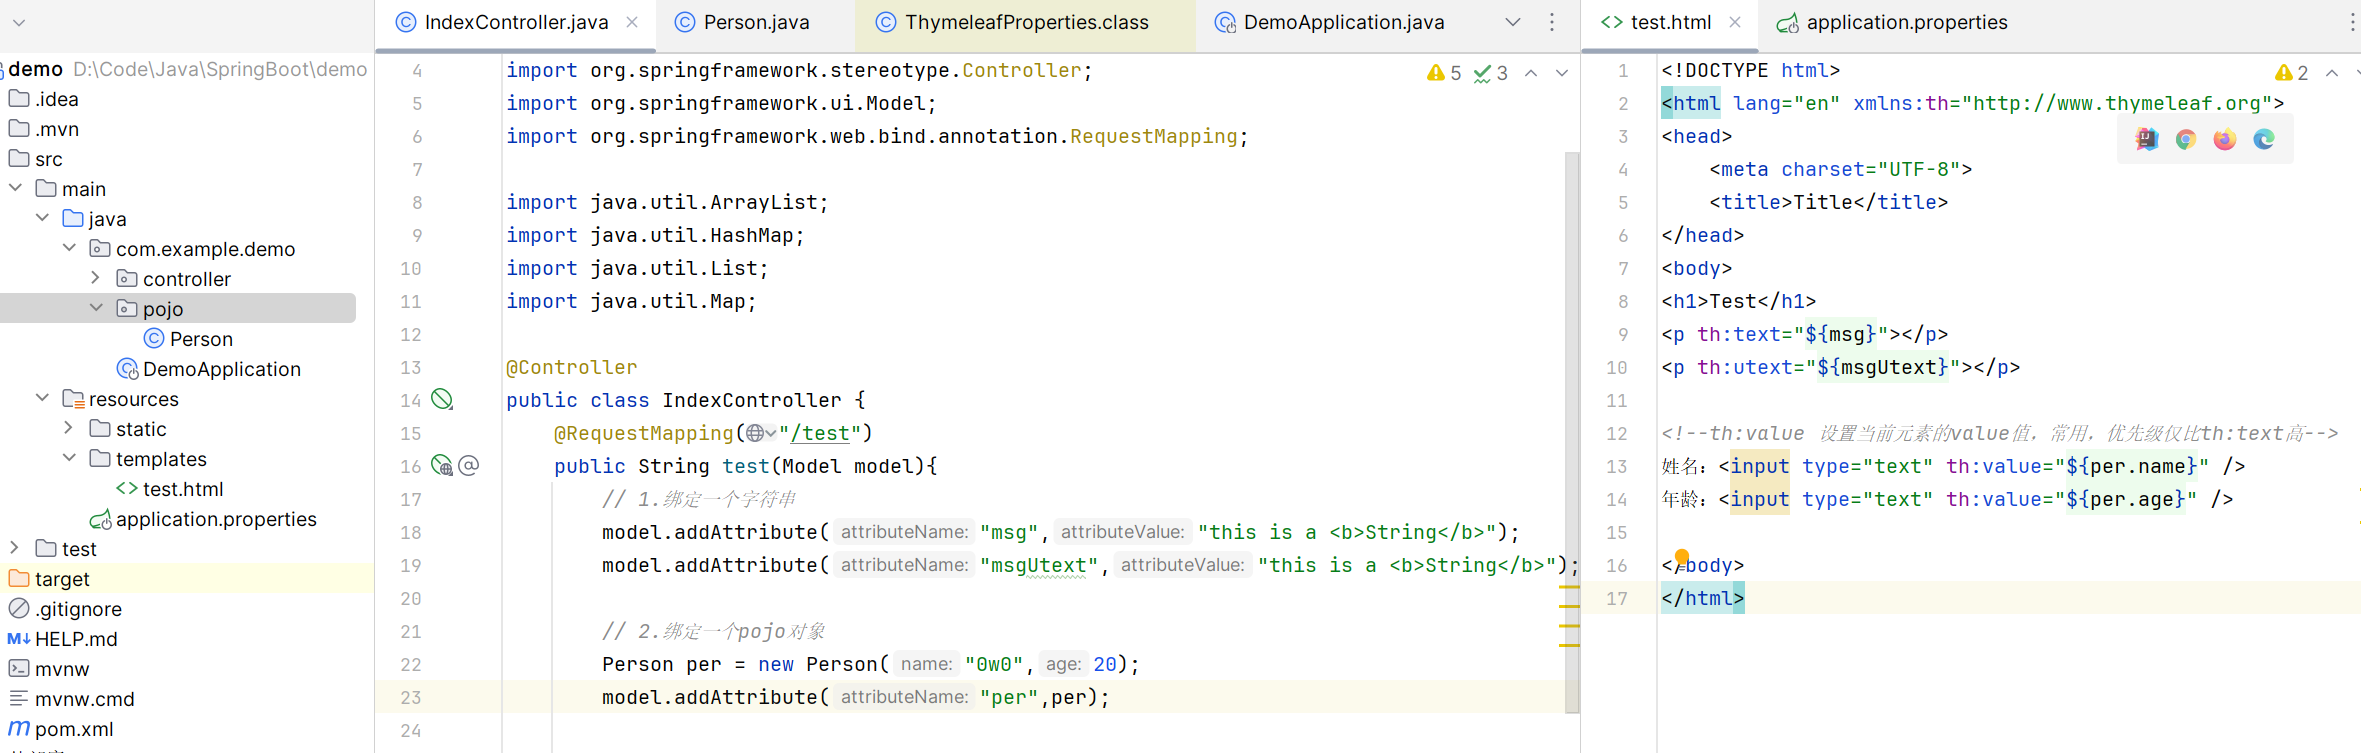
th:each:<body> <h1>Test</h1> <!--th:each 遍历列表,常用,优先级很高,仅此于代码块的插入,遍历被修饰的元素--> <table border="1px" th:width="200px"> <thead> <tr> <th>编号</th> <th>姓名</th> <th>年龄</th> <th>操作</th> </tr> </thead> <tbody> <tr th:each="p:${pers}"> <td>编号</td> <td th:text="${p.name}"></td> <td th:text="${p.age}"></td> <td>删除/修改</td> </tr> </tbody> <tbody> <tr th:each="p,pState:${pers}"> <td th:text="${pState.index+1}"></td> <td th:text="${p.name}"></td> <td th:text="${p.age}"></td> <td>删除/修改</td> </tr> </tbody> </table> </body>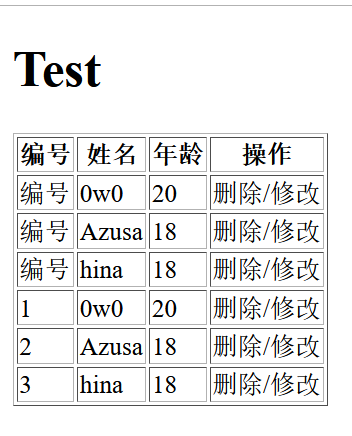
对于
th:each="p,:${pers},p是循环的每一项,pState是下标属性,包括:index:列表状态的序号,从0开始; count:列表状态的序号,从1开始; size:列表状态,列表数据条数; current:列表状态,当前数据对象 even:列表状态,是否为奇数,boolean类型 odd:列表状态,是否为偶数,boolean类型 first:列表状态,是否为第一条,boolean类型 last:列表状态,是否为最后一条,boolean类型th:if:<body> <h1>Test</h1> <!--th:if 条件判断,类似的有th:switch,th:case,优先级仅次于th:each,--> <p th:text="${map.Boss.name}" th:if="${map.Boss.age gt 20}"></p> </body>其中的关系运算:
gt:great than(大于)
ge:great equal(大于等于)
eq:equal(等于)
lt:less than(小于)
le:less equal(小于等于)
ne:not equal(不等于)
因为boss的age属性大于20,所以会显示

标准表达式语法
${}:变量表达式,有丰富的内置方法
可以获取对象的属性和方法
可以使用内置对象:
- ctx:上下文对象
- vars:上下文变量
- locale:上下文的语言环境
- request:仅在web上下文的 HttpServletRequest 对象
- response:仅在web上下文的 HttpServletResponse 对象
- session:仅在web上下文的 HttpSession对象
- servletContext:仅在web上下文的 ServletContext 对象
例子:
java 代码将用户名放在session中:
session.setAttribute("userinfo",username);html里Thymeleaf通过内置对象直接获取:
th:text="${session.userinfo}"可以使用内置方法:
dates:日期方法,常用的方法有:format,year,month,hour,createNow等
numbers:数值格式化方法,常用的方法有:formatDecimal等
strings:字符串格式化方法,常用的Java方法它都有。比如:equals,equalsIgnoreCase,length,trim,toUpperCase,toLowerCase,indexOf,substring,replace,startsWith,endsWith,contains,containsIgnoreCase等
bools:布尔方法,常用的方法有:isTrue,isFalse等
arrays:数组方法,常用的方法有:toArray,length,isEmpty,contains,containsAll等
lists,sets:集合方法,常用的方法有:toList,size,isEmpty,contains,containsAll,sort等
maps:对象方法,常用的方法有:size,isEmpty,containsKey,containsValue等
例子:
在controller中绑定字符串
model.addAttribute("itdragonStr","this is a DEMO");html中使用内置方法:
<h3>#strings</h3>
<div th:if="${not #strings.isEmpty(itdragonStr)}" >
    <p>Old Str : <span th:text="${itdragonStr}"/></p>
    <p>toUpperCase : <span th:text="${#strings.toUpperCase(itdragonStr)}"/></p>
    <p>toLowerCase : <span th:text="${#strings.toLowerCase(itdragonStr)}"/></p>
    <p>equals : <span th:text="${#strings.equals(itdragonStr, 'itdragonblog')}"/></p>
    <p>equalsIgnoreCase : <span th:text="${#strings.equalsIgnoreCase(itdragonStr, 'itdragonblog')}"/></p>
    <p>indexOf : <span th:text="${#strings.indexOf(itdragonStr, 'r')}"/></p>
    <p>substring : <span th:text="${#strings.substring(itdragonStr, 2, 8)}"/></p>
    <p>replace : <span th:text="${#strings.replace(itdragonStr, 'it', 'IT')}"/></p>
    <p>startsWith : <span th:text="${#strings.startsWith(itdragonStr, 'it')}"/></p>
    <p>contains : <span th:text="${#strings.contains(itdragonStr, 'IT')}"/></p>
</div>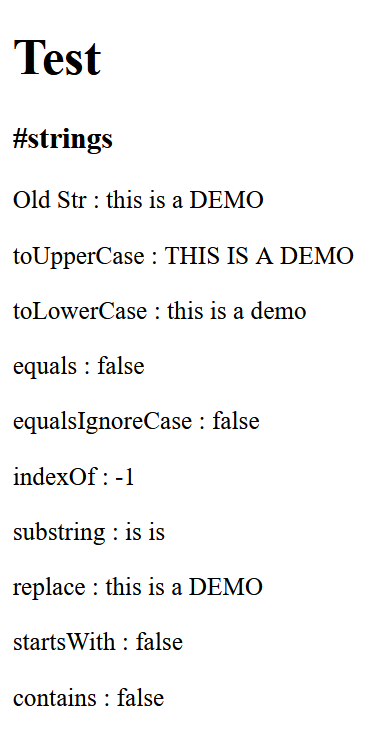
@{}:链接表达式
- 无参:
@{/xxx} - 有参:
@{/xxx(k1=v1,k2=v2)},对应url结构:xxx?k1=v1&k2=v2 - 引入本地资源:
@{/项目本地的资源路径} - 引入外部资源:
@{/webjars/资源在jar包中的路径}
例子:
<!--引入外部资源-->
<link th:href="@{/webjars/bootstrap/4.0.0/css/bootstrap.css}" rel="stylesheet">

<!--引入本地资源-->
<link th:href="@{/main/css/itdragon.css}" rel="stylesheet">

<!--表单提交路径-->
<form class="form-login" th:action="@{/user/login}" th:method="post" >

<!--超链接跳转路径附带参数-->
<a class="btn btn-sm" th:href="@{/login.html(l='zh_CN')}">中文</a>
<a class="btn btn-sm" th:href="@{/login.html(l='en_US')}">English</a>#{}:消息表达式,用来读取配置文件(通常是.properties文件)中的数据,th:text="#{msg}"
~{}:代码块表达式,可以用于引用公共的目标片段。支持两种结构:~{templatename::fragmentname}和~{templatename::#id}
- templatename:模版名,Thymeleaf会根据模版名解析完整路径:
/resources/templates/templatename.html,要注意文件的路径 - fragmentname:片段名,Thymeleaf通过
th:fragment声明定义代码块,即:th:fragment="fragmentname" - id:HTML的id选择器,使用时要在前面加上#号,不支持class选择器
使用时要配合th属性(th:insert,th:replace,th:include)一起使用:
th:insert:将代码块片段整个插入到使用了th:insert的HTML标签中th:replace:将代码块片段整个替换使用了th:replace的HTML标签中th:include:将代码块片段包含的内容插入到使用了th:include的HTML标签中
例子:在一个template/footer.html中定义下面的片段,并在另一个template中引用
<!--th:fragment定义代码块标识-->
<footer th:fragment="copy">
© 2019 The Good Thymes Virtual Grocery
</footer>
<!--三种不同的引入方式-->
<div th:insert="footer :: copy"></div>
<div th:replace="footer :: copy"></div>
<div th:include="footer :: copy"></div>而渲染后的结果是:
<!--th:insert是在div中插入代码块,即多了一层div-->
<div>
<footer>
© 2019 The Good Thymes Virtual Grocery
</footer>
</div>
<!--th:replace是将代码块代替当前div,其html结构和之前一致-->
<footer>
© 2019 The Good Thymes Virtual Grocery
</footer>
<!--th:include是将代码块footer的内容插入到div中,即少了一层footer-->
<div>
© 2019 The Good Thymes Virtual Grocery
</div>*{}:选择变量表达式,*{}只对选定对象评估表达式而不是整个上下文。只要没有选定的对象,${...}和*{...}的语法就完全一样
<div th:object="${user}">
    <p>Name: <span th:text="*{name}">赛</span>.</p>
    <p>Age: <span th:text="*{age}">18</span>.</p>
    <p>Detail: <span th:text="*{detail}">好好学习</span>.</p>
</div>
预处理表达式
语法:__${expression}__
预处理是在正常表达式之前完成的表达式的执行,允许修改最终将执行的表达式
装配扩展SpringMVC
Spring MVC 允许创建特殊
@Controller或@RestControllerBean 来处理传入的 HTTP 请求。控制器中的方法使用@RequestMapping注解映射到 HTTP
而Spring Boot 为 Spring MVC 提供了自动配置
这个感觉暂时用不到,先挂起
Configuration配置
我们可以在一个类上加上@configuration注解,来代表一个配置类,配置类可以配置拦截器,等等
并且我们需要实现WebMvcConfigurer接口
JDBC
Druid
Druid 是一个 JDBC 组件库,包含数据库连接池、SQL Parser 等组件
Mybatis
先稍微copy一下增删查改吧,现在实在不想碰数据库
select
写UserMapper.xml的时候有个select标签,里面有几个属性:
- id: 对应的就是接口中的方法名称(等效于JDBC中的实现接口)
- resultType: sql执行语句的返回值类型
- parameterType:参数类型
User getuserbyid(int id);<?xml version="1.0" encoding="UTF-8" ?>
<!DOCTYPE mapper PUBLIC "-//mybatis.org//DTD Mapper 3.0//EN"
"http://mybatis.org/dtd/mybatis-3-mapper.dtd">
<mapper namespace="com.kino.dao.UserMapper">
<select id="getuserlist" resultType="com.kino.pojo.User">
select * from user
</select>
<!--补充一个getuserbyid的select标签-->
<select id="getuserbyid" resultType="com.kino.pojo.User" parameterType="int">
select * from user where id=#{id}
</select>
</mapper>测试:
@Test
  public void getuserbyid(){
      SqlSession sqlSession=MybatisUtil.getSqlsession();
      UserMapper mapper = sqlSession.getMapper(UserMapper.class);
      User user = mapper.getuserbyid(1);
      System.out.println(user);

      sqlSession.close();
  }
insert
package com.kino.dao;

import com.kino.pojo.User;

import java.util.List;

public interface UserMapper {
    List<User> getuserlist();
    //根据ID返回数据
    User getuserbyid(int id);
    //添加用户
    Boolean adduser(User user);
}
<?xml version="1.0" encoding="UTF-8" ?>
<!DOCTYPE mapper PUBLIC "-//mybatis.org//DTD Mapper 3.0//EN"
"http://mybatis.org/dtd/mybatis-3-mapper.dtd">
<mapper namespace="com.kino.dao.UserMapper">
<select id="getuserlist" resultType="com.kino.pojo.User">
select * from user
</select>
<!--补充一个getuserbyid的select标签-->
<select id="getuserbyid" resultType="com.kino.pojo.User" parameterType="int">
select * from user where id=#{id}
</select>
<insert id="adduser" parameterType="com.kino.pojo.User">
insert into mybatis.user(id,name,pwd) values(#{id},#{name},#{pwd});
</insert>
</mapper>public void adduser(){
SqlSession sqlSession=MybatisUtil.getSqlsession();
UserMapper mapper = sqlSession.getMapper(UserMapper.class);
Boolean adduser = mapper.adduser(new User(3, "Boogipop2", "2662501"));
if (adduser){
System.out.println("添加成功");
}
sqlSession.commit(); //提交事务,是必须的,否则不会添加
sqlSession.close();
}delete
package com.kino.dao;

import com.kino.pojo.User;

import java.util.List;

public interface UserMapper {
    List<User> getuserlist();
    //根据ID返回数据
    User getuserbyid(int id);
    //添加用户
    Boolean adduser(User user);
    //删除用户
    Boolean deluser(int id);
}
<?xml version="1.0" encoding="UTF-8" ?>
<!DOCTYPE mapper PUBLIC "-//mybatis.org//DTD Mapper 3.0//EN"
"http://mybatis.org/dtd/mybatis-3-mapper.dtd">
<mapper namespace="com.kino.dao.UserMapper">
<select id="getuserlist" resultType="com.kino.pojo.User">
select * from user
</select>
<!--补充一个getuserbyid的select标签-->
<select id="getuserbyid" resultType="com.kino.pojo.User" parameterType="int">
select * from user where id=#{id}
</select>
<insert id="adduser" parameterType="com.kino.pojo.User">
insert into mybatis.user(id,name,pwd) values(#{id},#{name},#{pwd});
</insert>
<delete id="deluser" parameterType="int">
delete from user where id=#{id}
</delete>
</mapper>@Test
public void deluser(){
SqlSession sqlSession=MybatisUtil.getSqlsession();
UserMapper mapper = sqlSession.getMapper(UserMapper.class);
Boolean deluser=mapper.deluser(3);
if(deluser){
System.out.println("删除成功");
}
sqlSession.commit();//提交事务
sqlSession.close();
}update
package com.kino.dao;

import com.kino.pojo.User;

import java.util.List;

public interface UserMapper {
    List<User> getuserlist();
    //根据ID返回数据
    User getuserbyid(int id);
    //添加用户
    Boolean adduser(User user);
    //删除用户
    Boolean deluser(int id);
    //更新用户
    Boolean cguser(User user);
}<update id="cguser" parameterType="com.kino.pojo.User">
update user set name=#{name},pwd=#{pwd} where id=#{id}
</update>@Test
public void cguser(){
SqlSession sqlSession=MybatisUtil.getSqlsession();
UserMapper mapper = sqlSession.getMapper(UserMapper.class);
Boolean cguser=mapper.cguser(new User(1,"Kino2!","asdasdasd"));
if(cguser){
System.out.println("更新成功");
}
sqlSession.commit();//提交事务
sqlSession.close();
}SpringSecurity
参考:https://www.cnblogs.com/lenve/p/11242055.html
SpringSecurity 是在java开发中很常用的一个库,用于身份验证、授权和安全性等功能上
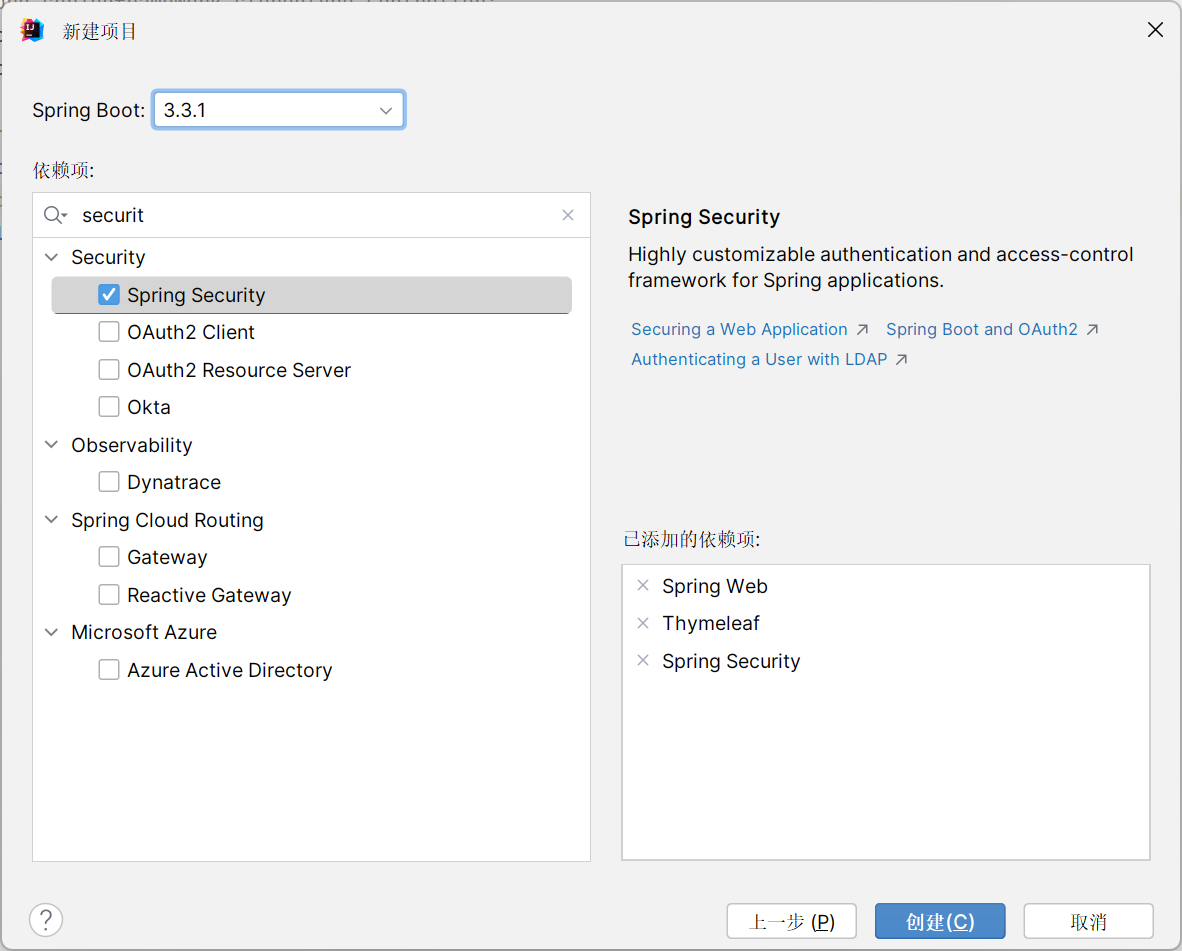
创建一个新项目,导入Spring Security的依赖
然后写一个普通的控制器
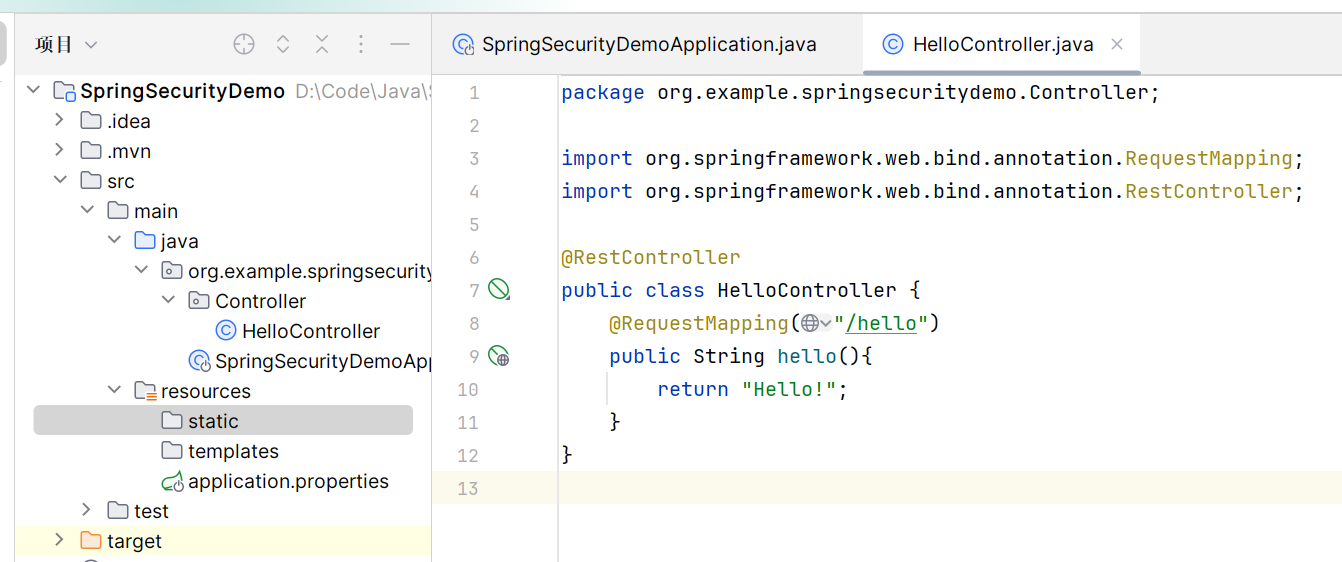
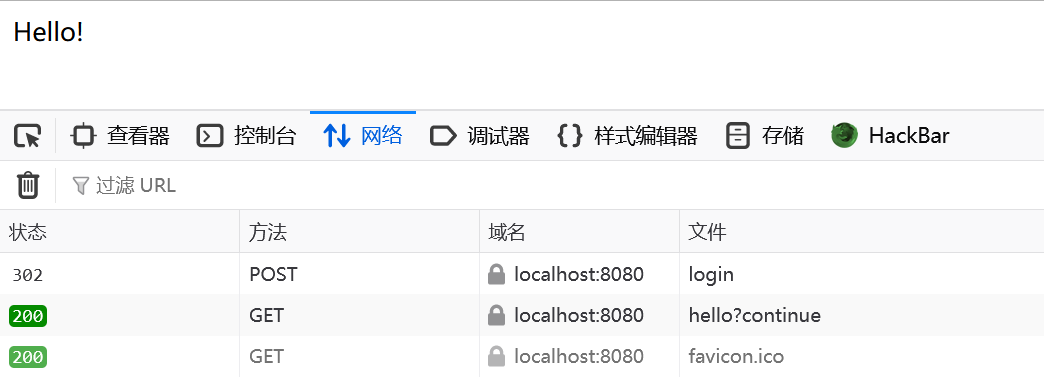
正常情况下我们直接访问/hello就能进入HelloController
但是这边我们引入了Spring Security,当我们尝试访问/hello的时候就会直接跳转到Spring Security自带的/login
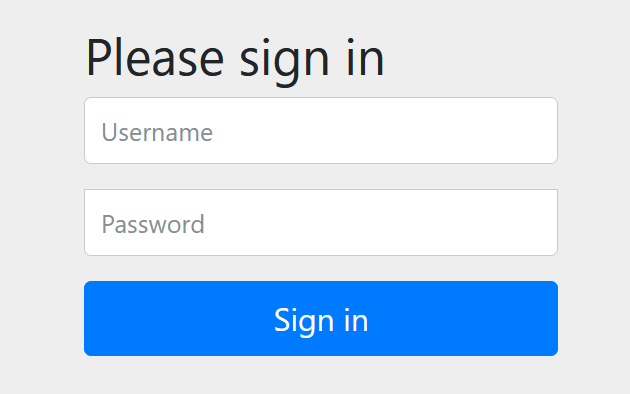
为了登录进去,我们需要知道用户名密码,spring security 默认的用户名是user,spring security启动的时候会生成默认密码(在启动日志中可以看到)

这里是890068b6-eb15-424a-a100-5df9b11cbdbc
输入错误的话会返回Bad credentials
登录后就会302跳转到原来要访问的路由
账密配置
这个登录的密码是随机生成的,每次启动时都会变。对登录的用户名/密码进行配置,有三种不同的方式:
在 application.properties 中进行配置
spring.security.user.name=gbc
sprint.security.user.roles=admin
spring.security.user.password=486
这个方法貌似只能设置一个用户
通过 Java 代码配置在内存中:即硬编码
创建一个 Spring Security 的配置类,继承自
WebSecurityConfigurerAdapter类,但是因为CVE-2022-22978,Spring Security 5.7(Springboot3后)及之后的版本中WebSecurityConfigurerAdapter被弃用了,要使用的话springboot版本得回退到2.x于是我们回退到2.x版本,创建SecurityConfig
package org.example.springsecuritydemo.Config;

import ...

@Configuration
public class SecurityConfig extends WebSecurityConfigurerAdapter {
    @Override
    protected void configure(AuthenticationManagerBuilder auth) throws Exception {
        //下面这两行配置表示在内存中配置了两个用户
        auth.inMemoryAuthentication()
                .withUser("gbc").roles("admin").password("$2a$12$D8ZZt6NMhpoPTzMhZqpVIO..gzDIXr/ryuzeOFR89UzdP28s1QGoe")
                .and()
                .withUser("nina").roles("user").password("$2a$12$D8ZZt6NMhpoPTzMhZqpVIO..gzDIXr/ryuzeOFR89UzdP28s1QGoe");
    }
    @Bean
    PasswordEncoder passwordEncoder() {
        return new BCryptPasswordEncoder();
    }
}
这里我们在 configure 方法中配置了两个用户,用户的密码都是Bcrypt加密之后的字符串(明文是 123)
(从 Spring5 开始,强制要求密码要加密,如果非不想加密,可以使用一个过期的 PasswordEncoder 的实例
NoOpPasswordEncoder)通过 Java 从数据库中加载:咕了,不想碰数据库
BCryptPasswordEncoder
BCrypt可以对密码做慢散列,然后存储。
BCryptVersion 有多个版本:$2a、$2y、$2b(见 BCryptVersion枚举类),默认$2a。
BCrypt密码强度:4~31,还可以设置一个随机数字——用于加盐,默认10。
BCryptPasswordEncoder的构造函数签名:
public BCryptPasswordEncoder()
public BCryptPasswordEncoder(int strength)
public BCryptPasswordEncoder(BCryptVersion version)
public BCryptPasswordEncoder(BCryptVersion version, SecureRandom random)
public BCryptPasswordEncoder(int strength, SecureRandom random)
public BCryptPasswordEncoder(BCryptVersion version, int strength)
public BCryptPasswordEncoder(BCryptVersion version, int strength, SecureRandom random)
对密码做散列后的值:
# 强度为 12
密码:123
$2a$12$D8ZZt6NMhpoPTzMhZqpVIO..gzDIXr/ryuzeOFR89UzdP28s1QGoe
密码:123456
$2a$12$8SKvIlSNNQlI0u3GqABk2uFQ/5NygMm9rCuyERb1CUybeboDntCyG

密文由4段组成:
# $2a 版本
# $12 强度
# $2a$12后前22位 随机盐值
# 最后31位 真正的散列值
登录配置
依旧是在 WebSecurityConfigurerAdapter 的实现类中进行配置
@Configuration
public class SecurityConfig extends WebSecurityConfigurerAdapter {
@Override
protected void configure(HttpSecurity http) throws Exception {
http.authorizeRequests() // 开启登录配置
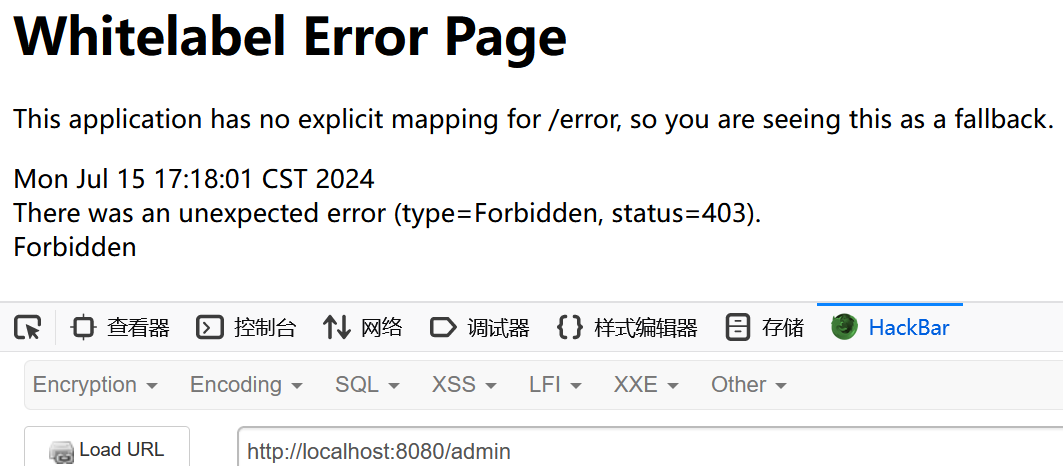
.antMatchers("/hello").permitAll() //表示访问 /hello 这个接口,所有角色都可访问
.antMatchers("/admin").hasRole("admin") // 只有 admin 角色能访问这个路由
.anyRequest().authenticated() //表示剩余的其他接口,登录之后就能访问
.and()
.formLogin(); // 定义登录页面,未登录时,访问一个需要登录之后才能访问的接口,会自动跳转到该页面
}
}我们要是以非admin的角色访问/admin路由的话就会有下面的回显:
接下来再加上上面的账密配置:
@Configuration
public class SecurityConfig extends WebSecurityConfigurerAdapter {
    @Override
    protected void configure(HttpSecurity http) throws Exception {
        http.authorizeRequests()    // 开启登录配置
            .antMatchers("/hello").permitAll()  //表示访问 /hello 这个接口,所有角色都可访问
            .antMatchers("/admin").hasRole("admin")    // 只有 admin 角色能访问这个路由
            .anyRequest().authenticated()   //表示剩余的其他接口,登录之后就能访问
            .and()
            .formLogin();    // 定义登录页面,未登录时,访问一个需要登录之后才能访问的接口,会自动跳转到该页面
    }

    @Override
    protected void configure(AuthenticationManagerBuilder auth) throws Exception {
        // 密码编码:PasswordEncoder
        auth.inMemoryAuthentication().passwordEncoder(new BCryptPasswordEncoder())
                .withUser("gbc").roles("admin").password(new BCryptPasswordEncoder().encode("486"))
                .and()
                .withUser("nina").roles("user").password("$2a$12$D8ZZt6NMhpoPTzMhZqpVIO..gzDIXr/ryuzeOFR89UzdP28s1QGoe");
    }
}
从而实现了认证和授权
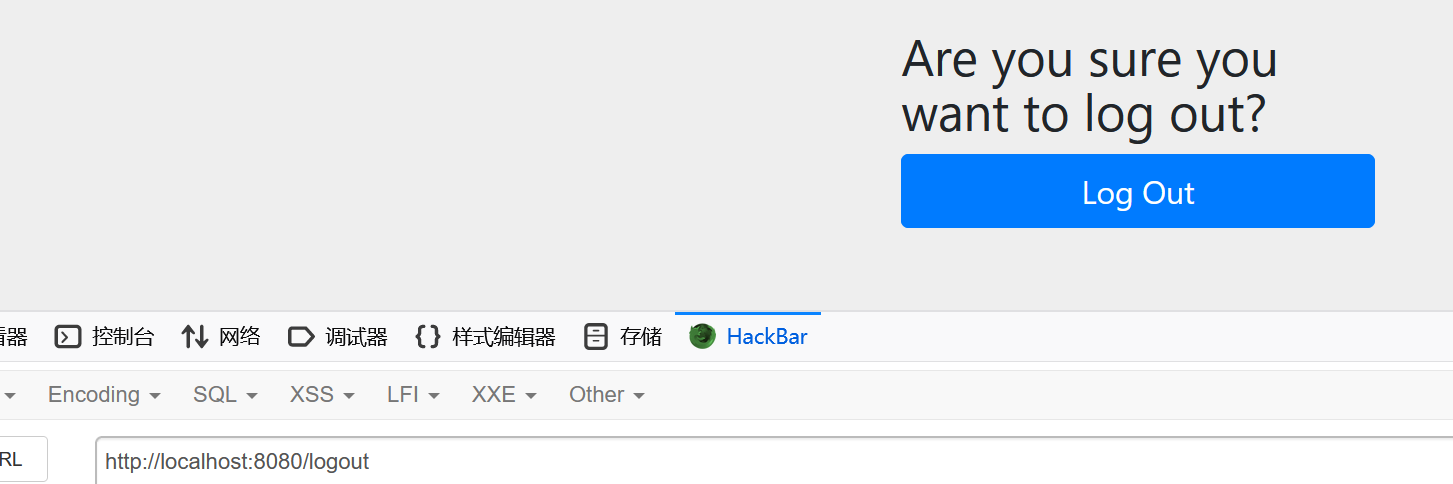
接下来添加注销功能:
@Override
protected void configure(HttpSecurity http) throws Exception {
    http.authorizeRequests()    // 开启登录配置
        .antMatchers("/hello").permitAll()  //表示访问 /hello 这个接口,所有角色都可访问
        .antMatchers("/admin").hasRole("admin")    // 只有 admin 角色能访问这个路由
        .anyRequest().authenticated()   //表示剩余的其他接口,登录之后就能访问
        .and()
        .formLogin();    // 定义登录页面,未登录时,访问一个需要登录之后才能访问的接口,会自动跳转到该页面
    http.logout().logoutUrl("/hello");  // 注销并跳转到 /hello
}
这样访问/logout就可以注销了
然后再添加几个其它的功能:
@Override
protected void configure(HttpSecurity http) throws Exception {
    http.authorizeRequests()    // 开启登录配置
        .antMatchers("/hello").permitAll()  //表示访问 /hello 这个接口,所有角色都可访问
        .antMatchers("/admin").hasRole("admin")    // 只有 admin 角色能访问这个路由
        .anyRequest().authenticated()   //表示剩余的其他接口,登录之后就能访问
        .and()
        .formLogin();    // 定义登录页面,未登录时,访问一个需要登录之后才能访问的接口,会自动跳转到该页面
    http.logout().logoutUrl("/hello");  // 注销并跳转到 /hello

    http.csrf().disable();  // 关闭csrf功能

    http.rememberMe().rememberMeParameter("remember");  // 记住我,默认保存两周,可以自定义接收前端的参数
}
汇总一下:
package org.example.springsecuritydemo.Config;

import org.springframework.context.annotation.Bean;
import org.springframework.context.annotation.Configuration;
import org.springframework.security.config.annotation.authentication.builders.AuthenticationManagerBuilder;
import org.springframework.security.config.annotation.web.builders.HttpSecurity;
import org.springframework.security.config.annotation.web.configuration.WebSecurityConfigurerAdapter;
import org.springframework.security.crypto.bcrypt.BCryptPasswordEncoder;
import org.springframework.security.crypto.password.PasswordEncoder;

@Configuration
public class SecurityConfig extends WebSecurityConfigurerAdapter {
    @Override
    protected void configure(HttpSecurity http) throws Exception {
        http.authorizeRequests()    // 开启登录配置
            .antMatchers("/hello").permitAll()  //表示访问 /hello 这个接口,所有角色都可访问
            .antMatchers("/admin").hasRole("admin")    // 只有 admin 角色能访问这个路由
            .anyRequest().authenticated()   //表示剩余的其他接口,登录之后就能访问
            .and()
            .formLogin();    // 定义登录页面,未登录时,访问一个需要登录之后才能访问的接口,会自动跳转到该页面
        http.logout().logoutUrl("/hello");  // 注销并跳转到 /hello

        http.csrf().disable();  // 关闭csrf功能

        http.rememberMe().rememberMeParameter("remember");  // 记住我,默认保存两周,可以自定义接收前端的参数
    }

    @Override
    protected void configure(AuthenticationManagerBuilder auth) throws Exception {
        // 密码编码:PasswordEncoder
        auth.inMemoryAuthentication().passwordEncoder(new BCryptPasswordEncoder())
                .withUser("gbc").roles("admin").password(new BCryptPasswordEncoder().encode("486"))
                .and()
                .withUser("nina").roles("user").password("$2a$12$D8ZZt6NMhpoPTzMhZqpVIO..gzDIXr/ryuzeOFR89UzdP28s1QGoe");
    }
}
忽略拦截
如果某一个请求地址不需要拦截的话,有两种方式实现:
设置该地址匿名访问
直接过滤掉该地址,即该地址不走 Spring Security 过滤器链
@Configuration
public class SecurityConfig extends WebSecurityConfigurerAdapter {
    @Override
    public void configure(WebSecurity web) throws Exception {
        web.ignoring().antMatchers("/vercode");
    }
}
Shiro
Apache Shiro是一个强大灵活的开源框架,可以完全处理身份验证、授权、加密和会话管理
参考:https://drun1baby.top/2022/07/07/Java%E5%BC%80%E5%8F%91%E4%B9%8Bshiro%E5%AD%A6%E4%B9%A0
功能:
- Authentication(认证):用户身份识别,通常被称为用户“登录”
- Authorization(授权):访问控制。比如某个用户是否具有某个操作的使用权限。
- Session Management(会话管理):特定于用户的会话管理,甚至在非 Web 或 EJB 应用程序。
- Cryptography(加密):在对数据源使用加密算法加密的同时,保证易于使用。
Shiro 架构包含三个主要的理念:
- Subject:当前用户,Subject 可以是一个人,但也可以是第三方服务、守护进程帐户、时钟守护任务或者其它–当前和软件交互的任何事件。一般 Subject 这里是连前端数据的。
- SecurityManager:管理所有 Subject,SecurityManager 是 Shiro 架构的核心,配合内部安全组件共同组成安全伞。
- Realms:用于进行权限信息的验证,我们自己实现。Realm 本质上是一个特定的安全 DAO:它封装与数据源连接的细节,得到 Shiro 所需的相关的数据。在配置 Shiro 的时候,你必须指定至少一个 Realm 来实现认证(authentication)和/或授权(authorization)。
配置
pom.xml
<dependencies>
    <dependency>
        <groupId>org.apache.shiro</groupId>
        <artifactId>shiro-core</artifactId>
        <version>1.2.4</version>
    </dependency>
    <dependency>
        <groupId>org.apache.shiro</groupId>
        <artifactId>shiro-web</artifactId>
        <version>1.2.4</version>
    </dependency>

    <dependency>
        <groupId>javax.servlet</groupId>
        <artifactId>javax.servlet-api</artifactId>
        <version>3.1.0</version>
        <scope>provided</scope>
    </dependency>

    <dependency>
        <groupId>javax.servlet.jsp</groupId>
        <artifactId>jsp-api</artifactId>
        <version>2.2</version>
        <scope>provided</scope>
    </dependency>

    <!-- https://mvnrepository.com/artifact/commons-logging/commons-logging -->
    <dependency>
        <groupId>commons-logging</groupId>
        <artifactId>commons-logging</artifactId>
        <version>1.2</version>
    </dependency>
    <dependency>
        <groupId>org.slf4j</groupId>
        <artifactId>slf4j-api</artifactId>
        <version>1.7.30</version>
    </dependency>
    <dependency>
        <groupId>org.slf4j</groupId>
        <artifactId>slf4j-simple</artifactId>
        <version>1.7.30</version>
    </dependency>

</dependencies>
依赖说明:
shiro-core、shiro-web,这是shiro本身的依赖
javax.servlet-api、jsp-api,这是JSP和Servlet的依赖,仅在编译阶段使用,因为Tomcat中自带这两个依赖
slf4j-api、slf4j-simple,这是为了显示shiro中的报错信息添加的依赖
commons-logging,这是shiro中用到的一个接口,不添加会爆
java.lang.ClassNotFoundException: org.apache.commons.logging.LogFactory错误